ps:本文偏向原理和操作性,原理适合于任何编译器。
支持Spring入门,目的是在xml文件里面装配相关bean(java对象),并实现获取。(IOC)
一、先建立一个Spring新项目,添加maven(此处自行百度如何配置maven)
Spring至少需要六个包:

用maven添加这六个包的依赖代码如下:
<dependencies> <!-- https://mvnrepository.com/artifact/org.springframework/spring-aop --> <dependency> <groupId>org.springframework</groupId> <artifactId>spring-aop</artifactId> <version>5.1.4.RELEASE</version> </dependency> <!-- https://mvnrepository.com/artifact/org.springframework/spring-beans --> <dependency> <groupId>org.springframework</groupId> <artifactId>spring-beans</artifactId> <version>5.1.1.RELEASE</version> </dependency> <!-- https://mvnrepository.com/artifact/org.springframework/spring-context --> <dependency> <groupId>org.springframework</groupId> <artifactId>spring-context</artifactId> <version>5.1.3.RELEASE</version> </dependency> <!-- https://mvnrepository.com/artifact/org.springframework/spring-core --> <dependency> <groupId>org.springframework</groupId> <artifactId>spring-core</artifactId> <version>5.1.3.RELEASE</version> </dependency> <!-- https://mvnrepository.com/artifact/org.springframework/spring-expression --> <dependency> <groupId>org.springframework</groupId> <artifactId>spring-expression</artifactId> <version>5.1.3.RELEASE</version> </dependency> <!--<!– https://mvnrepository.com/artifact/commons-logging/commons-logging –>--> <dependency> <groupId>commons-logging</groupId> <artifactId>commons-logging</artifactId> <version>1.1.1</version> </dependency> </dependencies>
扫描二维码关注公众号,回复:
5339330 查看本文章

二、建立一个实体类:
诸如学生类:
package entity;

public class Student {

    private int stuNo;
    private String name;
    private String score;

    public int getStuNo() {
        return stuNo;
    }

    public void setStuNo(int stuNo) {
        this.stuNo = stuNo;
    }

    public String getName() {
        return name;
    }

    public void setName(String name) {
        this.name = name;
    }

    public String getScore() {
        return score;
    }

    public void setScore(String score) {
        this.score = score;
    }

    @Override
    public String toString() {
        return "Student{" +
                "stuNo=" + stuNo +
                ", name='" + name + '\'' +
                ", score='" + score + '\'' +
                '}';
    }
}
三、而使用Spring的一个核心是使用xml文件配置bean:
我们新建一个ApplicationContext.xml文件(格式是Spring配置文件格式)
在里面添加bean:
bean的格式:
<bean name="student1" class="entity.Student">
        <property name="stuNo" value="1"/>
        <property name="name" value="huahua"/>
        <property name="score" value="100"/>
    </bean>

    <bean name="student2" class="entity.Student">
        <property name="stuNo" value="2"/>
        <property name="name" value="haha"/>
        <property name="score" value="90"/>
    </bean>
添加后的xml文件大约长这样:
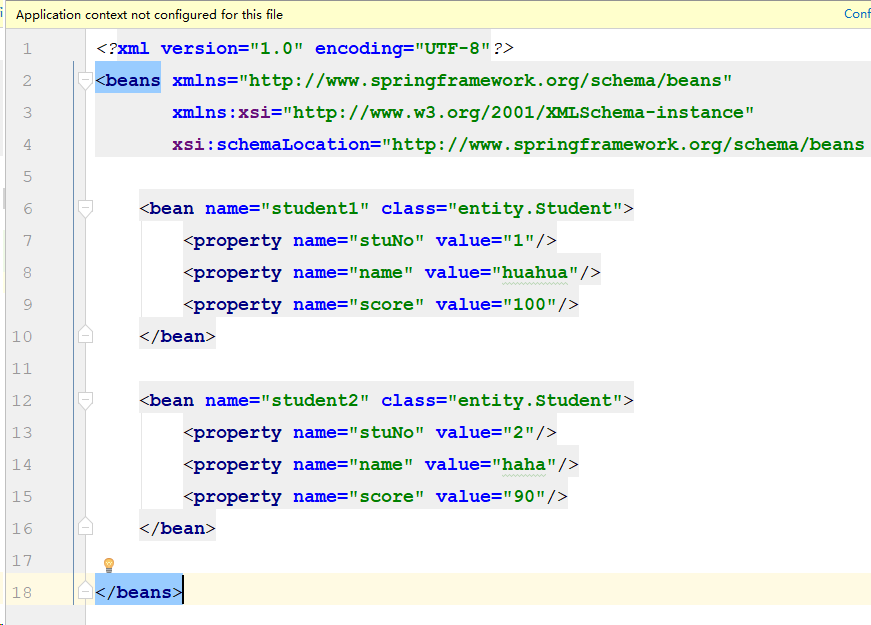
这就配置好了Student类的各个对象
四、新建Main类,我们在此类中获取并输出:
import entity.Student;
import org.springframework.context.ApplicationContext;
import org.springframework.context.support.ClassPathXmlApplicationContext;

public class Main {
    public static void main(String[] args){
        ApplicationContext context = new ClassPathXmlApplicationContext("ApplicationContext.xml");//括号内写xml文件路径
        Student student1 = (Student)context.getBean("student1");
        Student student2 = (Student)context.getBean("student2");
        System.out.println(student1);
        System.out.println(student2);
    }
}
之后运行Main文件,输出如下:

大功告成!!