音视频实践学习
- android全平台编译ffmpeg以及x264与fdk-aac实践
- ubuntu下使用nginx和nginx-rtmp-module配置直播推流服务器
- android全平台编译ffmpeg合并为单个库实践
- android-studio使用cmake编译ffmpeg实践
- android全平台下基于ffmpeg解码MP4视频文件为YUV文件
- android全平台编译ffmpeg支持命令行实践
- android全平台基于ffmpeg解码本地MP4视频推流到RTMP服务器
- android平台下音频编码之编译LAME库转码PCM为MP3
- ubuntu平台下编译vlc-android视频播放器实践
- 图解YU12、I420、YV12、NV12、NV21、YUV420P、YUV420SP、YUV422P、YUV444P的区别
- 图解RGB565、RGB555、RGB16、RGB24、RGB32、ARGB32等格式的区别
- YUV420P、YUV420SP、NV12、NV21和RGB互相转换并存储为JPEG以及PNG图片
- android全平台编译libyuv库实现YUV和RGB的转换
- android平台下基于ffmpeg对相机采集的NV21数据编码为MP4视频文件
- android平台下基于ffmpeg采集Camera数据编码成H.264推流到RTMP服务器
- android平台下基于ffmpeg和ANativeWindow实现简单的视频播放器
- android平台下基于ffmpeg实现对相机预览截图的功能(NV21数据编码为JPEG文件)
- android平台下基于ffmpeg的swscale模块实现对YUV和RGB数据进行转换
- android平台下基于MediaRecorder和AudioRecord实现录制AAC、PCM音频数据
- androd平台下基于ffmpeg对AudioRecord录制的PCM音频数据编码为AAC文件
概述
之前的博客写了关于使用Android SDK自带的MediaRecorder和AudioRecord录制音频数据,本次内容,主要是基于之前的内容,使用AudioRecord得到原始的PCM音频数据后用ffmpeg来完成编码工作
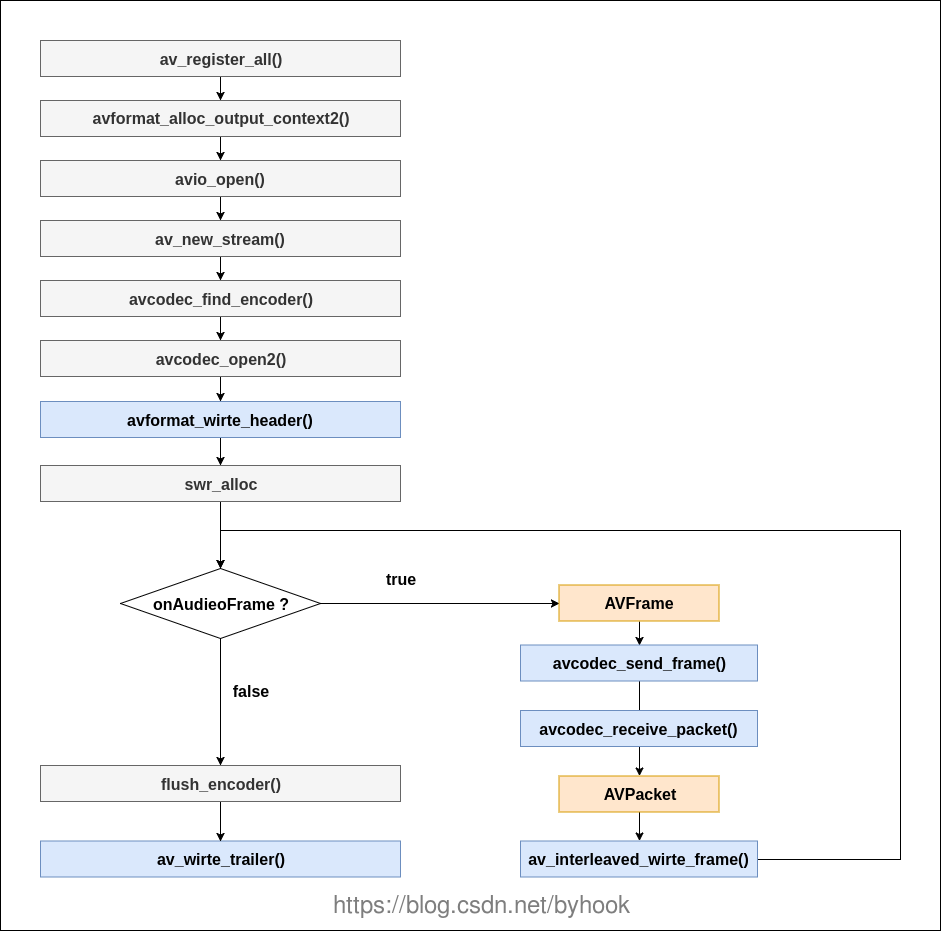
流程分析
ffmpeg的主要操作步骤通常比较固定,一般都是注册组件,打开输出文件,新建输出流,查找编码器,打开编码器,编码数据,关闭等等
工程实践
还是基于之前的工程项目ffmpeg-audio-encode
package com.onzhou.audio.encode;

public class NativeAudioEncoder implements IAudioRecorder, AudioRecordRecorder.OnAudioRecordListener {

    static {
        System.loadLibrary("native-encode");
    }

    public native void encodeAudioStart(String aacPath);

    public native void encodeAudioStop();

    public native void onAudioFrame(byte[] pcmData, int length);

    /**
     * 录制原始的音频数据
     */
    private AudioRecordRecorder audioRecorder;

    /**
     * 输出的aac文件路径
     */
    private String aacPath;

    public NativeAudioEncoder(String path) {
        this.aacPath = path;
        audioRecorder = new AudioRecordRecorder(null);
        audioRecorder.setOnAudioRecordListener(this);
    }

    @Override
    public void onAudioBuffer(byte[] buffer, int length) {
        onAudioFrame(buffer, length);
    }

    @Override
    public void initRecorder() {
        //初始化native层编码器
        encodeAudioStart(aacPath);
        //初始化音频录制
        if (audioRecorder != null) {
            audioRecorder.initRecorder();
        }
    }

    @Override
    public int recordStart() {
        if (audioRecorder != null) {
            return audioRecorder.recordStart();
        }
        return -1;
    }

    @Override
    public void recordStop() {
        //停止音频录制
        if (audioRecorder != null) {
            audioRecorder.recordStop();
        }
        //停止native层编码
        encodeAudioStop();
    }

}
对应的native_code.cpp实现代码如下:
AACEncoder *pAACEncoder = NULL;

/**
 * 主要用来接收音频数据
 * @param env
 * @param obj
 * @param jpcmBuffer
 * @param length
 */
void onAudioFrame(JNIEnv *env, jobject obj, jbyteArray jpcmBuffer, jint length) {
    if (NULL != pAACEncoder) {
        jbyte *buffer = env->GetByteArrayElements(jpcmBuffer, NULL);
        pAACEncoder->EncodeBuffer((unsigned char *) buffer, length);
        env->ReleaseByteArrayElements(jpcmBuffer, buffer, NULL);
    }
}

/**
 * 开始录制音频初始化工作
 * @param env
 * @param obj
 * @param jpath
 */
void encodeAudioStart(JNIEnv *env, jobject obj, jstring jpath) {
    if (NULL == pAACEncoder) {
        pAACEncoder = new AACEncoder();
        const char *aacPath = env->GetStringUTFChars(jpath, NULL);
        pAACEncoder->EncodeStart(aacPath);
    }
}

/**
 * 结束音频录制收尾工作
 * @param env
 * @param obj
 */
void encodeAudioStop(JNIEnv *env, jobject obj) {
    if (NULL != pAACEncoder) {
        pAACEncoder->EncodeStop();
        delete pAACEncoder;
        pAACEncoder = NULL;
    }
}
现在就是我们的主角了,音频编码器头文件encode_aac.h定义如下:
class AACEncoder {

private:

    int index = 0;
    int bufferSize = 0;

    AVFormatContext *pFormatCtx = NULL;
    AVOutputFormat *fmt = NULL;
    AVStream *audioStream = NULL;
    AVCodecContext *pCodecCtx = NULL;
    AVCodec *pCodec = NULL;

    uint8_t *audioBuffer = NULL;
    AVFrame *audioFrame = NULL;
    AVPacket audioPacket;

    SwrContext *swr;

    int EncodeFrame(AVCodecContext *pCodecCtx, AVFrame *pFrame);

public:

    int EncodeStart(const char *aacPath);

    int EncodeBuffer(const unsigned char *pcmBuffer, int length);

    int EncodeStop();

};
源代码文件native_aac.cpp实现如下:
#include "encode_aac.h"
#include "logger.h"

int AACEncoder::EncodeFrame(AVCodecContext *pCodecCtx, AVFrame *audioFrame) {
    int ret = avcodec_send_frame(pCodecCtx, audioFrame);
    if (ret < 0) {
        LOGE("Could't send frame");
        return -1;
    }
    while (avcodec_receive_packet(pCodecCtx, &audioPacket) == 0) {
        audioPacket.stream_index = audioStream->index;
        ret = av_interleaved_write_frame(pFormatCtx, &audioPacket);
        av_packet_unref(&audioPacket);
    }
    return ret;
}

int AACEncoder::EncodeStart(const char *aacPath) {
    //1.注册所有组件
    av_register_all();
    //2.获取输出文件的上下文环境
    avformat_alloc_output_context2(&pFormatCtx, NULL, NULL, aacPath);
    fmt = pFormatCtx->oformat;
    //3.打开输出文件
    if (avio_open(&pFormatCtx->pb, aacPath, AVIO_FLAG_READ_WRITE) < 0) {
        LOGE("Could't open output file");
        return -1;
    }
    //4.新建音频流
    audioStream = avformat_new_stream(pFormatCtx, NULL);
    if (audioStream == NULL) {
        return -1;
    }
    //5.寻找编码器并打开编码器
    pCodec = avcodec_find_encoder(fmt->audio_codec);
    if (pCodec == NULL) {
        LOGE("Could not find encoder");
        return -1;
    }

    //6.分配编码器并设置参数
    pCodecCtx = audioStream->codec;
    pCodecCtx->strict_std_compliance = FF_COMPLIANCE_EXPERIMENTAL;
    pCodecCtx->codec_id = fmt->audio_codec;
    pCodecCtx->codec_type = AVMEDIA_TYPE_AUDIO;
    pCodecCtx->sample_fmt = AV_SAMPLE_FMT_FLTP;
    pCodecCtx->sample_rate = 44100;
    pCodecCtx->channel_layout = AV_CH_LAYOUT_STEREO;
    pCodecCtx->channels = av_get_channel_layout_nb_channels(pCodecCtx->channel_layout);
    pCodecCtx->bit_rate = 96000;
    if (pFormatCtx->oformat->flags & AVFMT_GLOBALHEADER) {
        pCodecCtx->flags |= CODEC_FLAG_GLOBAL_HEADER;
    }

    //7.打开音频编码器
    int result = avcodec_open2(pCodecCtx, pCodec, NULL);
    if (result < 0) {
        LOGE("Could't open encoder");
        return -1;
    }

    audioFrame = av_frame_alloc();
    audioFrame->nb_samples = pCodecCtx->frame_size;
    audioFrame->format = pCodecCtx->sample_fmt;

    bufferSize = av_samples_get_buffer_size(NULL, pCodecCtx->channels, pCodecCtx->frame_size,
                                            pCodecCtx->sample_fmt, 1);
    audioBuffer = (uint8_t *) av_malloc(bufferSize);
    avcodec_fill_audio_frame(audioFrame, pCodecCtx->channels, pCodecCtx->sample_fmt,
                             (const uint8_t *) audioBuffer, bufferSize, 1);


    //8.写文件头
    avformat_write_header(pFormatCtx, NULL);
    av_new_packet(&audioPacket, bufferSize);

    //9.用于音频转码
    swr = swr_alloc();
    av_opt_set_channel_layout(swr, "in_channel_layout", AV_CH_LAYOUT_STEREO, 0);
    av_opt_set_channel_layout(swr, "out_channel_layout", AV_CH_LAYOUT_STEREO, 0);
    av_opt_set_int(swr, "in_sample_rate", 44100, 0);
    av_opt_set_int(swr, "out_sample_rate", 44100, 0);
    av_opt_set_sample_fmt(swr, "in_sample_fmt", AV_SAMPLE_FMT_S16, 0);
    av_opt_set_sample_fmt(swr, "out_sample_fmt", AV_SAMPLE_FMT_FLTP, 0);
    swr_init(swr);

    return 0;
}

int AACEncoder::EncodeBuffer(const unsigned char *pcmBuffer, int len) {

    uint8_t *outs[2];
    outs[0] = new uint8_t[len];
    outs[1] = new uint8_t[len];
    int count = swr_convert(swr, (uint8_t **) &outs, len * 4, &pcmBuffer, len / 4);
    audioFrame->data[0] = outs[0];
    audioFrame->data[1] = outs[1];

    if (count >= 0) {
        EncodeFrame(pCodecCtx, audioFrame);
    } else {
        char errorMessage[1024] = {0};
        av_strerror(len, errorMessage, sizeof(errorMessage));
        LOGE("error message: %s", errorMessage);
    }

    delete outs[0];
    delete outs[1];
    return 0;
}

int AACEncoder::EncodeStop() {

    EncodeFrame(pCodecCtx, NULL);
    //10.写文件尾
    av_write_trailer(pFormatCtx);

    //释放
    avcodec_close(pCodecCtx);
    av_free(audioFrame);
    av_free(audioBuffer);
    avio_close(pFormatCtx->pb);
    avformat_free_context(pFormatCtx);
    return 0;
}
注意:android平台下录制的音频是基于ENCODING_PCM_16BIT采样的,默认是AV_SAMPLE_FMT_S16格式的,笔者直接使用这个格式编码输出,发现音频播放会很奇怪,查找了一下相关的解决方案发现,最新ffmpeg库的sample_fmt必须以AV_SAMPLE_FMT_FLTP这种方式进行存储,因此,当我们的拿到AV_SAMPLE_FMT_S16数据的时候需要转换成AV_SAMPLE_FMT_FLTP格式,然后交给ffmpeg进行编码处理
音频转码初始化:
//9.用于音频转码
swr = swr_alloc();
//双声道
av_opt_set_channel_layout(swr, "in_channel_layout", AV_CH_LAYOUT_STEREO, 0);
av_opt_set_channel_layout(swr, "out_channel_layout", AV_CH_LAYOUT_STEREO, 0);
av_opt_set_int(swr, "in_sample_rate", 44100, 0);
av_opt_set_int(swr, "out_sample_rate", 44100, 0);
av_opt_set_sample_fmt(swr, "in_sample_fmt", AV_SAMPLE_FMT_S16, 0);
av_opt_set_sample_fmt(swr, "out_sample_fmt", AV_SAMPLE_FMT_FLTP, 0);
swr_init(swr);
对于双声道转码:
uint8_t *outs[2];
outs[0] = new uint8_t[len];
outs[1] = new uint8_t[len];
int count = swr_convert(swr, (uint8_t **) &outs, len * 4, &pcmBuffer, len / 4);
audioFrame->data[0] = outs[0];
audioFrame->data[1] = outs[1];
上面的总体过程跟之前的视频编码类似,只不过相应的编码器换成了音频编码器,整个流程还是通用的

/**
     * 点击开始录制
     * @param view
     */
    public void onRecordStart(View view) {
        File targetDir = getExternalFilesDir(null);
        if (audioRecorder == null) {
            //audioRecorder = new MediaRecordRecorder(targetDir.getAbsolutePath()+ File.separator+"output.aac");
            //audioRecorder = new AudioRecordRecorder(targetDir.getAbsolutePath()+ File.separator+"output.pcm");
            audioRecorder = new NativeAudioEncoder(targetDir.getAbsolutePath()+ File.separator+"output.aac");
        }
        audioRecorder.initRecorder();
        audioRecorder.recordStart();
        //更新按钮状态
        mBtnStart.setEnabled(false);
        mBtnStop.setEnabled(true);
    }

    /**
     * 点击停止录制
     * @param view
     */
    public void onRecordStop(View view) {
        if (audioRecorder != null) {
            audioRecorder.recordStop();
            audioRecorder = null;
        }
        //更新按钮状态
        mBtnStart.setEnabled(true);
        mBtnStop.setEnabled(false);
    }
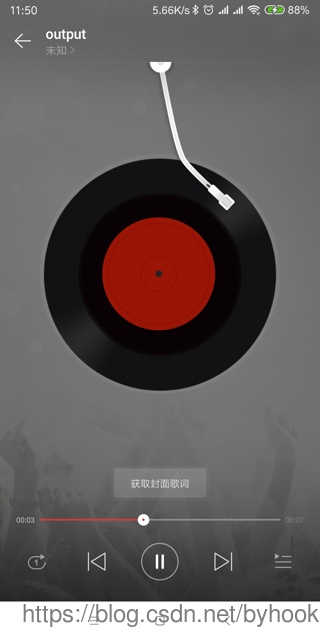
最终你会得到一个output.aac文件,使用系统自带的音频播放器即可播放:
项目地址:ffmpeg-audio-encode
https://github.com/byhook/ffmpeg4android
参考:
https://blog.csdn.net/leixiaohua1020/article/details/25430449
https://blog.csdn.net/XIAIBIANCHENG/article/details/72810495