在前面的学习中,我们使用了 Ribbon 的负载均衡功能,大大简化了远程调用时的代码:
String baseUrl = "http://user-service/user/";
User user = this.restTemplate.getForObject(baseUrl + id, User.class)
如果就学到这里,你可能以后需要编写类似的大量重复代码,格式基本相同,无非参数不一样。有没有更优雅的方式,来对这些代码再次优化呢?
这就是我们接下来要学的 Feign 的功能了。
1、简介
有道词典的英文解释:

为什么叫伪装?
Feign 可以把 Rest 的请求进行隐藏,伪装成类似 SpringMVC 的 Controller 一样。你不用再自己拼接 url,拼接参数等等操作,一切都交给 Feign 去做。
项目主页:https://github.com/OpenFeign/feign

2、快速入门
导入依赖 —— consumer-demo 中引入依赖
<!-- Hystix 依赖 -->
<dependency>
    <groupId>org.springframework.cloud</groupId>
    <artifactId>spring-cloud-starter-netflix-hystrix</artifactId>
</dependency>
<!-- Feign 依赖 -->
<dependency>
    <groupId>org.springframework.cloud</groupId>
    <artifactId>spring-cloud-starter-openfeign</artifactId>
</dependency>

整合了 负载均衡 和 熔断,不需要再添加对应的依赖了。
开启 Feign 功能
我们在启动类上,添加注解,开启 Feign 功能
package cn.ys;

import org.springframework.boot.SpringApplication;
import org.springframework.cloud.client.SpringCloudApplication;
import org.springframework.cloud.openfeign.EnableFeignClients;

@EnableFeignClients // 开启 Feign 功能
@SpringCloudApplication
public class ConsumerApplication {

    public static void main(String[] args) {
        SpringApplication.run(ConsumerApplication.class, args);
    }

}

- 你会发现 RestTemplate 的注册被我删除了。Feign 中已经自动集成了 Ribbon 负载均衡,因此我们不需要自己定义 RestTemplate 了
Feign 的客户端
package cn.ys.consumer.client;

import cn.ys.consumer.pojo.User;
import org.springframework.cloud.openfeign.FeignClient;
import org.springframework.web.bind.annotation.GetMapping;
import org.springframework.web.bind.annotation.PathVariable;

@FeignClient("user-service")
public interface UserClient {

    @GetMapping("/user/{id}")
    User queryById(@PathVariable("id") Long id);

}
- 首先这是一个接口,Feign 会通过动态代理,帮我们生成实现类。这点跟 mybatis 的 mapper 很像
@FeignClient,声明这是一个 Feign 客户端,类似@Mapper注解。同时通过value属性指定服务名称- 接口中的定义方法,完全采用 SpringMVC 的注解,Feign 会根据注解帮我们生成 URL ,并访问获取结果
修改 controller:
package cn.ys.consumer.controller;

import cn.ys.consumer.client.UserClient;
import cn.ys.consumer.pojo.User;
import org.springframework.beans.factory.annotation.Autowired;
import org.springframework.web.bind.annotation.GetMapping;
import org.springframework.web.bind.annotation.PathVariable;
import org.springframework.web.bind.annotation.RequestMapping;
import org.springframework.web.bind.annotation.RestController;

@RestController
@RequestMapping("consumer")
public class ConsumerController {

    @Autowired
    private UserClient userClient;

    @GetMapping("{id}")
    public User queryById(@PathVariable("id") Long id ){

        return userClient.queryById(id);
    }

}
启动测试:
访问接口:

正常获取到了结果。
3、负载均衡
Feign 中本身已经集成了 Ribbon 依赖和自动配置:

因此我们不需要额外引入依赖,也不需要再注册RestTemplate对象。
另外,我们可以像上节课中讲的那样去配置 Ribbon ,可以通过ribbon.xx来进行全局配置。也可以通过服务名.ribbon.xx来对指定服务配置:
user-service:
  ribbon:
    ConnectTimeout: 250 # 连接超时时间(ms)
    ReadTimeout: 1000 # 通信超时时间(ms)
    OkToRetryOnAllOperations: true # 是否对所有操作重试
    MaxAutoRetriesNextServer: 1 # 同一服务不同实例的重试次数
    MaxAutoRetries: 1 # 同一实例的重试次数
4、Hystix 支持
Feign 默认也有对 Hystix 的集成:

只不过,默认情况下是关闭的。我们需要通过下面的参数来开启:
feign:
  hystrix:
    enabled: true # 开启 Feign 的熔断功能
但是,Feign 中的 Fallback 配置不像 Ribbon 中那样简单了。
1)首先,我们要定义一个类,实现刚才编写的 UserClient,作为 fallback 的处理类
package cn.ys.consumer.client;

import cn.ys.consumer.pojo.User;
import org.springframework.stereotype.Component;

@Component
public class UserClientFallback implements UserClient {
    @Override
    public User queryById(Long id) {
        User user = new User();
        user.setId(id);
        user.setName("用户查询出现异常!");
        return user;
    }
}
2)然后在 UserClient 中,指定刚才编写的实现类
package cn.ys.consumer.client;

import cn.ys.consumer.pojo.User;
import org.springframework.cloud.openfeign.FeignClient;
import org.springframework.web.bind.annotation.GetMapping;
import org.springframework.web.bind.annotation.PathVariable;

@FeignClient(value = "user-service", fallback = UserClientFallback.class)
public interface UserClient {

    @GetMapping("/user/{id}")
    User queryById(@PathVariable("id") Long id);

}

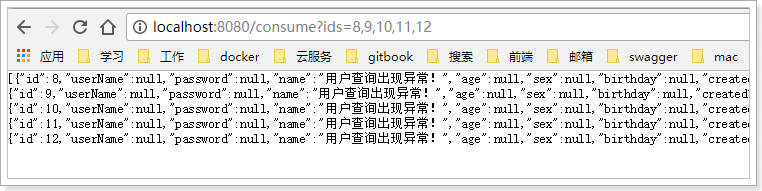
3)重启测试:
我们关闭user-service服务,然后在页面访问:
5、请求压缩(了解)
Spring Cloud Feign 支持对请求和响应进行 GZIP 压缩,以减少通信过程中的性能损耗。通过下面的参数即可开启请求与响应的压缩功能:
feign:
  compression:
    request:
      enabled: true # 开启请求压缩
    response:
      enabled: true # 开启响应压缩
同时,我们也可以对请求的数据类型,以及触发压缩的大小下限进行设置:
feign:
  compression:
    request:
      enabled: true # 开启请求压缩
      mime-types: text/html,application/xml,application/json # 设置压缩的数据类型
      min-request-size: 2048 # 设置触发压缩的大小下限
注:上面的数据类型、压缩大小下限均为默认值。
6、日志级别(了解)
前面讲过,通过logging.level.xx=debug来设置日志级别。然而这个对Fegin客户端而言不会产生效果。因为@FeignClient注解修改的客户端在被代理时,都会创建一个新的Fegin.Logger实例。我们需要额外指定这个日志的级别才可以。
1)设置 com.leyou 包下的日志级别都为 debug
logging:
  level:
    com.leyou: debug
2)编写配置类,定义日志级别
@Configuration
public class FeignConfig {
    @Bean
    Logger.Level feignLoggerLevel(){
        return Logger.Level.FULL;
    }
}
这里指定的Level级别是FULL,Feign支持4种级别:

- NONE:不记录任何日志信息,这是默认值。
- BASIC:仅记录请求的方法,URL以及响应状态码和执行时间
- HEADERS:在BASIC的基础上,额外记录了请求和响应的头信息
- FULL:记录所有请求和响应的明细,包括头信息、请求体、元数据。
3)在FeignClient中指定配置类:
@FeignClient(value = "user-service", fallback = UserFeignClientFallback.class, configuration = FeignConfig.class)
public interface UserFeignClient {
    @GetMapping("/user/{id}")
    User queryUserById(@PathVariable("id") Long id);
}
4)重启项目,即可看到每次访问的日志:
