单点登录和CAS
目前,实现单点登录最流行的是CAS框架,这是一个由耶鲁大学主导的开源框架,github地址为:https://github.com/apereo/cas
CAS 5.X要求JDK版本最低为1.8,并且基于Spring Boot框架进行了大幅重构,其构建方式比较4.X大相径庭,另外,5.X也引入了更多的特性。具体请参见官方文档。
搭建CAS服务器
服务端实际上是一个Web工程,需要放在Web容器如Tomcat中运行。CAS官方推荐采用overlay方式来实现服务端,详见官方文档。
何为overlay,中文意思为覆盖。overlay就是官方提供给你一个模板工程,我们只需要将修改或定制的文件覆盖模板工程中对应位置的对应文件,即可实现定制化。
为何需要overlay?以下为官方的说法。
- There is no need to download/build from the source.
- Upgrades are tremendously easier in most cases by simply adjusting
the build script to download the newer CAS release. - Rather than hosting the entire software source code, as the deployer
you ONLY keep your own local customizations which makes change
tracking much easier. - Tracking changes inside a source control repository is very
lightweight, again simply because only relevant changes (and not the
entire software) is managed.
首先,下载cas-overlay-template工程。CAS同时提供了maven和gradle两个类型,此处使用gradle版本的,下载地址
使用Idea打开工程:

在菜单Build/Build Artifacts中进行构建,选择exploded:

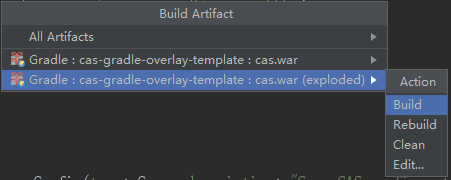
执行后,在cas/build目录中可以看到war文件:

我们将基于这个war文件搭建自己的服务端。新建一个基于gradle的web项目,目录如下:

build.gradle如下
group 'cas.app.com'
version '1.0'

apply plugin: 'java'
apply plugin: 'idea'
apply plugin: "org.springframework.boot"
apply plugin: "war"

sourceCompatibility = 1.8

buildscript {
    repositories {
        mavenLocal()
        jcenter()
    }
    dependencies {
        classpath "org.springframework.boot:spring-boot-gradle-plugin:1.5.14.RELEASE"
    }
}

springBoot {
    mainClass = "org.springframework.boot.loader.WarLauncher"
}

bootRepackage {
    mainClass = "org.apereo.cas.web.CasWebApplication"
    executable = false
    excludeDevtools = false
}

bootRun {
    addResources = true
    classpath = sourceSets.main.compileClasspath
}

war {
    baseName 'cas'
    entryCompression = ZipEntryCompression.STORED
}

repositories {
    mavenCentral()
}

dependencies {
    compile "org.apereo.cas:cas-server-webapp-tomcat:5.3.2@war"
    testCompile group: 'junit', name: 'junit', version: '4.12'
}
把刚才构建出来的war包解压,然后把在src\main下的META-INF、org、WEB-INF目录拷贝至webapp内:

到此为止我们的项目基本构建完成
下面是进行定制化,根据overlay的思路,我们只需要在源码路径src\main中进行定制,并将所有自定义配置文件都放置在src\main\resources中,但若要修改CAS的配置,一定要保证配置文件的路径和名称与webapp\WEB-INF中一致。
比如,我们要修改WEB-INF\application.properties这个Spring Boot配置文件中的server.port,我们只需要拷贝其至src\main\resources目录下进行修改,并且备份WEB-INF中的application.properties为其他名称(如application_bk.properties)即可。这样,构建后的War包中的WEB-INF就会替换为自己的配置文件。
服务器运行
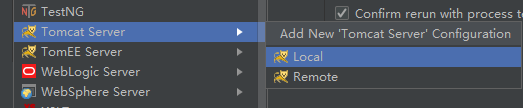
至此,我们已经搭建起一个最基本的Hello World项目,现在使用Idea配合Tomcat进行启动,我们可以在Run下的Edit Configurations中配置tomcat。
先部署war包

使用以下设置

设置完成即可启动服务器,账户密码可在application.properties中找到
cas.authn.accept.users=casuser::Mellon

到此我们的cas服务器构建完成(helloworld版)