目录
一、简单用法
1.创建通知
创建通知至少包含 小图标、标题、内容 才能显示
Notification.Builder builder = new Notification.Builder(this)
        .setSmallIcon(R.drawable.notification_icon)
        .setContentTitle("My notification")
        .setContentText("Hello World!");
2.发送通知
NotificationManager manager = (NotificationManager)getSystemService(NOTIFICATION_SERVICE);
manager.notify(notifyId, builder.build());
3.取消通知
// 取消notifyId关联的通知
manager.cancel(notifyId);

// 取消所有通知
manager.cancelAll();
二、Notification.Buider常用方法
1.布局(API 25)

1:setSmallIcon 小图标
2:AppName 应用名称
3:setSubText 副文本
4:setWhen 通知发出的时间
5:setContentTitle 标题
6:setContentText 内容
7:setLargeIcon 大图标
2.标题/内容/小图标
必要信息
// 标题
nBuilder.setContentTitle("ContentTitle");
// 内容
nBuilder.setContentText("ContentText");
// 小图标
nBuilder.setSmallIcon(R.mipmap.smallicon);
3.大图标
对于LargeIcon,不能像小图标一样直接使用资源名,使用位图
Bitmap LargeIcon = BitmapFactory.decodeResource(getResources(),R.drawable.timg003);

nBuilder.setLargeIcon(LargeIcon)
4.次要内容
setContentInfo 和setNumber在 api 24 被废弃,不再显示。次要内容用 setSubText 代替
// 次要内容
nBuilder.setSubText("SubText");
5.时间
基本时间
nBuilder.setWhen(System.currentTimeMillis());
//是否显示时间。默认false,即只写setWhen()还是不显示时间
nBuilder.setShowWhen(true);
6. 计时器
nBuilder.setWhen(System.currentTimeMillis());
nBuilder.setShowWhen(true);
//是否使用计时器,默认false
nBuilder.setUsesChronometer(true);
//是否使用倒计时的计时器,默认fasle
nBuilder.setChronometerCountDown(false);
7.进度条
确定的进度条:
调用setProgress(max, progress, false)来设置通知, 在更新进度的时候在此发起通知更新progress,并且在下载完成后要移除进度条 ,通过调用setProgress(0, 0, false)既可。
//确定的进度条
nBuilder.setProgress(100,59,false);
不确定(持续活动)的进度条:
这是在处理进度无法准确获知时显示活动正在持续,所以调用setProgress(0, 0, true) ,操作结束时,调用setProgress(0, 0, false)并更新通知以移除指示条
//不确定的进度条
nBuilder.setProgress(0,0,true);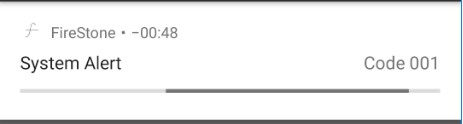
8.状态栏摘要(ticker)
//在api 21后不再显示
nBuilder.setTicker("not applicable");
9.通知提醒
(1)默认提醒方式
setDefaults(int):
向通知添加声音、闪灯和振动效果的最简单、 使用默认(defaults)属性,可以组合多个属性,
| Notification.DEFAULT_VIBRATE | (添加默认震动提醒) |
| Notification.DEFAULT_SOUND | (添加默认声音提醒) |
| Notification.DEFAULT_LIGHTS | (添加默认三色灯提醒) |
| Notification.DEFAULT_ALL | (添加默认以上3种全部提醒) |
PS:如果你像自定义振动方式、三色灯、通知提示音,就不用setDefaults()。
(2)自定义方式
setVibrate(long[]):设置振动方式,比如:
//new long[]{一对一对的}
nBuilder.setVibrate(new long[]{0,1000});
//延迟0ms,然后振动1000ms
nBuilder.setVibrate(new long[] {0,300,500,700});
//延迟0ms,然后振动300ms,再延迟500ms, 接着振动700ms
nBuilder.setVibrate(new long[]{0,100,100,100,100,100});
//延迟0ms,然后振动100ms,再延迟0ms,接着振动100ms,再延迟0ms,接着振动100ms
setLights(int argb, int onMs, int offMs):设置三色灯,参数依次是:灯光颜色, 亮持续时间,暗的时间,不是所有颜色都可以,这跟设备有关,有些手机还不带三色灯; 另外,还需要为Notification设置flags为Notification.FLAG_SHOW_LIGHTS才支持三色灯提醒!
//写法1:
nBuilder.setLights(0xfff000,1000,1000);
//@color int argb,int onMS,int offMs
//写法2
Notification notification = nBuilder.build();
notification.flags = Notification.FLAG_SHOW_LIGHTS;
notification.ledARGB = 0xff0000ff;
notification.ledOnMS = 300;
notification.ledOffMs = 300;
setSound(Uri):设置接收到通知时的铃声,可以用系统的,也可以自己设置,例子如下:
//获取默认铃声
nBuilder.setDefaults(Notification.DEFAULT_SOUND);
//获取自定义铃声
nBuilder.setSound(Uri.parse("file:///sdcard/xx/xx.mp3"));
//获取Android多媒体库内的铃声
nBuilder.setSound(Uri.withAppendedPath(Audio.Media.INTERNAL_CONTENT_URI, "5"));
10.点击通知启动setContentIntent
Intent intent=new Intent(MainActivity.this,Main2Activity.class);
//getActivity(Context context,int requestCode,Intent intent,int flags)启动一个服务
PendingIntent pi=PendingIntent.getActivity(this,0,intent,PendingIntent.FLAG_ONE_SHOT);
nBuilder.setContentIntent(pi);
PendingIntent
11.Notification标识符
| Flag | 描述 |
|---|---|
| Notification.FLAG_SHOW_LIGHTS | 是否使用呼吸灯提醒 |
| Notification.FLAG_INSISTENT | 持续提醒(声音/振动)直到用户响应(点击/取消) |
| Notification.FLAG_ONLY_ALERT_ONCE | 提醒(铃声/震动/滚动通知摘要)只执行一次 |
| Notification.FLAG_ONGOING_EVENT | 正在进行中通知 |
| Notification.FLAG_AUTO_CANCEL | 用户点击通知后自动取消 |
| Notification.FLAG_NO_CLEAR | 用户无法取消 |
| Notification.FLAG_FOREGROUND_SERVICE | 表示正在运行的服务 |
(1)使用方法:
//方式1Flag都有,方式2有的Flag没有

//方式1:
notification=nBuilder.build();
notification.flags=Notification.FLAG_ONLY_ALERT_ONCE;
//使用多个FLAG,如:notification.flags=Notification.FLAG_AUTO_CANCEL | Notification.FLAG_NO_CLEAR;

//方式2:
nBuilder.setOnlyAlertOnce(true);
(2)设置是否使用呼吸灯提醒(FLAG_SHOW_LIGHTS)
通过 builder.setLights 或 builder.setDefaults 设置使用呼吸灯时会自动添加 FLAG_SHOW_LIGHTS
(3)设置持续提醒
//只有方式1,没有方式2
notification=nBuilder.build();
notification.flags=Notification.FLAG_INSISTENT;
(4)设置提醒只执行一次(FLAG_ONLY_ALERT_ONCE)
设置提醒只执行一次
//方式2:
nBuilder.setOnlyAlertOnce(true);
(5)设置点击通知后自动取消(FLAG_AUTO_CANCEL)
不管哪种方式,都需要同时设置了 setContentIntent() 才有效
//设置一个PendingIntent,跳转到别的Activity:Main2Activity.class上
Intent intent=new Intent(this,Main2Activity.class);
PendingIntent pi=PendingIntent.getActivity(this,0,intent,0);
//点击通知,就会开始跳转
nBuilder.setContentIntent(pendingIntent);
nBuilder.setAutoCancel(true);
(6)设置通知为进行中(FLAG_ONGOING_EVENT)
设置他为一个正在进行的通知。他们通常是用来表示一个后台任务,用户积极参与(如播放音乐)或以某种方式正在等待,因此占用设备(如一个文件下载,同步操作,主动网络连接)
builder.setOngoing(true);
(7)设置不能取消(FLAG_NO_CLEAR)
用户不能取消(即不能划动取消或是在点击了通知栏中的"清除通知"后,此通知仍然不清除)
PS:用户点击通知且设置了自动取消时会被删除
NotificationCompat.Builder 未提供设置方法,只能通过 Notification
//在 builder.build()之后写
Notification notification=nBuilder.build();
//表示正在进行
notification.flags=Notification.FLAG_NO_CLEAR;
12.设置通知优先级
setPriority(int pri)
参数pri:
Notification.PRIORITY_MAX       //重要而紧急的通知,通知用户这个事件是时间上紧迫的或者需要立即处理的
Notification.PRIORITY_HIGH      //高优先级,用于重要的通信内容,例如短消息或者聊天
Notification.PRIORITY_DEFAULT   //默认优先级,用于没有特殊优先级分类的通知
Notification.PRIORITY_LOW       //低优先级,可以通知用户但又不是很紧急的事件
Notification.PRIORITY_MIN //用于后台消息(例如天气或者位置信息)。最低优先级通知将只在状态栏显示图标,只有用户下拉通知抽屉才能看到内容。nBuilder.setPriority(Notification.PRIORITY_MAX);13. 悬挂式Notification

//setFullScreenIntent(PendingIntent intent, boolean highPriority)
//参数:highPriority表示通知是否拥有高权限
Intent intent=new Intent(MainActivity.this,Main2Activity.class);
PendingIntent pi=PendingIntent.getActivity(this,0,intent,PendingIntent.FLAG_ONE_SHOT);
nBuilder.setFullScreenIntent(pi,true);
14.添加通知按钮addAction()
向通知添加操作,操作通常与通知的content相连被系统作为按钮来显示。在系统的content下方显示图片与title,点击这个图片或者title就会触发设置的intent。
注意:Android 4.1版本及其以上才能使用,之下版本不能使用。
nBuilder.addAction(R.drawable.icon,"test action",actionPendingIntent)15.锁屏通知
Android 5.0(API level 21)开始,通知可以显示在锁屏上。用户可以通过设置选择是否允许敏感的通知内容显示在安全的锁屏上。你的应用可以通过setVisibility()控制通知的显示等级:
VISIBILITY_PRIVATE : 显示基本信息,如通知的图标,但隐藏通知的全部内容
VISIBILITY_PUBLIC : 显示通知的全部内容
VISIBILITY_SECRET : 不显示任何内容,包括图标nBuilder.setVisibility(Notification.VISIBILITY_PUBLIC);三、Notification发展
随着Android系统不断升级,Notification的创建方式也随之变化,主要变化如下:
Android 3.0之前
Android 3.0 (API level 11)之前,使用new Notification()方式创建通知:
NotificationManager mNotifyMgr =
      (NotificationManager) getSystemService(NOTIFICATION_SERVICE);
PendingIntent contentIntent = PendingIntent.getActivity(
      this, 0, new Intent(this, ResultActivity.class), 0);

Notification notification = new Notification(icon, tickerText, when);
notification.setLatestEventInfo(this, title, content, contentIntent);

mNotifyMgr.notify(NOTIFICATIONS_ID, notification);
Android 3.0 (API level 11)及更高版本
Android 3.0开始弃用new Notification()方式,改用Notification.Builder()来创建通知:
NotificationManager mNotifyMgr =
      (NotificationManager) getSystemService(NOTIFICATION_SERVICE);
PendingIntent contentIntent = PendingIntent.getActivity(
      this, 0, new Intent(this, ResultActivity.class), 0);

Notification notification = new Notification.Builder(this)
            .setSmallIcon(R.drawable.notification_icon)
            .setContentTitle("My notification")
            .setContentText("Hello World!")
            .setContentIntent(contentIntent)
            .build();// getNotification()

mNotifyMgr.notify(NOTIFICATIONS_ID, notification);
这里需要注意: "build()" 是Androdi 4.1(API level 16)加入的,用以替代
"getNotification()"。API level 16开始弃用"getNotification()"
兼容Android 3.0之前的版本
为了兼容API level 11之前的版本,v4 Support Library中提供了NotificationCompat.Builder()这个替代方法。它与Notification.Builder()类似,二者没有太大区别。
NotificationManager mNotifyMgr =
      (NotificationManager) getSystemService(NOTIFICATION_SERVICE);
PendingIntent contentIntent = PendingIntent.getActivity(
      this, 0, new Intent(this, ResultActivity.class), 0);

NotificationCompat.Builder mBuilder =
      new NotificationCompat.Builder(this)
            .setSmallIcon(R.drawable.notification_icon)
            .setContentTitle("My notification")
            .setContentText("Hello World!")
            .setContentIntent(contentIntent);

mNotifyMgr.notify(NOTIFICATIONS_ID, mBuilder.build());
注:除特别说明外,本文将根据 NotificationCompat.Builder() 展开解析,
Notification.Builder()类似。
四、Android Support Library包的区别
Android Support v4:这个包是为了照顾1.6及更高版本而设计的,这个包是使用最广泛的。

Android Support v7:这个包是为了考虑照顾2.1及以上版本而设计的,但不包含更低,故如果不考虑1.6,我们可以采用再加上这个包,另外注意,v7是要依赖v4这个包的,即,两个得同时被包含。

Android Support v13:这个包的设计是为了android 3.2及更高版本的,一般我们都不常用,平板开发中能用到。
参考链接:
https://www.jianshu.com/p/22e27a639787
https://blog.csdn.net/u012124438/article/details/53574649