版权声明: https://blog.csdn.net/sandalphon4869/article/details/87727804
TimePicker
- MainActivity.java
public class MainActivity extends AppCompatActivity {

    private TimePicker timePicker;

    @Override
    protected void onCreate(Bundle savedInstanceState) {
        super.onCreate(savedInstanceState);
        setContentView(R.layout.activity_main);

        timePicker = findViewById(R.id.timepicker);
        //设置是24小时制还是12小时制
        timePicker.setIs24HourView(true);
        //设置背景颜色
        timePicker.setBackgroundColor(Color.BLACK);
        //设置监听器setOnTimeChangedListener
        timePicker.setOnTimeChangedListener(new TimePicker.OnTimeChangedListener() {
            @Override
            public void onTimeChanged(TimePicker view, int hourOfDay, int minute) {
                Toast.makeText(MainActivity.this,"您选择的时间是:"+hourOfDay+"时"+minute+"分!",Toast.LENGTH_SHORT).show();
            }
        });
    }
}- activity_main.xml
<?xml version="1.0" encoding="utf-8"?>
<RelativeLayout
    xmlns:android="http://schemas.android.com/apk/res/android"
    xmlns:tools="http://schemas.android.com/tools"
    android:layout_width="match_parent"
    android:layout_height="match_parent"
    tools:context=".MainActivity">

    <TimePicker
        android:layout_width="wrap_content"
        android:layout_height="wrap_content"
        android:id="@+id/timepicker">
    </TimePicker>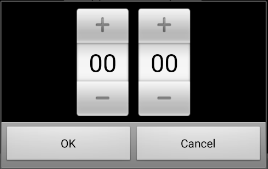
</RelativeLayout>- 效果

TimePickerDialog
构造方法1:默认弹出一个圆盘形Dialog
new TimePickerDialog(MainActivity.this,new TimePickerDialog.OnTimeSetListener() {
                    @Override
                    public void onTimeSet(TimePicker view, int hourOfDay, int minute) {

                    }
                },0,0,true).show();

//TimePickerDialog(Context context,OnTimeSetListener listener,int hourOfDay,int minute,boolean is24HourView)
效果

构造方法2:可选样式(如弹出古老的滚动式Dialog)
new TimePickerDialog(MainActivity.this,AlertDialog.THEME_HOLO_DARK,new TimePickerDialog.OnTimeSetListener() {
                    @Override
                    public void onTimeSet(TimePicker view, int hourOfDay, int minute) {

                    }
                },0,0,true).show();

//TimePickerDialog(Context context,int themeResId,OnTimeSetListener listener,int hourOfDay,boolean is24HourView)
themeResId:
| THEME_HOLO_DARK |
 |
|
 |
|
 |
|
 |
|
 |
时间参数:
参数:
外面构造方法中的hourOfDay和minute 是指TimePickerDialog显示出来初始化的时间。
而onTimeSet的hourOfDay和minute 是指选择时间后被改变的时间是多少。
下面的程序运行后,Dialog第一次显示00:00,选择一个时间14:00,这个时间就保存在MainActivity的成员变量hourOfDay,minute,Dialog第二次点开显示就是14:00
public class MainActivity extends AppCompatActivity {

    private Button button;
    private int hourOfDay=0,minute=0;
    //都初始化为0,则第一次Dialog显示时间为00:00

    @Override
    protected void onCreate(Bundle savedInstanceState) {
        super.onCreate(savedInstanceState);
        setContentView(R.layout.activity_main);


        button= this.<Button>findViewById(R.id.button);
        button.setOnClickListener(new View.OnClickListener() {
            @Override
            public void onClick(View v) {
                new TimePickerDialog(MainActivity.this,AlertDialog.THEME_DEVICE_DEFAULT_LIGHT,new TimePickerDialog.OnTimeSetListener() {
                    @Override
                    public void onTimeSet(TimePicker view, int hourOfDay, int minute) {
                        MainActivity.this.hourOfDay=hourOfDay;
                        MainActivity.this.minute=minute;
                    }
                },hourOfDay,minute,true).show();
            }
        });
    }
}
DatePicker和DatePickerDialog与TimePicker和TimePickerDialog差不多
DatePicker
- MainActivity.java
public class MainActivity extends AppCompatActivity {
    private DatePicker datePicker;

    @Override
    protected void onCreate(Bundle savedInstanceState) {
        super.onCreate(savedInstanceState);
        setContentView(R.layout.activity_main);

        datePicker= this.<DatePicker>findViewById(R.id.datepicker);
        datePicker.init(2019, 2, 20, new DatePicker.OnDateChangedListener() {
            @Override
            public void onDateChanged(DatePicker view, int year, int monthOfYear, int dayOfMonth) {
                // 获取一个日历对象,并初始化为当前选中的时间
                Calendar calendar = Calendar.getInstance();
                calendar.set(year, monthOfYear, dayOfMonth);
                SimpleDateFormat simpleDateFormat = new SimpleDateFormat("yyyy年MM月dd日  HH:mm");
                Toast.makeText(MainActivity.this, simpleDateFormat.format(calendar.getTime()), Toast.LENGTH_SHORT).show();
            }
        });
    }
}- activity_main.xml
<?xml version="1.0" encoding="utf-8"?>
<RelativeLayout
    xmlns:android="http://schemas.android.com/apk/res/android"
    xmlns:tools="http://schemas.android.com/tools"
    android:layout_width="match_parent"
    android:layout_height="match_parent"
    tools:context=".MainActivity">

    <DatePicker
        android:layout_width="wrap_content"
        android:layout_height="wrap_content"
        android:id="@+id/datepicker">
    </DatePicker>
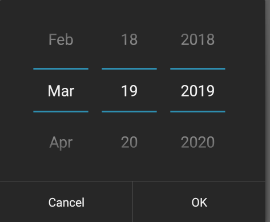
</RelativeLayout>- 效果

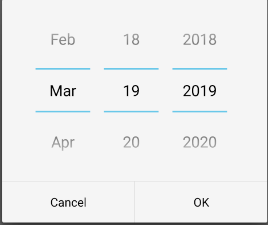
DatePickerDialog
和TimePickerDialog差不多
构造方法一:
new DatePickerDialog(this, new DatePickerDialog.OnDateSetListener() {
            @Override
            public void onDateSet(DatePicker view, int year, int month, int dayOfMonth) {

            }
        },2019,2,19).show();
//DatePickerDialog(Context context,OnDateSetListener listener,int year,int month,int dayOfMonth)
构造方法二:
new DatePickerDialog(this, AlertDialog.THEME_HOLO_DARK,new DatePickerDialog.OnDateSetListener() {
            @Override
            public void onDateSet(DatePicker view, int year, int month, int dayOfMonth) {

            }
        },2019,2,19).show();
//DatePickerDialog(Context context,int themeResId,OnDateSetListener listener,int year,int month,int dayOfMonth)
themeResId:
| THEME_HOLO_DARK |
 |
|
 |
|
 |
|
 |
|
 |