版权声明:转载请声明转自http://blog.csdn.net/thewindkee https://blog.csdn.net/thewindkee/article/details/86598516
流程图

流程
1.由于Servlet 3.0 的设计, 会自动扫描META-INF/services下的javax.servlet.ServletContainerInitializer实现。spring-web的实现是SpringServletContainerInitializer。自定义META-INF/services+实现ServletContainerInitializer可以代替web.xml。
2.SpringServletContainerInitializer关注所有WebApplicationInitializer并调用其onStartup方法。
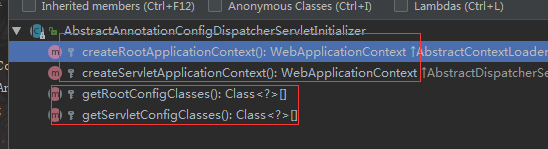
3.WebApplicationinitializer有一个AbstractDispatcherServletInitializer实现。发现其调用父类(AbstractContextLoaderInitializer)的onStartUp方法来创建Root WebApplicationContext ,和本类registerDispatcherServlet来创建Servlet WebApplicationContext。它是模板方法创建了两个容器,AbstractAnnotationConfigDispatcherServletInitializer提供的抽象的实现,我们只需要定义@Configuration对应的类即可。
创建两个容器
两种容器

自定义WebApplicationInitializer
public class MyWebAppInitializer implements WebApplicationInitializer {

  @Override
  public void onStartup(ServletContext container) {
    // Create the 'root' Spring application context
    AnnotationConfigWebApplicationContext rootContext =
      new AnnotationConfigWebApplicationContext();
    rootContext.register(AppConfig.class);

    // Manage the lifecycle of the root application context
    container.addListener(new ContextLoaderListener(rootContext));

    // Create the dispatcher servlet's Spring application context
    AnnotationConfigWebApplicationContext dispatcherContext =
      new AnnotationConfigWebApplicationContext();
    dispatcherContext.register(DispatcherConfig.class);

    // Register and map the dispatcher servlet
    ServletRegistration.Dynamic dispatcher =
      container.addServlet("dispatcher", new DispatcherServlet(dispatcherContext));
    dispatcher.setLoadOnStartup(1);
    dispatcher.addMapping("/");
  }