两种全局配置文件
application.properties
application.yml
配置文件的作用是修改spring boot的默认配置
YAML
.yml 是YAML 与标记语言有关,以数据为中心
之前的配置文件:xxx.xml
//.yml
service:
      port:8081
.xml:
<service>
   <port>8081</port>
</service>
//对比可知.yml 的突出特点:以数据为中心
1.YAML语法
1.基本语法
- key:(空格) value :表示一个键值对(冒号后面的空格一定要有)
- 通过空格的缩进来确定层级关系;只需要左边对齐就属于同一级
service:
		port: 8081
		path: /hello
属性和值是大小写敏感的
2.值的写法
- 字面量:普通的值(数字,字符串,布尔)
key: value   :字面值直接写
字符串默认不加双引号或者单引号
“”  :不会转义字符串中的特殊字符;特殊字符会直接表达本身的意思
      name : "zhang\nsan "      输出: zhang(换行)san
''  : 会转义字符串中的特殊字符;特殊字符会作为一个普通的字符
      name : 'zhnag\nsan '       输出: zhang\nsan
- 对象(Map ,键值对)
key: value   :在下一行来写对象的属性和值的关系(注意缩进)
friends:
    name: zhangsan
    age   : 15
行内写法:
friends: {name : zhangsan,age : 18}
- 数组(List,Set)
用-(空格)值的方式表示数组中的每一个值
pet:
    - cat
    - pig
    - dog
行内写法:
pet : [cat,pig,dog ]
3.配置文件注入
将配置文件中的设置和javaBean 绑定/获取配置文件中的值
1. 配置文件注入的方法Ⅰ
@ConfigurationProperties(prefix=" ")
配置文件:
JavaBean:

可以导入:spring-boot-configuration-processor 配置文件处理器,之后写配置文件的时候就会有相应的提示
2. 配置文件注入/获取值的方式Ⅱ
在javaBean 中的每一个属性上面添加注解
@value("")
public class Person {
    @Value("${person.name}")
    private String lastName;
    @Value("#(11*2)")
    private Integer age;
@ConfigurationProperties 和@Value 的区别
@ConfigurationProperties 是批量注入,@Value是一个一个的注入;@ConfigurantionApplication支持松散语法绑定:在进行配置文件注入时:LastName Last-name Last_name 是一样的,但是在@Value中是不允许这样的,并且支持spel(spring表达式)(可以识别#(11*2)可以计算出来),但是@ConfigurationApplication是不支持的
关于JSR 303 校验,@ConfigurationApplication 是支持的,@Value不支持
@Component
@ConfigurationProperties(prefix = "person")
@Validated     JRS303  校验
public class Person {
   // @Value("${person.name}")
    @Email                 //数据注入的时候检查此时的数据应该是邮箱格式
    private String lastName;
@Value 是不支持复杂数据注入的她只支持简单的数据注入:数字,字符串,布尔值
使用:
如果只是在处理业务逻辑的时候需要一项值就用@Value 如果需要整体注入需要一个完整的对象的数据就是用:@ConfiguractionApplication
3. 读取指定的配置文件
前言:
application.properties (application.yml ) 是全局配置文件,配置SpringBoot 的相关属性,如果将所有的配置都写在全局配置文件中肯定不行,因此要有其他的配置文件xxx.properties 或者xxx.yml
@PropertySource(value={"classpth: "})
@PropertySource(value={"classpath:person.properties"})//通过类路径找到在指定的配置文件,可以注入多个文件
@Component
@ConfigurationProperties(prefix = "person")

    public class Person {
4. 导入spring配置文件的方式
@ImportResource(location={“classpath:”})
ImportResource(location="classpath::xxx.xml")

导入Spring 的配置文件,让配置文件中的内容生效;
例如:给容器中加入一个helloService组件
创建一个spring 配置文件:
<?xml version="1.0" encoding="UTF-8"?>
<beans xmlns="http://www.springframework.org/schema/beans"
       xmlns:xsi="http://www.w3.org/2001/XMLSchema-instance"
       xsi:schemaLocation="http://www.springframework.org/schema/beans http://www.springframework.org/schema/beans/spring-beans.xsd">
    **<bean id ="helloservice" class = "spring_demo.service.helloservice"></bean>**
</beans>

spring配置文件中的内容不会自动加载,所以要将ImportResource("{location:}")标注在一个配置类上
在Spring 中给容器中加入组件是通过配置文件,但是在springboot 中是不建议这么麻烦的去给容器添加组件的。
< bean id =“helloservice” class = “spring_demo.service.helloservice”>< /bean>
SprongBoot 中推荐给容器中添加第三方组件的方式
1.配置类=====相当于Spring中的配置文件
@Configuration 标注配置类
@Bean 进行添加组件,将方法的返回值添加到容器中,方法名就是id
/**
 * 在Spring Boot中使用注解的方式向容器中添加第三方组件
 * @Configuration  表示这是一个配置类,相当于spring 中的配置文件
 * @Bean   将方法的返回值添加到容器中,容器中这个组件默认的id  就是方法名
 * 与Spring的配置结合:*< bean id ="helloservice" class = "spring_demo.service.helloservice">< /bean>*
 */
@Configuration
public class MyConfig {
    @Bean
    public helloservice HelloService(){
        return new helloservice();
    }
}
添加了一个组件:类helloservice  id:HelloService
4. 配置文件占位符
.properties 和.yml 中都可以使用
- 随机数
- 占位符获取之前配置的值,如果没有可以使用的值就指定的默认值
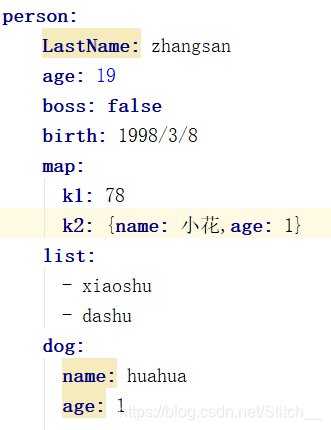
person.age=${random.int}                               随机数
person.last-name=张三${random.uuid}           随机uid
person.boss=false
person.birth=2017/3/8
person.map.k1=v1
person.map.k2=v2
person.list=1,2,3
person.dog.name=dog_${person.last-name}_${person.hello:hello}   获取之前的配置值,获取的配置值无法获取可以自定义值
person.dog.age=1
5. Profile多环境支持
一个程序的开发,测试,最终运行的环境都是不一样的,配置肯定也有不一样的地方为了方便的在不同的环境中运行,Spring提供了在不同环境下配置文件更方便切换的功能
- 在主配置文件编写的时候,文件名可以是:application-profile.properties/yml
profile 可以自己随便取
例如:

开发的主配置文件:application-dev.properties
运行的主配置文件:application-pro.properties
默认使用application.properties
- .yml 中的多模块化
在application.yml 文件中三个横线就划分一个文档模块,可以给每个文档模块指定profiles 然后在第一个文档模块中激活需要的文档模块,默认执行第一个文档模块这样就不用写那么多的文档模块
//要注意文件中的缩进
server:
  port: 8080
spring:
  profiles:
    active: dev   激活指定的profile
---
server :
  port :8081
spring:
  profiles:dev
---
server:
  port: 8082
spring:
  profiles: pro
- 激活指定的Propfile
激活方式Ⅰ:在主配置文件中激活
默认主配置文件:application.properties()的优先级高于application.yml
在application.properties 文件中:spring.profiles.active=dev(某个profile) 这样就激活的生产环境,使用的就是生产环境的配置
激活方式Ⅱ:命令行的方式
–spring.proflies.active=dev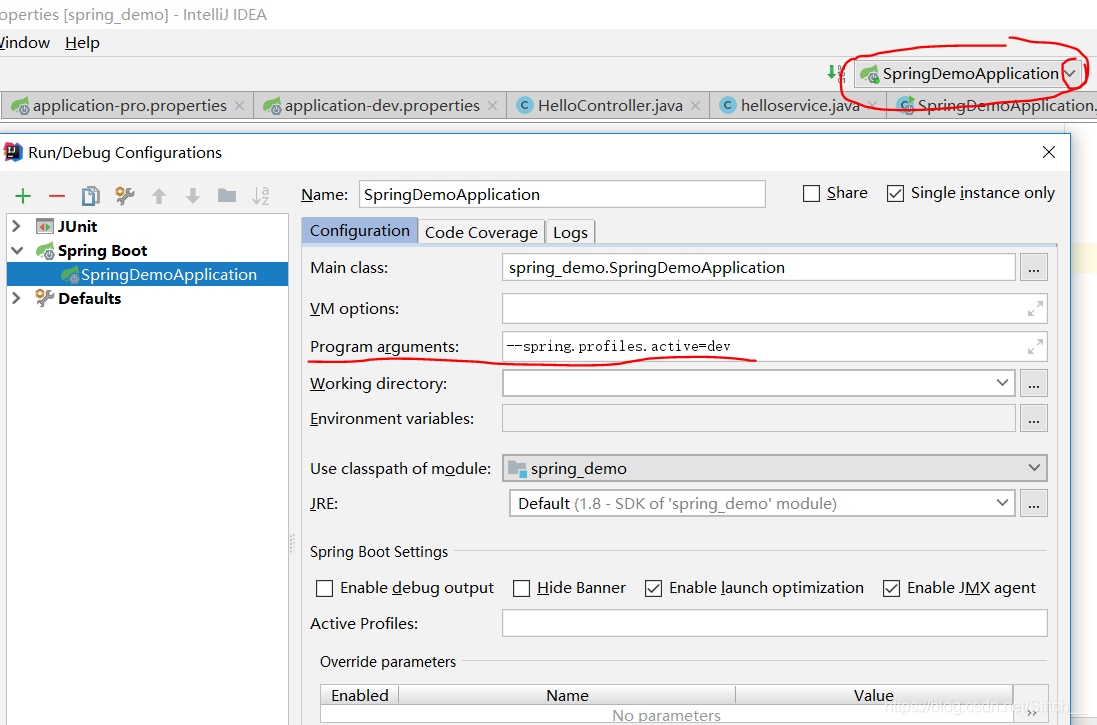
激活方式3: 虚拟机参数,再上图的VM options 一栏填写:-Dspring.profiles.active=dev 一样激活了开发环境的配置