一.创建maven项目
1.1 创建项目

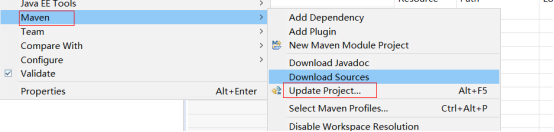
1.2 更新项目
注意:更新项目的目的是防止jar包加载不完全,导致项目报错.
操作:选中项目–鼠标右击–之后如下图:
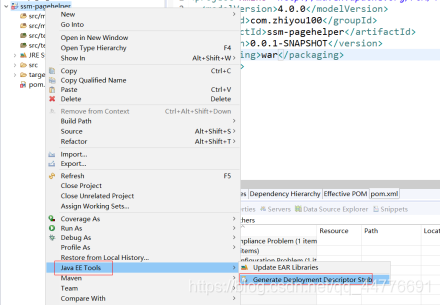
1.3 如果项目创建成功后,pom.xml,报错.解决此问题如下:
二: 配置pom.xml文件
<project xmlns="http://maven.apache.org/POM/4.0.0"
	xmlns:xsi="http://www.w3.org/2001/XMLSchema-instance"
	xsi:schemaLocation="http://maven.apache.org/POM/4.0.0 http://maven.apache.org/xsd/maven-4.0.0.xsd">
	<modelVersion>4.0.0</modelVersion>
	<groupId>com.zhiyou100</groupId>
	<artifactId>ssm-pagehelper</artifactId>
	<version>0.0.1-SNAPSHOT</version>
	<packaging>war</packaging>


	<!-- 定义版本 -->
	<properties>
		<project.build.sourceEncoding>UTF-8</project.build.sourceEncoding>
		<spring.version>5.1.2.RELEASE</spring.version>
	</properties>

	<dependencies>
		<!-- 单元测试 -->
		<dependency>
			<groupId>junit</groupId>
			<artifactId>junit</artifactId>
			<version>3.8.1</version>
			<!-- 项目打包时该包不会打入 -->
			<scope>test</scope>
		</dependency>
		<!-- JSTL标签类 -->
		<dependency>
			<groupId>jstl</groupId>
			<artifactId>jstl</artifactId>
			<version>1.2</version>
		</dependency>
		<!--mysql数据库驱动 -->
		<dependency>
			<groupId>mysql</groupId>
			<artifactId>mysql-connector-java</artifactId>
			<version>5.1.38</version>
		</dependency>
		<!-- 导入dbcp的jar包,用来在applicationContext.xml中配置数据库 -->
		<dependency>
			<groupId>commons-dbcp</groupId>
			<artifactId>commons-dbcp</artifactId>
			<version>1.4</version>
		</dependency>
		<!--log4j日志包 -->
		<dependency>
			<groupId>org.apache.logging.log4j</groupId>
			<artifactId>log4j-core</artifactId>
			<version>2.6.1</version>
		</dependency>
		<!-- mybatis ORM框架 -->
		<dependency>
			<groupId>org.mybatis</groupId>
			<artifactId>mybatis</artifactId>
			<version>3.4.6</version>
		</dependency>
		<!--mybatis-spring适配器 -->
		<dependency>
			<groupId>org.mybatis</groupId>
			<artifactId>mybatis-spring</artifactId>
			<version>1.3.1</version>
		</dependency>
		<!--Spring框架核心库 -->
		<dependency>
			<groupId>org.springframework</groupId>
			<artifactId>spring-context</artifactId>
			<version>${spring.version}</version>
		</dependency>
		<!-- aspectJ AOP 织入器 -->
		<dependency>
			<groupId>org.aspectj</groupId>
			<artifactId>aspectjweaver</artifactId>
			<version>1.8.9</version>
		</dependency>
		<!--Spring java数据库访问包,在本例中主要用于提供数据源 -->
		<dependency>
			<groupId>org.springframework</groupId>
			<artifactId>spring-jdbc</artifactId>
			<version>${spring.version}</version>
		</dependency>
		<dependency>
			<groupId>org.springframework</groupId>
			<artifactId>spring-tx</artifactId>
			<version>${spring.version}</version>
		</dependency>
		<dependency>
			<groupId>org.springframework</groupId>
			<artifactId>spring-web</artifactId>
			<version>${spring.version}</version>
		</dependency>
		<dependency>
			<groupId>org.springframework</groupId>
			<artifactId>spring-webmvc</artifactId>
			<version>${spring.version}</version>
		</dependency>

		<!-- pagehelper 插件jar包-->
		<dependency>
			<groupId>com.github.pagehelper</groupId>
			<artifactId>pagehelper</artifactId>
			<version>4.1.6</version>
		</dependency>
	</dependencies>
三:配置web.xml文件
<?xml version="1.0" encoding="UTF-8"?>
<web-app xmlns:xsi="http://www.w3.org/2001/XMLSchema-instance"
	xmlns="http://java.sun.com/xml/ns/javaee"
	xsi:schemaLocation="http://java.sun.com/xml/ns/javaee http://java.sun.com/xml/ns/javaee/web-app_2_5.xsd"
	version="2.5">
	<display-name>ssm-pagehelper</display-name>
	<welcome-file-list>
		<welcome-file>index.html</welcome-file>
		<welcome-file>index.htm</welcome-file>
		<welcome-file>index.jsp</welcome-file>
		<welcome-file>default.html</welcome-file>
		<welcome-file>default.htm</welcome-file>
		<welcome-file>default.jsp</welcome-file>
	</welcome-file-list>
	<!-- spring监听器 -->
	<listener>
		<listener-class>org.springframework.web.context.ContextLoaderListener</listener-class>
	</listener>
	<!-- springmvc核心控制器 -->
	<servlet>
		<servlet-name>springDispatcherServlet</servlet-name>
		<servlet-class>org.springframework.web.servlet.DispatcherServlet</servlet-class>
		<!-- 配置 DispatcherServlet 的一个初始化参数:配置 SpringMVC 配置文件的位置和名称 -->
		<!-- 默认的配置文件格式:/WEB-INF/<servlet-name>-servlet.xml -->
		<init-param>
			<param-name>contextConfigLocation</param-name>
			<param-value>classpath:spring-mvc.xml</param-value>
		</init-param>
		<load-on-startup>1</load-on-startup>
	</servlet>

	<!-- 配置核心控制器拦截的请求路径 -->
	<servlet-mapping>
		<servlet-name>springDispatcherServlet</servlet-name>
		<url-pattern>*.do</url-pattern>
	</servlet-mapping>
	<!-- 读取mybatis配置文件 -->
	<context-param>
		<param-name>contextConfigLocation</param-name>
		<param-value>classpath:spring-mybatis.xml</param-value>
	</context-param>
	<!-- 编码过滤器 ,使用ctrl+shift+t搜索类-->
	<filter>
		<filter-name>encoding</filter-name>
		<filter-class>org.springframework.web.filter.CharacterEncodingFilter</filter-class>
		<!-- 指定编码格式 -->
		<init-param>
			<param-name>encoding</param-name>
			<param-value>UTF-8</param-value>
		</init-param>
	</filter>
	<filter-mapping>
		<filter-name>encoding</filter-name>
		<url-pattern>/</url-pattern>
	</filter-mapping>
</web-app>
四、配置spring-mybatis、springmvc文件
1)Springmvc配置文件
<?xml version="1.0" encoding="UTF-8"?>
<beans xmlns="http://www.springframework.org/schema/beans"
	xmlns:xsi="http://www.w3.org/2001/XMLSchema-instance"
	xmlns:context="http://www.springframework.org/schema/context"
	xmlns:aop="http://www.springframework.org/schema/aop"
	xmlns:mvc="http://www.springframework.org/schema/mvc"
	xsi:schemaLocation="http://www.springframework.org/schema/beans http://www.springframework.org/schema/beans/spring-beans.xsd
         http://www.springframework.org/schema/context http://www.springframework.org/schema/context/spring-context.xsd
         http://www.springframework.org/schema/aop http://www.springframework.org/schema/aop/spring-aop.xsd
         http://www.springframework.org/schema/mvc http://www.springframework.org/schema/mvc/spring-mvc-4.0.xsd">

 	<!-- 包扫描 -->
	<context:component-scan base-package="com.zhiyou100.controller" />

	<!-- 定义跳转的文件的前后缀 ,视图模式配置 -->
	<bean class="org.springframework.web.servlet.view.InternalResourceViewResolver">
		<property name="prefix" value="/" />
		<property name="suffix" value=".jsp" />
	</bean>
</beans>
2)spring-mybatis配置文件
<?xml version="1.0" encoding="UTF-8"?>
<beans xmlns="http://www.springframework.org/schema/beans"
	xmlns:xsi="http://www.w3.org/2001/XMLSchema-instance"
	xmlns:context="http://www.springframework.org/schema/context"
	xsi:schemaLocation="http://www.springframework.org/schema/beans
	http://www.springframework.org/schema/beans/spring-beans.xsd
         http://www.springframework.org/schema/context
         http://www.springframework.org/schema/context/spring-context.xsd">
     <!-- 开启包扫描 -->
	<context:component-scan base-package="com.zhiyou100"/>
	<!-- 读取外部数据库配置文件 -->
	<bean id="propertyConfigurer"
		class="org.springframework.beans.factory.config.PropertyPlaceholderConfigurer">
		<property name="location" value="classpath:db.properties" />
	</bean>
	<!-- 配置数据源使用dbcp数据库连接池
	c3p0使用CombopooledDataSource
	destroy-method:销毁时自动调用close方法
	-->
	<bean id="dataSource"
		class="org.apache.commons.dbcp.BasicDataSource" destroy-method="close">
		<property name="driverClassName" value="${driver}" />
		<property name="url" value="${url}" />
		<property name="username" value="${username}" />
		<property name="password" value="${password}" />
		<!-- 初始化连接大小 -->
		<property name="initialSize" value="${initialSize}"></property>
		<!-- 连接池最大数量 -->
		<property name="maxActive" value="${maxActive}"></property>
		<!-- 连接池最大空闲 -->
		<property name="maxIdle" value="${maxIdle}"></property>
		<!-- 连接池最小空闲 -->
		<property name="minIdle" value="${minIdle}"></property>
		<!-- 获取连接最大等待时间 -->
		<property name="maxWait" value="${maxWait}"></property>
	</bean>

	<!-- session工厂 -->
	<bean id="sqlSessionFactory"
		class="org.mybatis.spring.SqlSessionFactoryBean">
		<property name="dataSource" ref="dataSource" />
		<!-- 自动扫描mapping.xml文件 -->
		<property name="mapperLocations"
			value="classpath:com/zhiyou100/mapping/*.xml"></property>
		<!-- 配置分页插件 -->
		<property name="plugins">
			<array>
				<bean class="com.github.pagehelper.PageHelper">
					<property name="properties">
						<value>
							dialect=mysql
							reasonable=true
						</value>
					</property>
				</bean>
			</array>
		</property>
	</bean>
	<!-- DAO接口所在包名,Spring会自动查找其下的类,不需要写接口的实现类 -->
	<bean class="org.mybatis.spring.mapper.MapperScannerConfigurer">
		<property name="basePackage" value="com.zhiyou100.dao"/>
	</bean>
	<!-- 事务管理 -->
	<bean id="transactionManager"
		class="org.springframework.jdbc.datasource.DataSourceTransactionManager">
		<property name="dataSource" ref="dataSource" />
	</bean>
</beans>
3)写db.properties文件
driver=com.mysql.jdbc.Driver
url=jdbc:mysql:///数据库名字
username=数据库账号
password=数据库密码
initialSize=5
maxActive=20
maxIdle=20
minIdle=1
maxWait=60000
五:
剩下就是写dao层和实体类,实体类映射文件.service层,以及controller层,还有创建数据库和创建测试页面,相信有些JAVA功底的伙伴们都应该会写吧!我在这也就不班门弄斧啦!
六:测试!!!
七:最后呢!
我刚加入CSDN这个大家庭!希望各位伙伴们多多支持!