一、引入jar
<dependency>
    <groupId>org.mybatis.spring.boot</groupId>
    <artifactId>mybatis-spring-boot-starter</artifactId>
    <version>1.3.3</version>
</dependency>
二、创建JavaBean
public class Employee {
    private Integer id;
    private String lastName;
    private Integer gender;
    private String email;
    private Integer dId;

    public Integer getId() {
        return id;
    }
...
三、创建Mapper接口
public interface EmployeeMapper {
    public Employee getEmpById(Integer id);
    public void insertEmp(Employee employee);
}
四、搭建XML文件配置
1)、结构:可自行定义
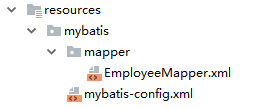
2)、yml文件中指定mybatis全局配置文件和接口映射文件位置
mybatis:
  config-location: classpath:mybatis/mybatis-config.xml
  mapper-locations: classpath:mybatis/mapper/*.xml
3)、查看官网复制主配置文件模板修改如下
网址:http://www.mybatis.org/mybatis-3/
<?xml version="1.0" encoding="UTF-8" ?>
<!DOCTYPE configuration
        PUBLIC "-//mybatis.org//DTD Config 3.0//EN"
        "http://mybatis.org/dtd/mybatis-3-config.dtd">
<configuration>
    <settings>
        <setting name="mapUnderscoreToCamelCase" value="true"/>
    </settings>
</configuration>
4)、查看官网复制接口映射文件模板修改如下
<?xml version="1.0" encoding="UTF-8" ?>
<!DOCTYPE mapper
PUBLIC "-//mybatis.org//DTD Mapper 3.0//EN"
"http://mybatis.org/dtd/mybatis-3-mapper.dtd">
<mapper namespace="com.zhq.springboot.mapper.EmployeeMapper">
<!--查询-->
<select id="getEmpById" resultType="com.zhq.springboot.bean.Employee">
select * from employee where id=#{id}
</select>
<!--插入-->
<insert id="insertEmp" >
insert into employee(lastName,email,gender,d_id) values(#{lastName},#{email},#{gender},#{d_id})
</insert>
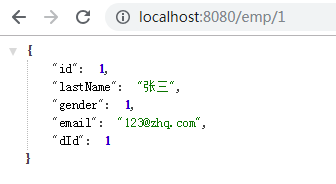
</mapper>五、编写接口测试
    @GetMapping("emp/{id}")
    public Employee getEmp(@PathVariable("id") Integer id){
        Employee emp = employeeMapper.getEmpById(id);
        return emp;
    }