版权声明:本文为博主原创文章,未经博主允许不得转载。 https://blog.csdn.net/qq_34598667/article/details/84404923
整合web层
表现层就一个springmvc框架!由springmvc来管理controller,配置文件内容有:
- 需要扫描controller
- 配置注解驱动
- 配置视图解析器
配置完spring-mvc之后不要忘了在web.xml中添加配置:
- Spring容器的配置
- Springmvc前端控制器的配置
- Post乱码过滤器
1)配置spring-mvc.xml文件
<beans xmlns="http://www.springframework.org/schema/beans"
    xmlns:xsi="http://www.w3.org/2001/XMLSchema-instance"
    xmlns:context="http://www.springframework.org/schema/context"
    xmlns:aop="http://www.springframework.org/schema/aop"
    xmlns:tx="http://www.springframework.org/schema/tx"
    xmlns:mvc="http://www.springframework.org/schema/mvc"
    xsi:schemaLocation="http://www.springframework.org/schema/beans
        http://www.springframework.org/schema/beans/spring-beans.xsd
        http://www.springframework.org/schema/context
        http://www.springframework.org/schema/context/spring-context-4.2.xsd
        http://www.springframework.org/schema/aop
		http://www.springframework.org/schema/aop/spring-aop-4.2.xsd
		http://www.springframework.org/schema/tx
		http://www.springframework.org/schema/tx/spring-tx.xsd
		http://www.springframework.org/schema/mvc
 		http://www.springframework.org/schema/mvc/spring-mvc-3.2.xsd">

   	<!--指定注解扫描包路径-->
  	<context:component-scan base-package="com.oak.xiyuyou.controller"/>

    <!-- 开启Spring mvc注解扫描,处理器映射器和适配器均不需要再配置 -->
    <mvc:annotation-driven/>

    <!--定义视图解析器ViewResolver -->
    <bean id="viewResolver"
        class="org.springframework.web.servlet.view.InternalResourceViewResolver">
        <!-- 前缀属性 返回的视图以prefix属性的值作为开头-->
        <property name="prefix" value="/WEB-INF/"/>
        <!-- 后缀属性 返回的视图以suffix属性的值作为结尾-->
        <property name="suffix" value=".jsp"/>
    </bean>
</beans>
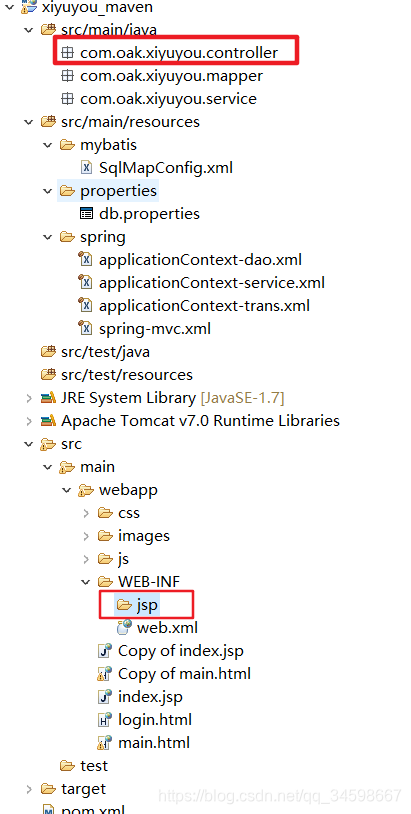
我们springmvc.xml文件中配置的扫描包是com.taotao.controller,因此我们需要创建这么一个目录,并且从视图解析器的配置中可以看出,我们还要在WEB-INF目录下新建一个jsp目录:
2)在web.xml中配置前端控制器和编码过滤器
<?xml version="1.0" encoding="UTF-8"?>
<web-app xmlns:xsi="http://www.w3.org/2001/XMLSchema-instance" xmlns="http://java.sun.com/xml/ns/javaee" xsi:schemaLocation="http://java.sun.com/xml/ns/javaee http://java.sun.com/xml/ns/javaee/web-app_3_0.xsd" id="WebApp_ID" version="3.0">
  <display-name>netctoss0702_ssm_demo05</display-name>
  <welcome-file-list>
    <welcome-file>index.html</welcome-file>
    <welcome-file>index.htm</welcome-file>
    <welcome-file>index.jsp</welcome-file>
    <welcome-file>default.html</welcome-file>
    <welcome-file>default.htm</welcome-file>
    <welcome-file>default.jsp</welcome-file>
  </welcome-file-list>
	  <!-- post字符集编码过滤器 -->
      <filter>
        <filter-name>encodingFilter</filter-name>
        <filter-class>org.springframework.web.filter.CharacterEncodingFilter</filter-class>
        <init-param>
            <param-name>encoding</param-name>
            <param-value>UTF-8</param-value>
        </init-param>
    </filter>
    <filter-mapping>
        <filter-name>encodingFilter</filter-name>
        <url-pattern>/*</url-pattern>
    </filter-mapping>

      <!-- 初始化Spring容器 -->
	<context-param>
	    <param-name>contextConfigLocation</param-name>
	    <param-value>classpath:spring/applicationContext-*.xml</param-value>
	</context-param>
	<listener>
	    <listener-class>org.springframework.web.context.ContextLoaderListener</listener-class>
	</listener>

   <!-- 配置前端控制器 -->
   <servlet>
       <servlet-name>springmvc</servlet-name>
       <servlet-class>org.springframework.web.servlet.DispatcherServlet</servlet-class>
       <init-param>
           <!-- 指定springmvc配置文件的路径。如果不指定,默认为:/WEB-INF/${servlet-name}-servlet.xml -->
           <param-name>contextConfigLocation</param-name>
           <param-value>classpath:spring/spring-mvc.xml</param-value>
       </init-param>
   </servlet>
   <servlet-mapping>
       <servlet-name>springmvc</servlet-name>
       <url-pattern>/</url-pattern>
   </servlet-mapping>
</web-app>
启动项目访问测试即可。