Wordpress怎么加入广告功能
请参考ad inserter官方文档
Quick start - https://adinserter.pro/documentation/quick-start
Code editing - https://adinserter.pro/documentation/code-editing
Common Settings - https://adinserter.pro/documentation/common-settings
Plugin installation
To install Ad Inserter Pro plugin check Plugin installation page. To install free Ad Inserter plugin log in to your WordPress dashboard, click on Plugins in the WordPress menu, click on Add New on top of the plugin page, search for ad inserter, select Ad Inserter from the results, click Install and then Activate the plugin.

First ad block
To go to plugin settings click on the left side Settings > Ad Inserter.
Practical example for settings for ad before the second paragraph on all posts:
- Click on the block name and rename it to Posts
- Enter
<img src="https://via.placeholder.com/468x60/0000ff/ffffff.png?text=TEST">into code widow - Set Automatic Insertion to Before Paragraph
- Leave Posts checked, other page types should be unchecked
- Set Paragraph(s) to 2
- Click on Save Settings

Now you can check your posts and you should see a test banner before the second paragraph. In the case there is no banner please check settings and other documentation and try to use debugging functions to diagnose the problem.
Ad Inserter menu item in the WordPress admin toolbar on the top of every post/page contains debugging functions that can help you to label inserted blocks and visualize available positions for automatic insertion:
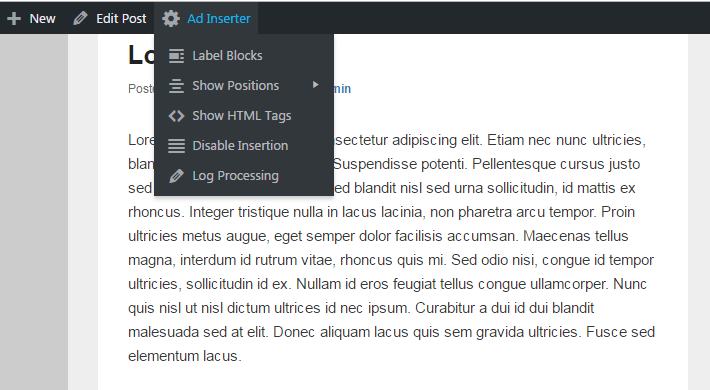
Quick info
Few very important things you need to know in order to display some ad:
- Code block (there are 16 of them, 64 in Pro) is ad code with settings which define where the ad will be inserted (displayed).
- Each code block can be renamed. Click on the name to edit it.
- Use code tools to generate or edit code
- Each code block has many independent insertion options, enable at least one:
- Automatic Insertion (before/after paragraph,…)
- Widget (for widget positions / sidebars, enabled by default)
- Shortcode (for manual insertion of shortcodes in posts or pages)
- Enable insertion on at least one WordPress page type (Posts, Static pages, Blog pages, Homepage, Category pages, Search Pages, Archive pages)
- Please note that not all positions for automatic insertion are available on all page types – use debugging function Show positions to see what is available on particular page
- For Posts and Static pages leave default blank selection value (no individual exceptions)

- If you don’t see inserted code block turn on debugging functions: Label blocks (Ad Inserter menu item in the WordPress admin toolbar on the top of every post/page)
- Check also some common settings
- Using AdSense? If you are new to AdSense you should first install the Ad Inserter plugin as described above and then jump to Connect your site. Check also description of AdSense ads.
If you are using AdSense you may get blank (empty) ad blocks. This might be because there is some error in the code (wrong IDs), your AdSense account is not fully approved yet, your website was not accepted or your AdSense account is banned. In most cases once Google approves your account you’ll get ads. Check also Troubleshooting page for more information. You can also try Media net ads as good AdSense alternative for contextual ads, infolinks ads to complement existing ads or contextual in-stream video ads.
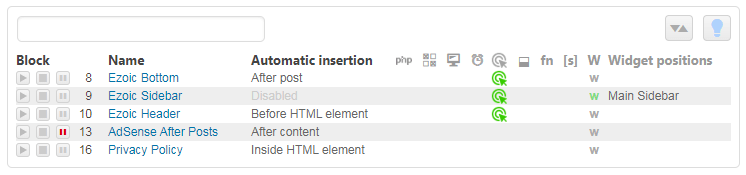
To display a list of all blocks click on the Blocks button in the header row.

This list shows all active code blocks. To show all blocks click on the button with a dot. To filter blocks enter keywords in the search field. You can also use php, shortcode and widget keywords to filter blocks that have enabled respective functions.
以下是一个amazon的广告位样例代码
<script type="text/javascript">
    amzn_assoc_placement = "adunit0";
    amzn_assoc_search_bar = "true";
    amzn_assoc_tracking_id = "ad-inserter-20";
    amzn_assoc_search_bar_position = "top";
    amzn_assoc_ad_mode = "search";
    amzn_assoc_ad_type = "smart";
    amzn_assoc_marketplace = "amazon";
    amzn_assoc_region = "US";
    amzn_assoc_title = "Search Results from Amazon";
    amzn_assoc_default_search_phrase = "[adinserter data='smart-tag']";
    amzn_assoc_default_category = "All";
    amzn_assoc_linkid = "cf1873f027a57f63cede634cfd444bea";
    </script>
    <script src="//z-na.amazon-adsystem.com/widgets/onejs?MarketPlace=US"></script>
请参考一下图片进行设置

效果图
