注解
- Spring支持哪些注解呢?
- @Compinent:组件,标志一个普通的Spring bena类
- @Controller:控制器组件
- @service:业务层组件
- @Repository:数据层组件
- 通过以上的注解,都可以将普通的java类标志成为一个bean,交给Spring的容器管理
- 注解的默认ID:类名小写
- @Autowire:自动装配
- @Resoource:按名称装配,如果没有相同名称,则按类型
- @Value:基本属性赋值
- @Qualifler:根据指定的名称装配
- @Configuration:将本来作为bean的管理
- @ComponenScan:配置要扫描的包,可以实现零配置
基于注解的分层

以上是一个标准的web分层应用,servlet、dao、servlet以及对应的实现类,都有了,那么接下来我们就通过注解实现分层解耦
Dao层
public interface UserDao {
	public void login();
}

//@Repository就是基于数据层的注解

@Repository
public class UserDaoImpl implements UserDao{

	@Override
	public void login() {
		// TODO 自动生成的方法存根
		System.out.println("Dao层");
	}

}
service层
public interface UserSever {
	public void login();
}

//@Service是基于业务层,@Autowired是自动装配bean

	@Service
public class UserSeverImpl implements UserSever{

	@Autowired
	UserDao userDao;

	@Override
	public void login() {
		// TODO 自动生成的方法存根
		System.out.println("Sever层");
		userDao.login();
	}

}
servlet层
//@Controller基于控制器

@Controller
public class UserSevlet {

	@Autowired
	UserSever userSever;

	public void login() {
		System.out.println("Sevlet层");
		userSever.login();
	}
}
测试类(1)
@Configuration
@ComponentScan(basePackages="login")
public class Text01 {

	public Text01() {
		System.out.println("Spring初始化");
	}

	public static void main(String[] args) {

		ApplicationContext ac=new AnnotationConfigApplicationContext(Text01.class);
		//通过ID拿到bean

		UserSevlet userSevlet=(UserSevlet) ac.getBean("userSevlet");
		userSevlet.login();
	}
}
- 这个测试类,是基于@Configuration以及@ComponentScan(basePackages=“login”)实现的零配置
- 通过ApplicationContext ac=new AnnotationConfigApplicationContext(Text01.class);
获取到ApplicationContext,然后来使用bean
测试类(2)
public class Text01 {
public Text01() {
	System.out.println("Spring初始化");
}

public static void main(String[] args) {


	ApplicationContext ac = new ClassPathXmlApplicationContext("applicationContext.xml");

	UserSevlet userSevlet=(UserSevlet) ac.getBean("userSevlet");
	userSevlet.login();
}
}
配置文件
<?xml version="1.0" encoding="UTF-8"?>

<beans xmlns="http://www.springframework.org/schema/beans"
       xmlns:xsi="http://www.w3.org/2001/XMLSchema-instance" xmlns:aop="http://www.springframework.org/schema/aop"
       xmlns:tx="http://www.springframework.org/schema/tx" xmlns:context="http://www.springframework.org/schema/context"
       xmlns:mvc="http://www.springframework.org/schema/mvc" xmlns:task="http://www.springframework.org/schema/task"
       xsi:schemaLocation="
        http://www.springframework.org/schema/beans
        http://www.springframework.org/schema/beans/spring-beans-3.1.xsd
        http://www.springframework.org/schema/tx
        http://www.springframework.org/schema/tx/spring-tx-3.1.xsd
        http://www.springframework.org/schema/aop
        http://www.springframework.org/schema/aop/spring-aop-3.1.xsd
        http://www.springframework.org/schema/context
        http://www.springframework.org/schema/context/spring-context-3.1.xsd
        http://www.springframework.org/schema/mvc
        http://www.springframework.org/schema/mvc/spring-mvc-3.1.xsd
        http://www.springframework.org/schema/task
        http://www.springframework.org/schema/task/spring-task-3.1.xsd">

   <context:component-scan base-package="login"></context:component-scan>


</beans>
- 这个测试类,就是通过扫描包实现的,相对而言比前面那个测试类多写一个配置文件
运行结果
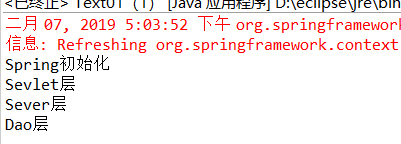
总结
- 我们通过注解成功的实现了bean的装配以及使用
- 这里我们需要注意,我们测试类中不能使用new出一个servlet。不然前面装配属性就不成立了