Part 4 App布局优化化
一 Android绘制原理及工具选择
1、绘制原理
硬件
CPU负责计算显示内容(视图的创建,布局计算,图片解码,文本绘制等)
GPU负责棚格化(UI元素绘制到屏幕上,也就是将一些组件,如button,bitmap拆分成不同的像素进行显示,然后完成绘制,比较耗时)
原则
16ms发出VSync信号触发UI渲染
大多数的Android设备屏幕刷新帧率:60Hz
2、优化工具
Systrace
关注Frames
正常:绿色圆点
丢帧:黄色或红色
Alerts栏(自动分析标注异常问题的条目)
参考文档
https://www.jianshu.com/p/f83d84dcd0b8 (Android Systrace使用介绍)
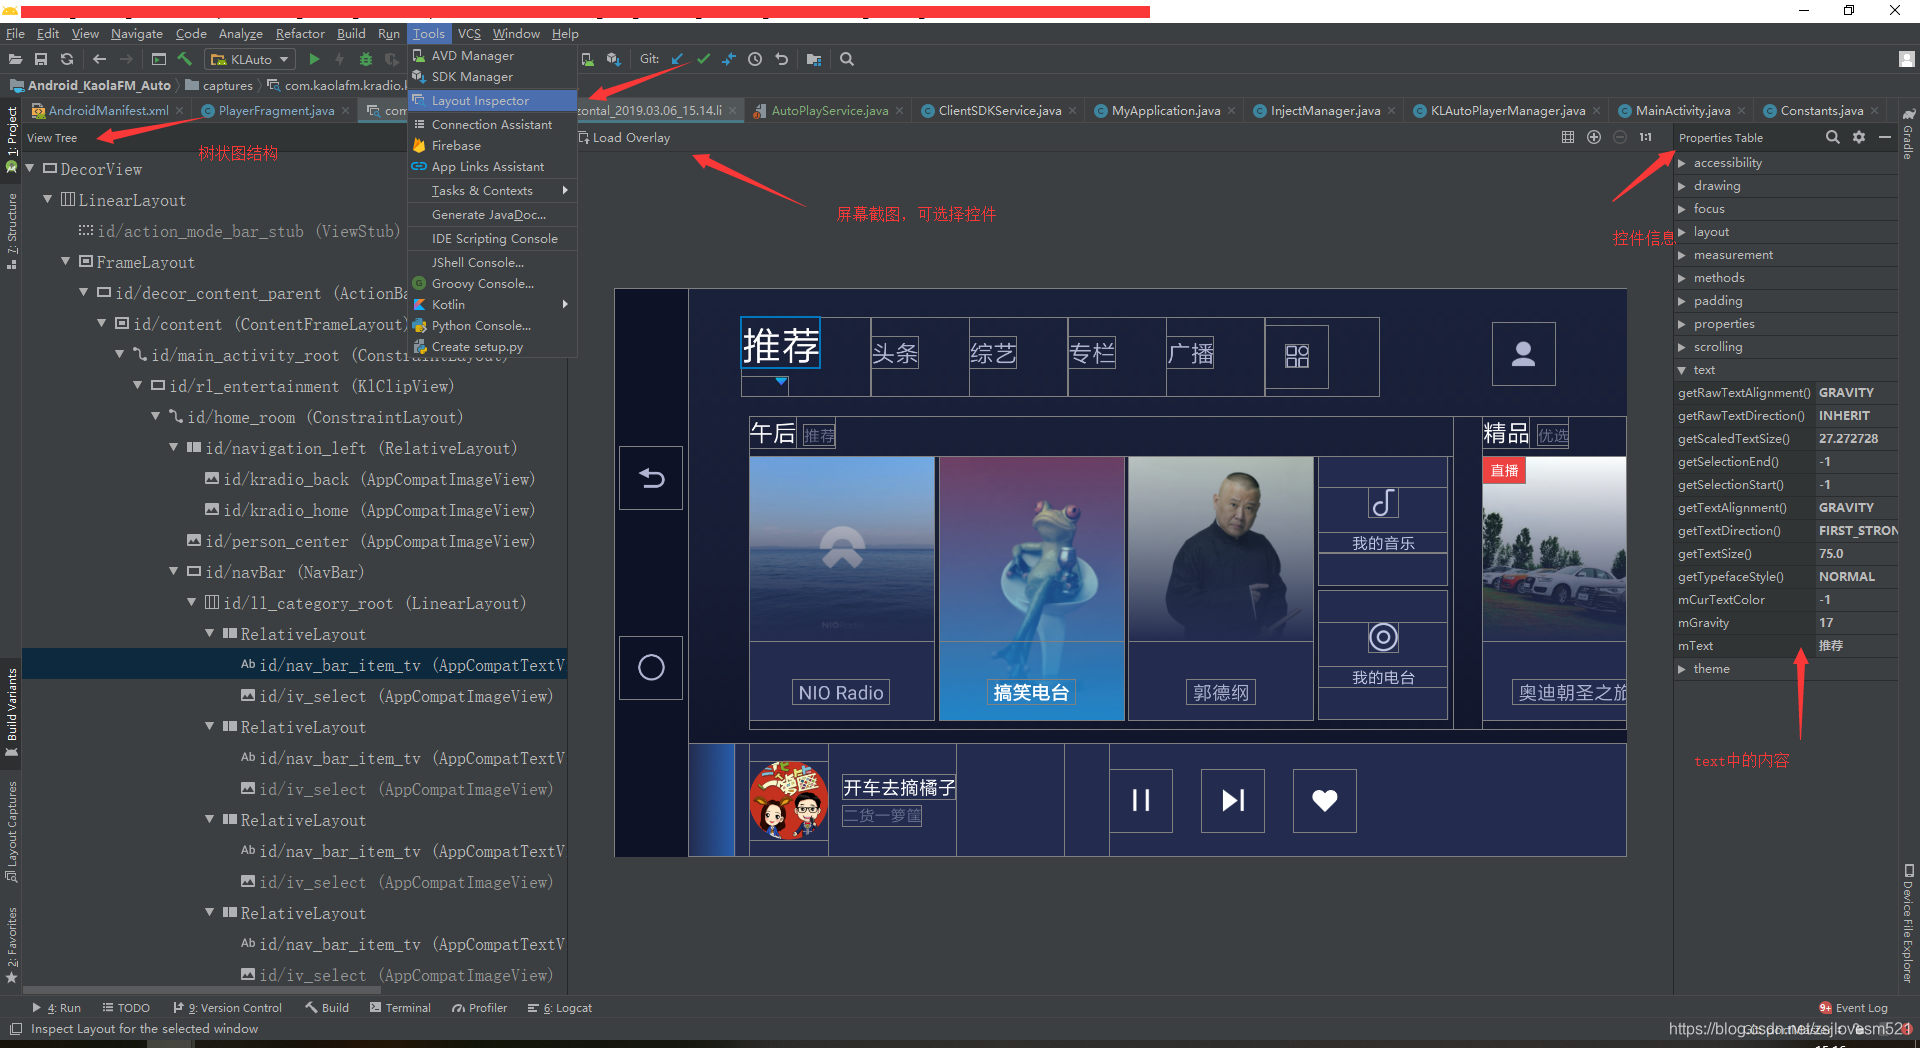
Layout Inspector
Choreographer
获取fps,线上使用,具备实时性
Api 16之后才可以使用
Choreographer.getInstance().postFrameCallback();
    private long mStartFrameTime = 0;
    private int mFrameCount = 0;
    private static final long MONITOR_INTERVAL = 160L; //单次计算FPS使用160毫秒
    private static final long MONITOR_INTERVAL_NANOS = MONITOR_INTERVAL * 1000L * 1000L;
    private static final long MAX_INTERVAL = 1000L; //设置计算fps的单位时间间隔1000ms,即fps/s;

 @TargetApi(Build.VERSION_CODES.JELLY_BEAN)
    private void getFPS() {
        if (Build.VERSION.SDK_INT < Build.VERSION_CODES.JELLY_BEAN) {
            return;
        }
        Choreographer.getInstance().postFrameCallback(new Choreographer.FrameCallback() {
            @Override
            public void doFrame(long frameTimeNanos) {
                if (mStartFrameTime == 0) {
                    mStartFrameTime = frameTimeNanos;
                }
                long interval = frameTimeNanos - mStartFrameTime;
                if (interval > MONITOR_INTERVAL_NANOS) {
                    double fps = (((double) (mFrameCount * 1000L * 1000L)) / interval) * MAX_INTERVAL;
                    Log.e("fps", "fps = " + fps);
                    mFrameCount = 0;
                    mStartFrameTime = 0;
                } else {
                    ++mFrameCount;
                }

                Choreographer.getInstance().postFrameCallback(this);
            }
        });
    }
二 Android布局加载原理
1、布局加载源码追踪
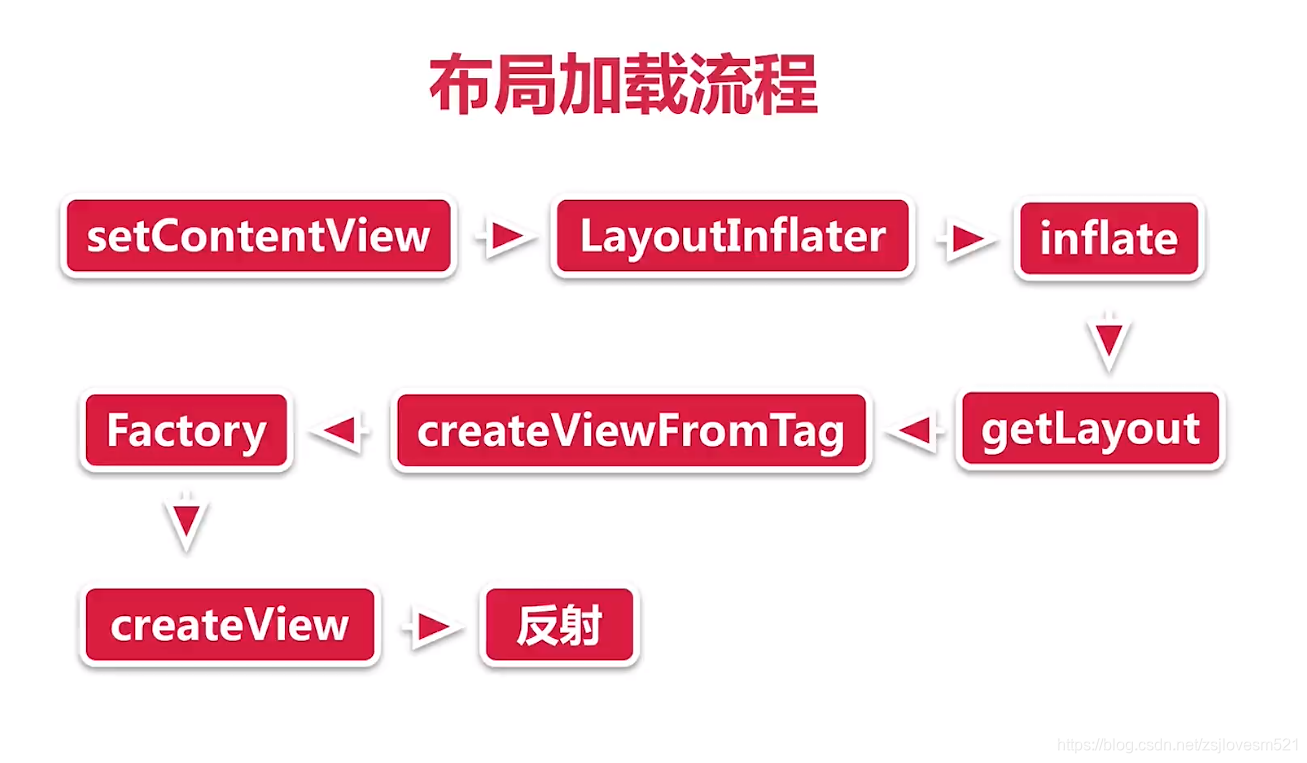
布局加载流程
/**
     * Low-level function for instantiating a view by name. This attempts to
     * instantiate a view class of the given <var>name</var> found in this
     * LayoutInflater's ClassLoader.
     *
     * <p>
     * There are two things that can happen in an error case: either the
     * exception describing the error will be thrown, or a null will be
     * returned. You must deal with both possibilities -- the former will happen
     * the first time createView() is called for a class of a particular name,
     * the latter every time there-after for that class name.
     *
     * @param name The full name of the class to be instantiated.
     * @param attrs The XML attributes supplied for this instance.
     *
     * @return View The newly instantiated view, or null.
     */
    public final View createView(String name, String prefix, AttributeSet attrs)
            throws ClassNotFoundException, InflateException {
        Constructor<? extends View> constructor = sConstructorMap.get(name);
        if (constructor != null && !verifyClassLoader(constructor)) {
            constructor = null;
            sConstructorMap.remove(name);
        }
        Class<? extends View> clazz = null;

        try {
            Trace.traceBegin(Trace.TRACE_TAG_VIEW, name);

            if (constructor == null) {
                // Class not found in the cache, see if it's real, and try to add it
                clazz = mContext.getClassLoader().loadClass(
                        prefix != null ? (prefix + name) : name).asSubclass(View.class);

                if (mFilter != null && clazz != null) {
                    boolean allowed = mFilter.onLoadClass(clazz);
                    if (!allowed) {
                        failNotAllowed(name, prefix, attrs);
                    }
                }
> > > > > > > > //这里使用到了反射
                constructor = clazz.getConstructor(mConstructorSignature);
                constructor.setAccessible(true);
                sConstructorMap.put(name, constructor);
            } else {
                // If we have a filter, apply it to cached constructor
                if (mFilter != null) {
                    // Have we seen this name before?
                    Boolean allowedState = mFilterMap.get(name);
                    if (allowedState == null) {
                        // New class -- remember whether it is allowed
                        clazz = mContext.getClassLoader().loadClass(
                                prefix != null ? (prefix + name) : name).asSubclass(View.class);

                        boolean allowed = clazz != null && mFilter.onLoadClass(clazz);
                        mFilterMap.put(name, allowed);
                        if (!allowed) {
                            failNotAllowed(name, prefix, attrs);
                        }
                    } else if (allowedState.equals(Boolean.FALSE)) {
                        failNotAllowed(name, prefix, attrs);
                    }
                }
            }

            Object[] args = mConstructorArgs;
            args[1] = attrs;

            final View view = constructor.newInstance(args);
            if (view instanceof ViewStub) {
                // Use the same context when inflating ViewStub later.
                final ViewStub viewStub = (ViewStub) view;
                viewStub.setLayoutInflater(cloneInContext((Context) args[0]));
            }
            return view;

        } catch (NoSuchMethodException e) {
            final InflateException ie = new InflateException(attrs.getPositionDescription()
                    + ": Error inflating class " + (prefix != null ? (prefix + name) : name), e);
            ie.setStackTrace(EMPTY_STACK_TRACE);
            throw ie;

        } catch (ClassCastException e) {
            // If loaded class is not a View subclass
            final InflateException ie = new InflateException(attrs.getPositionDescription()
                    + ": Class is not a View " + (prefix != null ? (prefix + name) : name), e);
            ie.setStackTrace(EMPTY_STACK_TRACE);
            throw ie;
        } catch (ClassNotFoundException e) {
            // If loadClass fails, we should propagate the exception.
            throw e;
        } catch (Exception e) {
            final InflateException ie = new InflateException(
                    attrs.getPositionDescription() + ": Error inflating class "
                            + (clazz == null ? "<unknown>" : clazz.getName()), e);
            ie.setStackTrace(EMPTY_STACK_TRACE);
            throw ie;
        } finally {
            Trace.traceEnd(Trace.TRACE_TAG_VIEW);
        }
    }
性能瓶颈
布局文件的解析:是通过XmlResourceParser进行的,属于IO操作
创建view对象:使用了反射
LayoutInflater.Factory
LayoutInflater创建view的一个Hook(挂钩)
定制创建view的过程:例如全局替换自定义Textview等
2、LayoutInflater.Factory介绍
LayoutInflater包含Factory和Factory2两个
Factory和Factory2:Factory2继承自Factory,并且多了一个参数parent
四 优雅获取界面布局耗时
1、常规方式
背景:获取每个界面加载耗时
实现:覆写方法、手动埋点
2、AOP/ArtHook实现
Aop实现:
//切面点:Activity的setContentView
    @Around("execution(* android.app.Activity.setContentView(..))")
    public void getSetContentViewTime(ProceedingJoinPoint joinPoint) {
        Signature signature = joinPoint.getSignature();
        String name = signature.toShortString();
        long time = System.currentTimeMillis();
        try {
            joinPoint.proceed();
        } catch (Throwable throwable) {
            throwable.printStackTrace();
        }
        LogUtils.i(name + " cost " + (System.currentTimeMillis() - time));
    }
ArtHook实现:
参考 part3中第六部分的ARTHook优雅检测不合理图片的实现方式。
3、获取任一控件的耗时
低侵入性、使用LayoutInflater.Factory
        //带有Compat表示的是兼容类,一般都有比较好的兼容性
        LayoutInflaterCompat.setFactory2(getLayoutInflater(), new LayoutInflater.Factory2() {
            @Override
            public View onCreateView(View parent, String name, Context context, AttributeSet attrs) {
                //替换示例:将布局中的某一个控件替换成我们自定义的控件(如Textview)伪代码如下
                if (TextUtils.equals(name, "TextView")) {
                    // 生成自定义TextView,然后将Textview return回去
                }

                //每个控件的耗时    可以将此方法放入base类onCreate中  必须在super.onCreate(savedInstanceState)之前设置才有效
                long time = System.currentTimeMillis();
                View view = getDelegate().createView(parent, name, context, attrs);
                LogUtils.i(name + " cost " + (System.currentTimeMillis() - time));
                return view;
            }

            @Override
            public View onCreateView(String name, Context context, AttributeSet attrs) {
                return null;
            }
        });

五 异步Inflate实战
1、背景
布局文件读取慢:是一个IO过程
创建View过程慢:反射(比new慢3倍)
思路介绍
根本性解决:不用反射,不用IO
侧面缓解:主线程不耗时,使用异步的方式
2、AsyncLayoutInflater实战
google提供的类(简称异步Inflate)
在WorkThread加载布局(原生的是在MainThread加载)
加载完成回调至主线程
节约主线程的时间
AsyncLayoutInflater的使用
implementation ‘com.android.support:asynclayoutinflater:28.0.0-alpha1’
        new AsyncLayoutInflater(this).inflate(layoutId, null, new AsyncLayoutInflater.OnInflateFinishedListener() {
            @Override
            public void onInflateFinished(@NonNull View view, int resid, @Nullable ViewGroup parent) {
                setContentView(view);
                overridePendingTransition(R.anim.enter_default_transition_animation, 0);
                initData();
                mPresenter = createPresenter();
                initView(savedInstanceState);
            }
        });
总结:
侧面缓解卡顿
使用了AsyncLayoutInflater就失去了向下兼容的特性,不能设置 LayoutInflater.Factory(自定义解决)
注意view中不能有依赖主线程的操作
参考文章:
https://www.jianshu.com/p/f0c0eda06ae4 (Android AsyncLayoutInflater 限制及改进)
https://blog.csdn.net/theone10211024/article/details/52781079 (AsyncLayoutInflater的简单介绍和源码分析)
六 布局加载优化实战
1、背景介绍
问题
IO操作、反射
AsyncLayoutInflater只是缓解
办法
java代码写布局:本质上解决了xml上的性能问题,但是不便于开发、可维护性差
2、X2C
X2C介绍:
保留xml优点,解决性能问题(开发人员写xml,加载java代码),原理:通过APT编译期翻译xml为java代码
x2c使用:
依赖:
annotationProcessor 'com.zhangyue.we:x2c-apt:1.1.2'
implementation 'com.zhangyue.we:x2c-lib:1.0.6'

使用方式:
@Xml(layouts = "activity_main")//添加Xml注解标明使用布局
public class MainActivity extends AppCompatActivity {

    @Override
    protected void onCreate(Bundle savedInstanceState) {
        setTheme(R.style.AppTheme);
        super.onCreate(savedInstanceState);
//        setContentView(R.layout.activity_main);
        //使用X2C.setContentView,传入上下文和布局文件
        X2C.setContentView(MainActivity.this, R.layout.activity_main);
    }
}
x2c问题:
部分属性Java不支持
失去了系统的兼容(AppCompat)如:TextView、ImageView系统在高版本向低版本有兼容。解决办法:修改x2c源码,如发现是TextView直接new AppCompatTextView。
参考文档:https://github.com/iReaderAndroid/X2C (github项目源码)
七 视图绘制优化实战
1、优化布局层级及复杂度
布局绘制回顾:
测量:确定大小(遍历视图树,确认viewgroup和view元素的大小)
布局:确定位置(遍历视图树,每个viewgroup根据测量阶段的大小确认自己的位置)
绘制:绘制视图(视图树中的每个对象都会创建一个canvas对象,向GPU发送绘制命令)
性能瓶颈:
每个阶段耗时
自顶向下的遍历
触发多次(如嵌套RelativeLayout)
减少布局层级和复杂度:
准则:减少view树层级、宽而浅,避免窄而深
ConstraintLayout:实现几乎完全扁平化布局、构建复杂布局性能更高、具有RelativeLayout和LinearLayout特性
其他:不嵌套使用elativeLayout、不在嵌套LinearLayout中使用weight、merge标签可减少一个层级(只能用于根view)
2、避免过度绘制
一个像素最好只被绘制一次、调试GPU过度绘制、蓝色可接受
方法:
去掉多余背景色,减少复杂shape使用
避免层级叠加(控件不要重叠)
自定义view使用clipRect屏蔽被遮盖View绘制
    //自定义view的onDraw优化方法
    /**
     * Custom implementation to do drawing in this view. Waits for the AsyncTasks to fetch
     * bitmaps for each Droid and populate mDroidCards, a list of DroidCard objects. Then, draws
     * overlapping droid cards.
     */
    protected void onDraw(Canvas canvas) {
        super.onDraw(canvas);

        // Don't draw anything until all the Asynctasks are done and all the DroidCards are ready.
        if (mDroids.length > 0 && mDroidCards.size() == mDroids.length) {
            // Loop over all the droids, except the last one.
            int i;
            for (i = 0; i < mDroidCards.size() - 1; i++) {

                mCardLeft = i * mCardSpacing;
                canvas.save();
                // 指定绘制区域

                canvas.clipRect(mCardLeft,0,mCardLeft+mCardSpacing,mDroidCards.get(i).getHeight());

                // Draw the card. Only the parts of the card that lie within the bounds defined by
                // the clipRect() get drawn.
                drawDroidCard(canvas, mDroidCards.get(i), mCardLeft, 0);

                canvas.restore();
            }

            // Draw the final card. This one doesn't get clipped.
            drawDroidCard(canvas, mDroidCards.get(mDroidCards.size() - 1),
                    mCardLeft + mCardSpacing, 0);
        }

        // Invalidate the whole view. Doing this calls onDraw() if the view is visible.
        invalidate();
    }

3、其他
ViewStub:高效占位符、延迟初始化(没有测量和布局的过程)
onDraw中避免:创建大量对象、耗时操作
TextView优化:参考文档:https://blog.csdn.net/self_study/article/details/42297573 (android textview settext卡顿深层次原因)