类属性隐藏的问题
默认情况是可从外部访问对象的属性如c.name,但违背封装的原则
如果set_name()不光会修改name还会向管理员发送邮件,那么c.name就什么都不发生
可以将属性设为私有,使属性不能从对象外部访问,而只能通过存取器方法如get_name访问。py不直接支持私有属性,但在其名称下使用两个下划线。
幕后:对以两下划线打头的名称进行转换,即在开头加上一个下划线和类名
Secretive._Secretive__inaccessible
只要知道这种幕后处理方法,也能从类外访问私有方法
总之,无法禁止别人访问对象的私有方法和属性,但双下划线可以起到提示的作用
封装与多态的区别
封装让你无需知道对象的构造就能使用
多态让你无需知道对象所属的类就能调用其方法
正则匹配
e.g.要匹配python, perl
- ‘python|perl’
- ‘p(ython|erl)’
e.g. 在子模式后加上问号,就成为可选项
r’(http://)?(www.)?python.org’
‘http://www.python.org’, ‘http://python.org’, ‘www.python.org’, ‘python.org’
?是出现一次或零次,*号重复0次或多次,+重复1次或多次
e.g. group()
import re
a = "123abc456" print re.search("([0-9]*)([a-z]*)([0-9]*)",a).group(0) #123abc456,返回整体
print re.search("([0-9]*)([a-z]*)([0-9]*)",a).group(1) #123
print re.search("([0-9]*)([a-z]*)([0-9]*)",a).group(2) #abc
print re.search("([0-9]*)([a-z]*)([0-9]*)",a).group(3) #456
‘There (was a (wee) (cooper)) who (lived in Fyfe)
0 There was a wee cooper who lived in Fyfe
1 was a wee cooper
2 wee
3 cooper
4 lived in Fyfe配置文件的用法
配置文件 configparser module
文件由块组成,每个块包含带值的键
读取配置文件基本步骤:
import configparser
cfg_file = os.path.join(‘cfg.ini’)
cfg_parser = configparser.ConfigParser()
cfg_parser.read(cfg_file) # 把配置文件读进去
trainer_cl = cfg_parser.get(‘trainer’, ‘trainer_cl’) # 读取特定值
config解析器不会猜测配置文件中的值的数据类型,始终将它们作为字符串存储在内部。这意味着如果你需要其他数据类型,自己转换:
config解析器提供方法 getxxx来获取键对应的值
# example.ini
[DEFAULT]
ServerAliveInterval = 45
Compression = yes
CompressionLevel = 9
ForwardX11 = yes
[bitbucket.org]
User = hg
[topsecret.server.com]
Port = 50022
ForwardX11 = no
从文件中读取和查看
>>> import configparser
>>> config = configparser.ConfigParser()
>>> config.read('example.ini')
['example.ini']
>>> config.sections()
['bitbucket.org', 'topsecret.server.com'] #没有default section
>>> 'bitbucket.org' in config
True
>>> config['bitbucket.org']['User']
'hg'
>>> config['DEFAULT']['Compression']
'yes'
>>> topsecret = config['topsecret.server.com'] # 别名
>>> topsecret['ForwardX11']
'no'
>>> topsecret['Port']
'50022'
>>> for key in config['bitbucket.org']: print(key)
...
user #剩下4个是default,default是每个section都默认带有
compressionlevel
serveraliveinterval
compression
forwardx11
>>> config['bitbucket.org']['ForwardX11'] # bitbucket包含default的4个
'yes'
自定义命令参数基本步骤
1. 创建解析器: parser = argparser.ArgumentParser(description='xxx')
2. 添加参数: add_argument(name of flags...[, action][, nargs][, const][, default][, type][, choices][, required][, help][, metavar][, dest])
dest: 将命令行参数解析到指定的属性
>>>parser.add_argument(‘-file’, dest=’run_type’)
>>>args = parser.parse_args()
>>>print(“read in %s”%(args.run_type)
$python test.py --file import
read in import
parse.add_argument('-a', '--abc', help='a sourcedir', nargs='?')
print(args.abc)
print(args.a) // error
# 运行时使用python demo.py -a abc
# 或者使用python demo.py --abc abc(使用的是两个短横)
# 参数的前面可以添加‘-’,也可以添加‘--’。说明添加的参数可以用简写也可以用全称来标明。但是解析的时候必须用全称。
3.解析参数: parse_args(),将参数字符串转成对象,并将这些对象填充到Namespace并返回。默认情况,参数字符串取自sys.argv
import argparse
arg_parser = argparse.ArgumentParser()
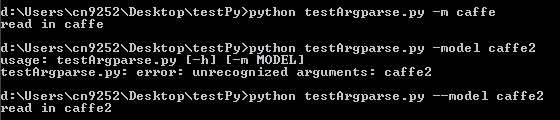
arg_parser.add_argument(‘-m’, dest=’model’)
arg_parser.add_argument(‘-n’, ‘--n’, default=None)
args = arg_parser.parser_args()
model = args.model # string format
target_nn = args.nn函数作用域嵌套
def multiplier(factor):
    def multiplyByFactor(number):
        return number * factor
return multiplyByFactor外面的函数return里面的函数,不是call
call means receive the result of the function, while return the function itself means it needs another argument.
>>>double = multiplier(2)
>>>double(5)
10
>>>multiplier(5)(4)
20
如果是call function的方式
def multiplier(factor):
    def multiplyByFactor(number=5):
        return number * factor
    return multiplyByFactor()

# >>>multiplier(3)
# 15
# >>>multiplier(3)(6)  # error
将某文件内容里的相对路径, 改为绝对路径 参考handle_dataset函数
list, dict相当于全局变量,一处改变,全局影响
py程序中途退出调试
sys.exit(0/1) 0: normal, 1:abnormal
python进到指定的夹子下面运行程序
os.chdir()先切换
os.system()再运行
append和extend的区别
a = list()
b = ['a', 'b']
a.append(b)
# a = [['a', 'b']]
len(a)
# 1

c = list()
d = ['a', 'b']
c.extend(d)
# c = ['a', 'b']
len(c)
# 2