swagger是一款流行的restful api展示和测试的插件,本文讲述springboot如何整合swagger。
1、环境约束
- win10 64位操作系统
- idea2018.1.5
- maven-3.0.5
- jdk-8u162-windows-x64
2、前提约束
- 完成springboot创建web项目 https://www.jianshu.com/p/de979f53ad80
注意:笔者创建项目的时候约束的包前缀是net.wanho.springboot,读者可以自行创建包名,只是要注意本文中的代码也要修改包名
3、修改pom.xml
在dependencies标签中加入以下依赖:
        <dependency>
            <groupId>io.springfox</groupId>
            <artifactId>springfox-swagger-ui</artifactId>
            <version>2.4.0</version>
        </dependency>
        <dependency>
            <groupId>io.springfox</groupId>
            <artifactId>springfox-swagger2</artifactId>
            <version>2.4.0</version>
        </dependency>
        <dependency>
            <groupId>com.alibaba</groupId>
            <artifactId>fastjson</artifactId>
            <version>1.2.47</version>
        </dependency>
4、在主启动类同等包下面创建pojo、controller、system三个package
在pojo下面加入User.java
package net.wanho.springboot.pojo;

public class User {

    private int id;
    private String name;

    public User(String name) {
        this.name = name;
    }

    public User(int id, String name) {
        this.id = id;
        this.name = name;
    }

    public User() {
    }

    public String getName() {
        return name;
    }

    public void setName(String name) {
        this.name = name;
    }

    public int getId() {
        return id;
    }

    public void setId(int id) {
        this.id = id;
    }
}
在controller下面加入UserController.java
package net.wanho.springboot.controller;


import com.alibaba.fastjson.JSONObject;
import net.wanho.springboot.pojo.User;
import org.springframework.web.bind.annotation.PathVariable;
import org.springframework.web.bind.annotation.RequestMapping;
import org.springframework.web.bind.annotation.RequestMethod;
import org.springframework.web.bind.annotation.RestController;


/**
创建restful形式的crud接口,swagger只关注controller层的请求和响应,
因此,本文中响应数据是固定的,没有去查数据库,也就没有service层
**/
@RestController
@RequestMapping("/user")
public class UserController {

    @RequestMapping(value = "/{name}",method = RequestMethod.POST)
    public JSONObject insert(@PathVariable("name") String name)
    {
        JSONObject jsonObject = new JSONObject();
        jsonObject.put("status",200);
        jsonObject.put("msg","insert");
        return jsonObject;
    }

    @RequestMapping(value = "/{id}",method = RequestMethod.DELETE)
    public JSONObject delete(@PathVariable("id") int id)
    {
        JSONObject jsonObject = new JSONObject();
        jsonObject.put("status",200);
        jsonObject.put("msg","delete "+id);
        return jsonObject;
    }

    @RequestMapping(value = "/{id}/{name}",method = RequestMethod.PUT)
    public JSONObject update(@PathVariable("id") int id,@PathVariable("name") String name)
    {
        JSONObject jsonObject = new JSONObject();
        jsonObject.put("status",200);
        jsonObject.put("msg","update");
        return jsonObject;
    }

    @RequestMapping(value = "/{id}",method = RequestMethod.GET)
    public JSONObject get(@PathVariable("id") int id)
    {
        JSONObject jsonObject = new JSONObject();
        jsonObject.put("status",200);
        jsonObject.put("msg","get");
        return jsonObject;
    }

}
在system下加入Swagger2.java
package net.wanho.springboot.system;

//swagger2的配置文件,在项目的启动类的同级文件建立

import org.springframework.context.annotation.Bean;
import org.springframework.context.annotation.Configuration;
import springfox.documentation.builders.ApiInfoBuilder;
import springfox.documentation.builders.PathSelectors;
import springfox.documentation.builders.RequestHandlerSelectors;
import springfox.documentation.service.ApiInfo;
import springfox.documentation.service.Contact;
import springfox.documentation.spi.DocumentationType;
import springfox.documentation.spring.web.plugins.Docket;
import springfox.documentation.swagger2.annotations.EnableSwagger2;

@Configuration
@EnableSwagger2
public class Swagger2 {
    //swagger2的配置文件,这里可以配置swagger2的一些基本的内容,比如扫描的包等等
    @Bean
    public Docket createRestApi() {
        return new Docket(DocumentationType.SWAGGER_2)
                .apiInfo(apiInfo())
                .select()
                //为当前包路径
                .apis(RequestHandlerSelectors.basePackage("net.wanho.springboot.controller"))
                .paths(PathSelectors.any())
                .build();
    }
    //构建 api文档的详细信息函数,注意这里的注解引用的是哪个
    private ApiInfo apiInfo() {
        return new ApiInfoBuilder()
                //页面标题
                .title("Spring Boot 测试使用 Swagger2 构建RESTful API")
                //创建人
                .contact(new Contact("zhangli", "wh1993.net", "[email protected]"))
                //版本号
                .version("1.0")
                //描述
                .description("API 描述")
                .build();
    }
}
5、修改application.yml【作用等价于application.properties】
spring:
  mvc:
    static-path-pattern: /**
  resources:
    static-locations: classpath:/META-INF/resources/
6、启动和测试
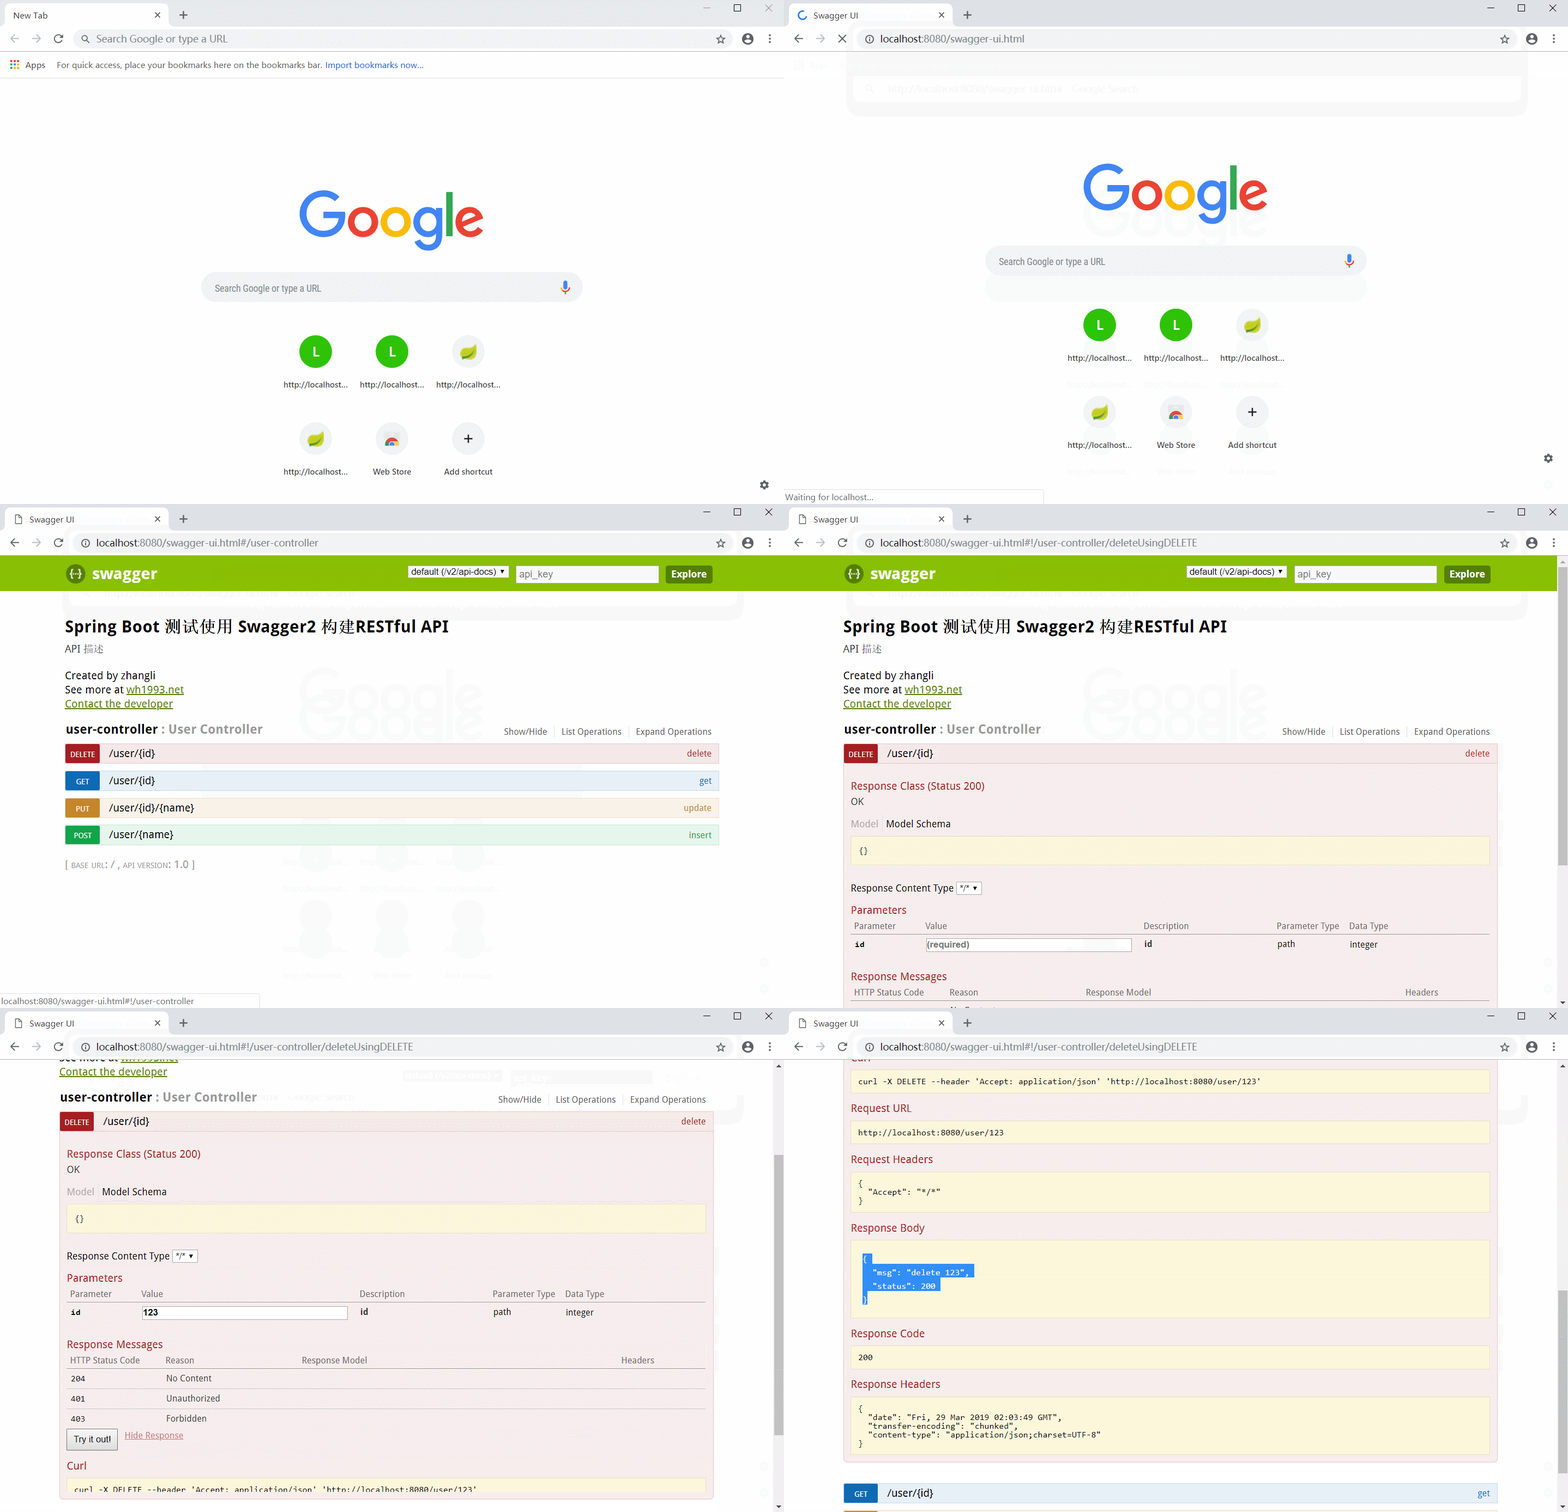
打开浏览器,输入http://localhost:8080/swagger-ui.html,具体操作如下:

至此,我们完成了springboot与swagger的整合,并做了测试。