版权声明:尊重原创,码字不易,转载需博主同意。 https://blog.csdn.net/qq_34626097/article/details/89249210
缓冲区(Buffer)
- 缓冲区(Buffer):一个用于特定基本数据类型的容器。由java.nio包定义的,所有缓冲区都是Buffer抽象类的子类。
- Java NIO 中的Buffer主要用于与NIO通道进行交互,数据是从通道读入缓冲区,从缓冲区写入通道中的。
- Buffer 就像一个数组,可以保存多个相同类型的数据。根据数据类型不同(boolean除外),有以下Buffer常用子类:
- ByteBuffer
- CharBuffer
- ShortBuffer
- IntBuffer
- LongBuffer
- FloatBuffer
- DoubleBuffer
上述Buffer类他们都采用相似的方法进行管理数据,只是各自管理的数据类型不同而已。都是通过如下方法获取一个Buffer对象:
static XxxBuffer allocate(int capacity) : 创建一个容量为capacity的XxxBuffer对象
缓冲区的基本属性 Buffer 中的重要概念
- 容量(capacity): 表示Buffer的最大数据容量,缓冲区容量不能为负,并且创建后不能更改。
- 限制(limit): 第一个不应该读取或写入的数据的索引,即位于limit后的数据不可读写。缓冲区的限制不能为负,并且不能大于其容量。
- 位置(position): 下一个要读或写入的数据的索引。缓冲区的位置不能为负,并不能大于其限制。
- 标记(mark)与重置(reset) : 标记是一个索引,通过Buffer中的mark( )方法指定Buffer中一个特定的position,之后可以通过调用reset( ) 方法恢复到这个position。
注: 标记、位置、限制、容量遵守以下不变式:0<=mark<=position<=limit<=capacity

Buffer的常用方法
| 方法 | 描述 |
|---|---|
| Buffer clear( ) | 清空缓冲区并返回对缓冲区的引用 |
| Buffer flip( ) | 缓冲区的界限设置为当前位置,并将当前位置充值为0 |
| int capacity( ) | 返回Buffer的capacity 大小 |
| boolean hasRemaining( ) | 判断缓冲区中是否还有元素 |
| int limit( ) | 返回Buffer的界限(limit)的位置 |
| Buffer limit( int n) | 将设置缓冲区的界限为n,并返回一个具有新limit的缓冲区对象 |
| Buffer mark( ) | 对缓冲区设置标记 |
| int position( int n ) | 将设置缓冲区的当前位置为n,并返回修改后的Buffer对像 |
| int remaining() | 返回position和limit之间的元素个数 |
| Buffer reset( ) | 将位置position转到以前设置 mark 所在的位置 |
| Buffer rewind( ) | 将位置设置为0,取消设置的mark |
缓冲区的数据操作
- Buffer 所有子类提供了两个用于数据操作的方法:get( ) 与 put( ) 方法
- 获取 Buffer 中的数据
get( ) : 读取单个字节
get( byte[] dst) : 批量读取多个字节到dst中
get( int index) : 读取指定索引位置的字节(不会移动position) - 放入 数据到 Buffer 中
put(byte b ) : 将给定单个字节写入缓冲区的当前位置
put(byte [] src) : 将src中的字节写入缓冲区中的当前位置
put(int index,byte b ) : 将指定的字节写入缓冲区的索引位置( 不会移动position )
- 获取 Buffer 中的数据
demo
	@Test
	public void test1() {
		String str = "12345";

		//1. 分配一个指定大小缓冲区
		ByteBuffer buf = ByteBuffer.allocate(1024);

		System.out.println("-------allocte()---------");
		System.out.println(buf.position());
		System.out.println(buf.limit());
		System.out.println(buf.capacity());

		//2. 使用put() 存入数据到缓冲区中
		buf.put(str.getBytes());

		System.out.println("-------put()---------");
		System.out.println(buf.position());
		System.out.println(buf.limit());
		System.out.println(buf.capacity());

		//3.切换成读取数据模式
		buf.flip();
		System.out.println("-------filp()---------");
		System.out.println(buf.position());
		System.out.println(buf.limit());
		System.out.println(buf.capacity());

		//4. 使用get() 读取缓冲区的数据
		System.out.println("-------get()---------");
		byte [] dst = new byte[buf.limit()];
		buf.get(dst);
		System.out.println(new String(dst,0,dst.length));
		System.out.println(buf.position());
		System.out.println(buf.limit());
		System.out.println(buf.capacity());

		//5. rewind() :可重复读数据
		buf.rewind();
		System.out.println("-------rewind()---------");
		System.out.println(buf.position());
		System.out.println(buf.limit());
		System.out.println(buf.capacity());

		//6. clear(): 清空缓冲区,但是缓冲区的数据依然存在,但是出于“被遗忘”状态,因为不知道爱limit为多少
		buf.clear();
		System.out.println("-------clear()---------");
		System.out.println(buf.position());
		System.out.println(buf.limit());
		System.out.println(buf.capacity());

		System.out.println((char)buf.get());
	}

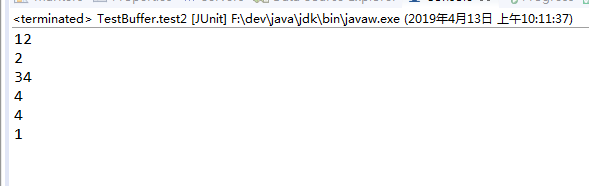
	@Test
	public void test2() {

		String str = "12345";

		ByteBuffer buf = ByteBuffer.allocate(1024);

		buf.put(str.getBytes());

		buf.flip();

		byte[] dst = new byte[buf.limit()];
		buf.get(dst,0,2);
		System.out.println(new String(dst,0,2));

		System.out.println(buf.position());

		//mark() : 标记

		buf.mark();
		buf.get(dst, 2, 2);
		System.out.println(new String(dst,2,2));
		System.out.println(buf.position());

		//reset() : 恢复到mark的位置
		System.out.println(buf.position());

		//判断缓冲区中是否还有剩余数据
		if(buf.hasRemaining()) {

			//获取缓冲区可以操作的数据的数量
			System.out.println(buf.remaining());
		}
	}