版权声明:作者:星云 交流即分享,分享才能进步!喜欢我的文章,可在博客左侧扫码赞赏~ https://blog.csdn.net/hadues/article/details/89420502
Swagger 是个什么东东呢?
我们都知道一个项目,良好的API 文档是非常重要的,而Swagger 这个类库可以通过注解的方式帮助我们快速生成API 文档。
Swagger 官网:https://swagger.io/
Swagger GitHub Page: http://springfox.github.io/springfox/
这篇博文讲解Spring Boot 2.x 和Swagger集成。
1.pom.xml 中添加依赖
首先我们需要在pom.xml 中引入Swagger 的两个依赖
      <!--http://springfox.github.io/springfox/ -->
        <!-- https://mvnrepository.com/artifact/io.springfox/springfox-swagger2 -->
        <!-- Swagger 一个描述API的json文件,而这个组件的功能就是帮助我们自动生成这个json文件 -->
        <dependency>
            <groupId>io.springfox</groupId>
            <artifactId>springfox-swagger2</artifactId>
            <version>2.7.0</version>
        </dependency>
        <!-- https://mvnrepository.com/artifact/io.springfox/springfox-swagger-ui -->
        <!-- Swagger 就是将这个json文件解析出来,用一种更友好的方式呈现出来 -->
        <dependency>
            <groupId>io.springfox</groupId>
            <artifactId>springfox-swagger-ui</artifactId>
            <version>2.7.0</version>
        </dependency>
2. 启用Swagger功能和进行配置
在一个配置类中使用@EnableSwagger2注解启用Swagger功能
继承自WebMvcConfigurationSupport重写静态资源过滤方法
配置Swagger 文档基础信息
SwaggerConfig.java
package com.xingyun.springbootwithswaggersample.config;
import org.springframework.context.annotation.Bean;
import org.springframework.context.annotation.Configuration;
import org.springframework.web.servlet.config.annotation.ResourceHandlerRegistry;
import org.springframework.web.servlet.config.annotation.WebMvcConfigurationSupport;
import springfox.documentation.builders.ApiInfoBuilder;
import springfox.documentation.builders.PathSelectors;
import springfox.documentation.builders.RequestHandlerSelectors;
import springfox.documentation.service.ApiInfo;
import springfox.documentation.service.Contact;
import springfox.documentation.spi.DocumentationType;
import springfox.documentation.spring.web.plugins.Docket;
import springfox.documentation.swagger2.annotations.EnableSwagger2;
/**
* Swagger 官网: https://swagger.io/
* **/
@EnableSwagger2
@Configuration
public class SwaggerConfig extends WebMvcConfigurationSupport {
//构建 api文档的详细信息函数,注意这里的注解引用的是哪个
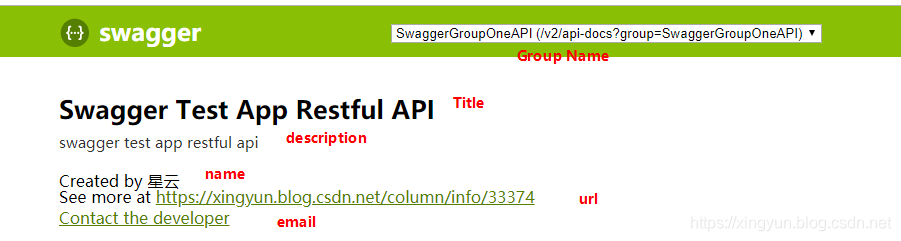
private ApiInfo apiInfo() {
return new ApiInfoBuilder()
.title("Swagger Test App Restful API")
.description("swagger test app restful api")
.termsOfServiceUrl("http://127.0.0.1:8080")
.contact(new Contact("星云","https://xingyun.blog.csdn.net/column/info/33374","[email protected]"))
.version("1.0")
.build();
}
/**
* API分组一
* **/
@Bean
public Docket createRestApi() {
return new Docket(DocumentationType.SWAGGER_2)
.apiInfo(apiInfo())
.groupName("SwaggerGroupOneAPI")
.select()
.apis(RequestHandlerSelectors.basePackage("com.xingyun"))
.paths(PathSelectors.any())
.build();
}
// /**
// * API分组二
// * **/
// @Bean
// public Docket createHomeInfoGroup2RestApi() {
// return new Docket(DocumentationType.SWAGGER_2)
// .apiInfo(apiInfo())
// .groupName("SwaggerGroupTwoAPI")
// .select()
// .apis(RequestHandlerSelectors.basePackage("com.xingyun"))
// .paths(PathSelectors.any())
// .build();
// }
@Override
public void addResourceHandlers(ResourceHandlerRegistry registry) {
registry.addResourceHandler("/static/**").addResourceLocations("classpath:/static/");
//Swagger 静态资源处理
registry.addResourceHandler("swagger-ui.html").addResourceLocations("classpath:/META-INF/resources/");
registry.addResourceHandler("/webjars/**").addResourceLocations("classpath:/META-INF/resources/webjars/");
}
}
值得注意的是:
.groupName(“SwaggerGroupOneAPI”)中间不可有空格,否则会报错。
3.忽略不想生成文档的接口
某些Controller 不需要生成API文档的接口,可以通过@ApiIgnore忽略掉
HomeController.java
package com.xingyun.springbootwithswaggersample.controller;

import org.springframework.web.bind.annotation.GetMapping;
import org.springframework.web.bind.annotation.RestController;
import springfox.documentation.annotations.ApiIgnore;

@RestController
public class HomeController {

    /**
     * @ApiIgnore 该注解表示忽略,不会被Swagger扫描解析成API 文档
     * ***/
    @ApiIgnore
    @GetMapping(value = "/")
    public String homePage(){
        return "Hello World";
    }
}
4. 业务实体类中脱敏注解
有时候一个实体类中可能有一些敏感的数据,比如密码,直接显示在API中会有安全性问题,因此可以使用注解过滤掉。
User.java
import io.swagger.annotations.ApiModelProperty;
import org.springframework.stereotype.Component;

import java.io.Serializable;

@Component
public class User implements Serializable {

    private String username;

    //该字段是敏感字段,因此设置隐藏
    @ApiModelProperty(hidden = true)
    private String password;

    private String token;

   // ... 省略 getter and setter

 }
5.文档的注解写法如下
接下来编写API信息
实现上的效果就使用下面代码中的注解:
package com.xingyun.springbootwithswaggersample.controller;
import com.xingyun.springbootwithswaggersample.model.User;
import io.swagger.annotations.Api;
import io.swagger.annotations.ApiImplicitParam;
import io.swagger.annotations.ApiImplicitParams;
import io.swagger.annotations.ApiOperation;
import org.springframework.beans.factory.annotation.Autowired;
import org.springframework.web.bind.annotation.*;
@RequestMapping(value = "/api")
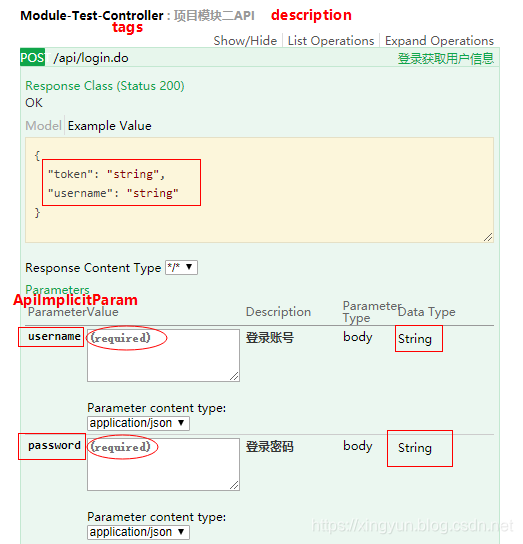
@Api(tags = "Module-Test-Controller", description = "项目模块二API")
@RestController
public class ModuleTestController {
@Autowired
User user;
@ApiOperation(value="登录获取用户信息")
//配置多个参数
@ApiImplicitParams({
@ApiImplicitParam(name = "username", value = "登录账号", required = true, dataType = "String"),
@ApiImplicitParam(name = "password", value = "登录密码", required = true, dataType = "String")
})
@PostMapping(value = "/login.do")
public User loginMethod(@RequestParam(value = "username",required = false,defaultValue = "admin") String usernameArg,@RequestParam(value = "password",required = false,defaultValue = "root") String passwordArg){
user.setUsername(usernameArg);
user.setPassword(passwordArg);
return user;
}
@ApiOperation(value="根据账号获取用户信息")
//文档中配置单个参数
@ApiImplicitParam(name = "username", value = "登录账号", required = true, dataType = "String")
@GetMapping(value = "/user/{username}")
public User groupOneTest(@PathVariable("username") String usernameArg){
user.setUsername(usernameArg);
user.setPassword("root");
return user;
}
}
6.访问Swagger API 文档
打开网址: http://127.0.0.1:8080/swagger-ui.html

好了,本篇教程到此结束~
更多关注我的这个系列的专栏:Spring Boot 2.x 最佳实践手册