最近在做一个小项目,其中认证这块使用shiro+SpringMVC+easyUI,因为easyUI在提交数据的时候使用的是ajax的异步提交,所以shiro在处理数据的时候需要重写FormAuthenticationFilter的相关方法,所以在此记录下实现的过程,以供大伙参考。
本文只给出核心代码,完整代码可去本人github上查看
https://github.com/q279583842q/SRM.git
ShiroLoginFilter
因为shiro默认的处理验证的方式是验证成功直接跳转到我们配置的successURL中,如果认证失败则会跳转到我们指定的fail地址,而和easyUI一块使用的话通过ajax提交,shiro只需要给调用者返回一个验证的结果就可以了,所以我们需要重写FormAuthenticationFilter中的相关方法,如下:
/**
 * 拦截验证后的请求
 * @author 波波烤鸭
 * @email [email protected]
 *
 */
public class ShiroLoginFilter extends FormAuthenticationFilter{

	private static final Logger log = LoggerFactory.getLogger(FormAuthenticationFilter.class);

	 /**
     * 表示当访问拒绝时
     * @param request
     * @param response
     * @return
     * @throws Exception
     */
    @Override
    protected boolean onAccessDenied(ServletRequest request, ServletResponse response) throws Exception {

        if(this.isLoginRequest(request, response)) {
            if(this.isLoginSubmission(request, response)) {
                if(log.isTraceEnabled()) {
                    log.trace("Login submission detected.  Attempting to execute login.");
                }

                return this.executeLogin(request, response);
            } else {
                if(log.isTraceEnabled()) {
                    log.trace("Login page view.");
                }

                return true;
            }
        } else {
            if(log.isTraceEnabled()) {
                log.trace("Attempting to access a path which requires authentication.  Forwarding to the Authentication url [" + this.getLoginUrl() + "]");
            }

            this.saveRequestAndRedirectToLogin(request, response);
            return false;
        }
    }

    /**
     *
     * 当登录成功
     *
     * @param token
     * @param subject
     * @param request
     * @param response
     * @return
     * @throws Exception
     */
    @Override
    protected boolean onLoginSuccess(AuthenticationToken token, Subject subject, ServletRequest request, ServletResponse response) throws Exception {

        HttpServletResponse httpServletResponse = (HttpServletResponse) response;
        String requestType = ((HttpServletRequest)request).getHeader("X-Requested-With");
        if (requestType==null){// 不是ajax请求
            issueSuccessRedirect(request, response);
        } else {
            httpServletResponse.setCharacterEncoding("UTF-8");
            PrintWriter out = httpServletResponse.getWriter();
            out.println(JSONObject.toJSON(Resp.success()));
            out.flush();
            out.close();
        }
        return false;
    }

    /**
     *
     * 当登录失败
     *
     * @param token
     * @param e
     * @param request
     * @param response
     * @return
     */
    @Override
    protected boolean onLoginFailure(AuthenticationToken token, AuthenticationException e, ServletRequest request, ServletResponse response) {
    	String requestType = ((HttpServletRequest)request).getHeader("X-Requested-With");
    	if (requestType==null) {// 不是ajax请求
            setFailureAttribute(request, e);
            return true;
        }
        try {
            response.setCharacterEncoding("UTF-8");
            PrintWriter out = response.getWriter();
            String message = e.getClass().getSimpleName();
            String info = null;
            if ("IncorrectCredentialsException".equals(message)) {
                info = "密码错误";
            } else if ("UnknownAccountException".equals(message)) {
                info = "账号不存在";
            } else if ("LockedAccountException".equals(message)) {
                info = "账号被锁定";
            } else {
                info = "未知错误";
            }
            out.println(JSONObject.toJSON(Resp.fail(ErrorCode.SYSTEM_ERROR, info)));
            out.flush();
            out.close();
        } catch (IOException e1) {
            // TODO Auto-generated catch block
            e1.printStackTrace();
        }
        return false;
    }
}
自定义realm
/**
 * 认证和授权的自定义Realm
 *
 * @author 波波烤鸭
 * @email [email protected]
 *
 */
public class SecurityRealm extends AuthorizingRealm {

	@Resource
	private IUserService userService;

	/**
	 * 认证的方法
	 */
	@Override
	protected AuthenticationInfo doGetAuthenticationInfo(AuthenticationToken token) throws AuthenticationException {
		// 获取提交的账号
		UsernamePasswordToken t = (UsernamePasswordToken) token;
		// 获取登录的账号
		String userName = t.getUsername();
		System.out.println("---->" + userName);
		User user = new User();
		user.setUsername(userName);
		List<User> list = userService.login(userName);
		if (list == null || list.size() != 1) {
			// 账号不存在或者用户过多都返回null
			return null;
		}
		user = list.get(0);

		SimpleAuthenticationInfo info = new SimpleAuthenticationInfo(user, user.getPassword(), "bobo");
		return info;
	}

	/**
	 * 授权的方法
	 */
	@Override
	protected AuthorizationInfo doGetAuthorizationInfo(PrincipalCollection arg0) {
		// 省略 。。。
		return null;
	}

}
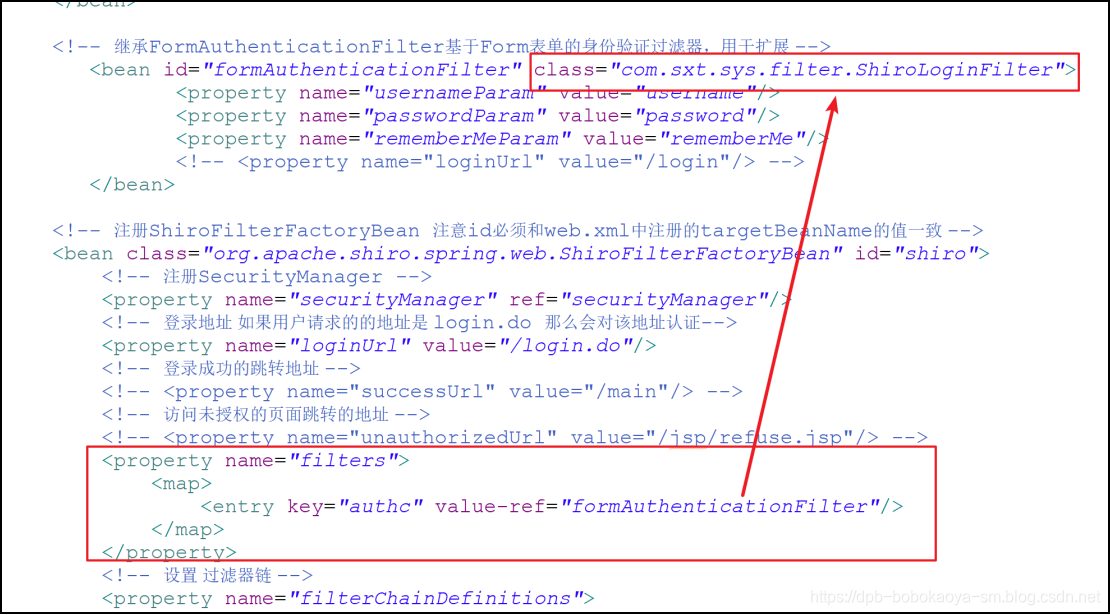
shiro的配置文件
easyUI中提交数据
$.ajax({
	type: "post"
	, timeout: 10000
	, // 超时时间 10 秒
	headers: { 'X-Requested-With':'XMLHttpRequest' }
	, url: "login.do"
	, data: $("#ff").serialize()
	, success: function(data) {
		if(JSON.parse(data).status==200){
			// 表示登录成功,跳转到home页面
			location.href="home";
		}else{
			$.messager.alert('登录失败',JSON.parse(data).message);
		}
	}
});

如此就可以实现我们需要的功能了,希望此文对你有所帮助^ _ ^