记住一点:nginx配置文件很多坑来源自你的空格少了或多了。
1.Centos下载安装
如果你的系统是 Centos 或 RedHat 可以使用以下命令:
yum install readline-devel pcre-devel openssl-devel接下我们可以在官方(https://openresty.org/cn/)下载最新的 OpenResty 源码包并解压编译安装:
wget https://openresty.org/download/ngx_openresty-1.9.7.1.tar.gz   # 下载
tar xzvf ngx_openresty-1.9.7.1.tar.gz       # 解压
cd ngx_openresty-1.9.7.1/
./configure
make
make install
默认情况下程序会被安装到 /usr/local/openresty 目录,你可以使用 ./configure --help 查看更多的配置选项。
2.HelloWorld实例
安装成功后,我们就可以使用 openresty 直接输出 html 页面。
首先我们可以创建一个工作目录:
mkdir /home/www
cd /home/www/
mkdir logs/ conf/
其中 logs 目录用于存放日志,conf 用于存放配置文件。
接着,我们在 conf 目录下创建一个 nginx.conf 文件 代码如下:
worker_processes  1;
error_log logs/error.log;
events {
    worker_connections 1024;
}
http {
    server {
        listen 9000;
        location / {
            default_type text/html;
            content_by_lua '
                ngx.say("<p>Hello, World!</p>")
            ';
        }
    }
}
如果你熟悉 nginx 的配置,应该对以上代码就很熟悉。这里我们将 html 代码直接写在了配置文件中。
启动 openresty
默认情况下 openresty 安装在 /usr/local/openresty 目录中,启动命令为:
/usr/local/openresty/nginx/sbin/nginx -p /home/www/ -c conf/nginx.conf如果没有任何输出,说明启动成功,-p 指定我们的项目目录,-c 指定配置文件。
接下来我们可以使用 curl 来测试是否能够正常范围:
curl http://localhost:9000/输出结果为:
<p>Hello, World!</p>3.调用Lua脚本文件
在 HelloWorld 实例中,我们直接在 nginx.conf 中写Lua脚本,很多时候,Lua脚本是一个文件。下面演示使用 content_by_lua_file 指令调用Lua脚本文件。
在conf文件夹下创建helloworld.lua:
ngx.say("<p>Hello, World!</p>")修改你的 nginx.conf 文件内容为:
worker_processes  1;
error_log logs/error.log;
events {
    worker_connections 1024;
}
http {
    server {
        listen 9000;
        location / {
            default_type text/html;
            content_by_lua_file 'conf/helloworld.lua';
        }
    }
}
停止已启动的nginx进程:
killall -9 nginx启动nginx进程:
/usr/local/openresty/nginx/sbin/nginx -p /home/www/ -c conf/nginx.conf接下来我们可以使用 curl 来测试是否能够正常范围:
curl 'localhost:9000'输出结果为:
<p>Hello, World!</p>4.set_by_lua指令
使用 set_by_lua 指定可以用类似调用函数的形式去调用Lua脚本。语法:
set_by_lua $res <lua-script-str> [$arg1 $arg2 ...]修改你的conf/nginx.conf文件:
worker_processes  1;
error_log logs/error.log;
events {
    worker_connections 1024;
}
http {
    server {
        listen 9000;
        location / {
            default_type text/html;
            set_by_lua $res '
                local a = tonumber(ngx.arg[1])
                local b = tonumber(ngx.arg[2])
                return a+b' $arg_a $arg_b;
            echo $res;
        }
    }
}
停止已启动的nginx进程,命令:
killall -9 nginx启动nginx进程:
/usr/local/openresty/nginx/sbin/nginx -p /home/www/ -c conf/nginx.conf接下来我们可以使用 curl 来测试是否能够正常范围:
curl 'localhost:9000/?a=2&b=5'输出结果为:
75.set_by_lua_file指令
set_by_lua_file可以调用本地Lua脚本文件。语法与set_by_lua相同:
set_by_lua_file $res <lua-script-str> [$arg1 $arg2 ...]在conf文件夹下创建hello.lua文件:
local a = tonumber(ngx.arg[1])
local b = tonumber(ngx.arg[2])
return a+b
在conf文件夹下创建nginx_lua.conf文件:
worker_processes  1;
error_log logs/error.log;
events {
    worker_connections 1024;
}
http {
    server {
        listen 9000;
        location = / {
            default_type text/html;
            set_by_lua_file $res "conf/hello.lua" $arg_a $arg_b;
            echo $res;
        }
    }
}
启动nginx进程:
/usr/local/openresty/nginx/sbin/nginx -p /home/www/ -c conf/nginx_lua.conf接下来我们可以使用 curl 来测试是否能够正常范围:
curl 'localhost:9000/?a=2&b=5'输出结果为:
74.运行周期
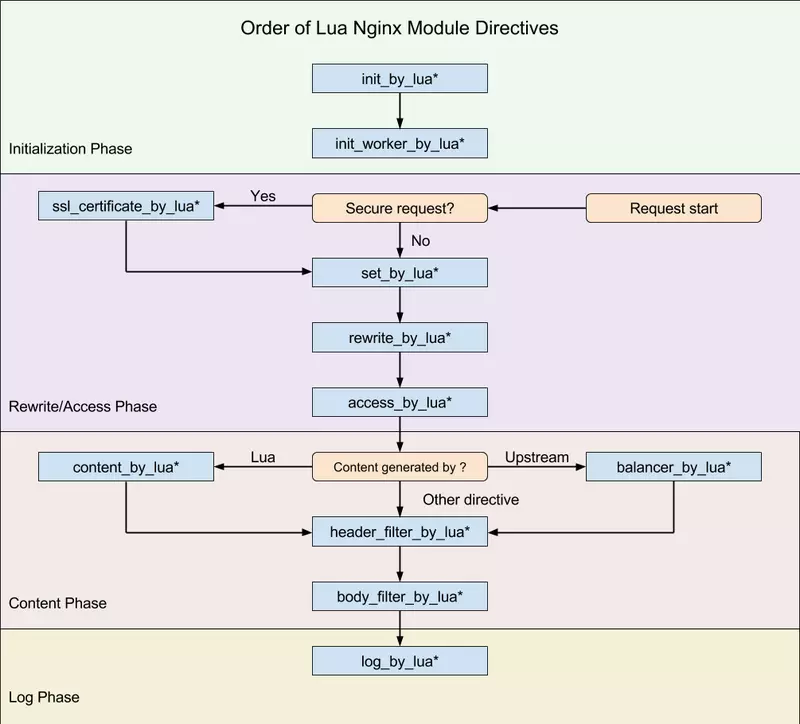
现在已经学会了content_by_lua 与 set_by_lua 指令,其它类似的指令还有很多,那么这些指令都是有什么区别呢?主要区别是指令的运行周期不同,如图所示。(图片来源于网络)
6.其它常用指令
其它命令类似于上面的两条,所以不在一一叙述。
lua_code_cache
语法:lua_code_cache on | off
默认: on
适用上下文:http、server、location、location if
这个指令是指定是否开启lua的代码编译缓存,开发时可以设置为off,以便lua文件实时生效,如果是生产线上,为了性能,建议开启。
ua_package_path
语法:lua_package_path <lua-style-path-str>
默认:由lua的环境变量决定
适用上下文:http
设置lua代码的寻找目录。
例如:lua_package_path "/opt/nginx/conf/www/?.lua;;";
具体的路径设置要参考lua的模块机制
init_by_lua(_file)
语法:init_by_lua <lua-script-str>
适用上下文:http
init_by_lua 'cjson = require "cjson"';
server {
    location = /api {
        content_by_lua '
            ngx.say(cjson.encode({dog = 5, cat = 6}))
        ';
    }
}
从这段配置代码,我们可以看出,其实这个指令就是初始化一些lua的全局变量,以便后续的代码使用。
注:有(_file)的选项代表可以直接引用外部的lua源代码文件,效果与直接写配置文件一样,不过可维护性当然是分开好点。
init_worker_by_lua(_file)
类似于上面的,不过是作用在work进程的,先于work进程启动而调用。
set_by_lua(_file)
语法:set_by_lua $res <lua-script-str> [$arg1 $arg2 ...]
适用上下文:server、location、location if
 location /foo {
    set $diff ''; # we have to predefine the $diff variable here
    set_by_lua $sum '
        local a = 32
        local b = 56

        ngx.var.diff = a - b;  -- write to $diff directly
        return a + b;          -- return the $sum value normally
    ';
    echo "sum = $sum, diff = $diff";
}
这个指令是为了能够让nginx的变量与lua的变量相互作用赋值。
rewrite_by_lua(_file)
语法:rewrite_by_lua <lua-script-str>
适用上下文:location、location if
这个指令更多的是为了替代HttpRewriteModule的rewrite指令来使用的,优先级低于rewrite指令
比如
 location /foo {
          set $a 12; # create and initialize $a
          set $b ''; # create and initialize $b
          rewrite_by_lua 'ngx.var.b = tonumber(ngx.var.a) + 1';
          if ($b = '13') {
             rewrite ^ /bar redirect;
             break;
          }

         echo "res = $b";
    }
这个并不会像预期的那样子,因为我猜测,rewrite_by_lua是开启一个协程去工作的,可是下面却继续执行下去了,所以得不到预期的结果。
此时如果由lua代码来控制rewrite,那就没有问题了。
    location /foo {
        set $a 12; # create and initialize $a
        set $b ''; # create and initialize $b
        rewrite_by_lua '
            ngx.var.b = tonumber(ngx.var.a) + 1
            if tonumber(ngx.var.b) == 13 then
                return ngx.redirect("/bar");
            end
        ';
       echo "res = $b";
    }
access_by_lua(_lua)
语法:access_by_lua <lua-script-str>
适用上下文:http, server, location, location if
 location / {
        deny    192.168.1.1;
        allow   192.168.1.0/24;
        allow   10.1.1.0/16;
        deny    all;

        access_by_lua '
            local res = ngx.location.capture("/mysql", { ... })
            ...
        ';

        # proxy_pass/fastcgi_pass/...
    }
顾名思义,这个指令用在验证通过或者需要验证的时候。
header_filter_by_lua(_file)
语法:header_filter_by_lua <lua-script-str>
适用上下文:http, server, location, location if
    location / {
        proxy_pass http://mybackend;
        header_filter_by_lua 'ngx.header.Foo = "blah"';
    }
用lua的代码去指定http响应的 header一些内容。
body_filter_by_lua(_file)
语法:body_filter_by_lua <lua-script-str>
适用上下文:http, server, location, location if
   location /t {
        echo hello world;
        echo hiya globe;

        body_filter_by_lua '
            local chunk = ngx.arg[1]
            if string.match(chunk, "hello") then
                ngx.arg[2] = true  -- new eof
                return
            end

            -- just throw away any remaining chunk data
            ngx.arg[1] = nil
        ';
    }
这个指令可以用来篡改http的响应正文的。
上面的命令转载自:https://blog.csdn.net/imlsz/article/details/42297383
推荐一篇介绍运行周期的文章:https://www.jianshu.com/p/18b42d11671e
Nginx API for Lua:https://www.cnblogs.com/wangxusummer/p/4309007.html