服务治理
主要用来实现各个微服务实例的自动化注册与发现,为啥需要这玩意呢?在一开始比如A系统调用B服务,可能通过手工维护B服务的实例,并且还得采用负载均衡等方式,这些全部都得需要手工维护,等后面系统越来越多,这维护起来可就费了劲了。那么服务治理就是帮你管理这些服务,这些框架和产品的实现都围绕着服务注册与服务发现机制来完成对微服务应用实例的自动化管理。
由于Spring Cloud为服务治理做了一层抽象接口,所以在Spring Cloud应用中可以支持多种不同的服务治理框架,比如:Netflix Eureka、Consul、Zookeeper。在Spring Cloud服务治理抽象层的作用下,我们可以无缝地切换服务治理实现,并且不影响任何其他的服务注册、服务发现、服务调用等逻辑。
spring cloud版本
spring cloud目前属于快速更新状态,因此版本也是非常多,cloud与boot版本对应如下:
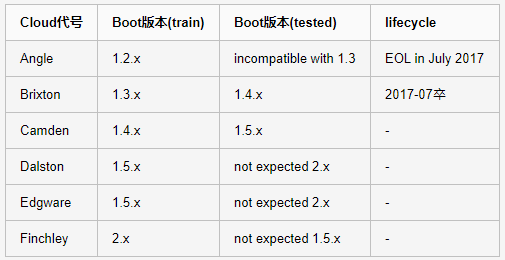
目前可以简单的理解为A-F版本,F版本只支持springboot 2.x版本,不支持1.5版本。不过目前貌似G版本都出来了。。。
Spring Cloud Eureka
1、创建服务注册中心
pom.xml如下:
<?xml version="1.0" encoding="UTF-8"?>
<project xmlns="http://maven.apache.org/POM/4.0.0" xmlns:xsi="http://www.w3.org/2001/XMLSchema-instance"
         xsi:schemaLocation="http://maven.apache.org/POM/4.0.0 http://maven.apache.org/xsd/maven-4.0.0.xsd">
    <modelVersion>4.0.0</modelVersion>
    <parent>
        <groupId>org.springframework.boot</groupId>
        <artifactId>spring-boot-starter-parent</artifactId>
        <version>2.1.4.RELEASE</version>
        <relativePath/> <!-- lookup parent from repository -->
    </parent>
    <groupId>com.ty</groupId>
    <artifactId>eureka-server</artifactId>
    <version>0.0.1-SNAPSHOT</version>
    <name>eureka-server</name>
    <description>Demo project for Spring Boot</description>

    <properties>
        <java.version>1.8</java.version>
    </properties>

    <dependencies>
        <dependency>
            <groupId>org.springframework.boot</groupId>
            <artifactId>spring-boot-starter</artifactId>
        </dependency>

        <dependency>
            <groupId>org.springframework.boot</groupId>
            <artifactId>spring-boot-starter-test</artifactId>
            <scope>test</scope>
        </dependency>
        <dependency>
            <groupId>org.springframework.cloud</groupId>
            <artifactId>spring-cloud-starter-netflix-eureka-server</artifactId>
            <version>2.1.1.RELEASE</version>
        </dependency>

    </dependencies>

    <dependencyManagement>
        <dependencies>
            <dependency>
                <groupId>org.springframework.cloud</groupId>
                <artifactId>spring-cloud-dependencies</artifactId>
                <version>Finchley.RELEASE</version>
                <type>pom</type>
            </dependency>

        </dependencies>
    </dependencyManagement>

    <build>
        <plugins>
            <plugin>
                <groupId>org.springframework.boot</groupId>
                <artifactId>spring-boot-maven-plugin</artifactId>
            </plugin>
        </plugins>
    </build>

</project>
2、主类中添加注解
package com.ty.eurekaserver;

import org.springframework.boot.SpringApplication;
import org.springframework.boot.autoconfigure.SpringBootApplication;
import org.springframework.cloud.netflix.eureka.server.EnableEurekaServer;

//通过此注解启动一个服务注册中心提供给其他应用进行对话
@EnableEurekaServer
@SpringBootApplication
public class EurekaServerApplication {

    public static void main(String[] args) {
        SpringApplication.run(EurekaServerApplication.class, args);
    }

}
在默认设置下,该服务注册中心也会将自己作为客户端来尝试注册它自己,所以我们需要禁用它的客户端注册行为,只需要在application.properties配置文件中增加如下信息:
# 服务注册中心应用名
spring.application.name=eureka-server
# 服务注册中心端口
server.port=1001
# 服务注册中心主机名
eureka.instance.hostname=localhost
# 禁止服务注册中心注册自己
eureka.client.register-with-eureka=false
eureka.client.fetch-registry=false
然后运行http://localhost:1001/,效果如下:

说明当前没有服务。
服务提供者
服务注册中心已经创建完毕,现在再来创建一个服务提供者,eureka-provider.
首先创建一个springboot项目,项目名就叫eureka-provider。
1、pom.xml
<?xml version="1.0" encoding="UTF-8"?>
<project xmlns="http://maven.apache.org/POM/4.0.0" xmlns:xsi="http://www.w3.org/2001/XMLSchema-instance"
         xsi:schemaLocation="http://maven.apache.org/POM/4.0.0 http://maven.apache.org/xsd/maven-4.0.0.xsd">
    <modelVersion>4.0.0</modelVersion>
    <parent>
        <groupId>org.springframework.boot</groupId>
        <artifactId>spring-boot-starter-parent</artifactId>
        <version>2.1.4.RELEASE</version>
        <relativePath/> <!-- lookup parent from repository -->
    </parent>
    <groupId>com.ty</groupId>
    <artifactId>eureka-provider</artifactId>
    <version>0.0.1-SNAPSHOT</version>
    <name>eureka-provider</name>
    <description>Demo project for Spring Boot</description>

    <properties>
        <java.version>1.8</java.version>
    </properties>

    <dependencies>
        <dependency>
            <groupId>org.springframework.boot</groupId>
            <artifactId>spring-boot-starter</artifactId>
        </dependency>

        <dependency>
            <groupId>org.springframework.boot</groupId>
            <artifactId>spring-boot-starter-test</artifactId>
            <scope>test</scope>
        </dependency>

        <dependency>
            <groupId>org.springframework.cloud</groupId>
            <artifactId>spring-cloud-starter-netflix-eureka-client</artifactId>
            <version>2.1.1.RELEASE</version>
        </dependency>

        <dependency>
            <groupId>org.springframework.boot</groupId>
            <artifactId>spring-boot-starter-web</artifactId>
        </dependency>
    </dependencies>

    <dependencyManagement>
        <dependencies>
            <dependency>
                <groupId>org.springframework.cloud</groupId>
                <artifactId>spring-cloud-dependencies</artifactId>
                <version>Finchley.RELEASE</version>
                <type>pom</type>
            </dependency>

        </dependencies>
    </dependencyManagement>

    <build>
        <plugins>
            <plugin>
                <groupId>org.springframework.boot</groupId>
                <artifactId>spring-boot-maven-plugin</artifactId>
            </plugin>
        </plugins>
    </build>

</project>
2、运行主类
package com.ty.eurekaprovider;

import org.springframework.boot.SpringApplication;
import org.springframework.boot.autoconfigure.SpringBootApplication;
import org.springframework.cloud.client.discovery.EnableDiscoveryClient;

//该注解能激活Eureka中的DiscoveryClient实现,这样才能实现Controller中对服务信息的输出。
@EnableDiscoveryClient
@SpringBootApplication
public class EurekaProviderApplication {

    public static void main(String[] args) {
        SpringApplication.run(EurekaProviderApplication.class, args);
    }

}
3、配置文件
# 服务名称
spring.application.name=eureka-client
# 端口号
server.port=2001
# 服务注册中心地址
eureka.client.serviceUrl.defaultZone=http://localhost:1001/eureka/
4、controller
package com.ty.eurekaprovider.controller;

import org.springframework.beans.factory.annotation.Autowired;
import org.springframework.cloud.client.discovery.DiscoveryClient;
import org.springframework.web.bind.annotation.GetMapping;
import org.springframework.web.bind.annotation.RestController;

@RestController
public class ProviderController {

    @Autowired
    private DiscoveryClient discoveryClient;

    @GetMapping("/firstCall")
    public String firstCall() {
        String services = "Services: " + discoveryClient.getServices();
        System.out.println(services);
        return services;
    }

}
当启动服务提供者之后,在eureka-server控制台可以看到这样的信息:
Registered instance EUREKA-CLIENT/P1XO0D5HS8H0XRH:eureka-client:2001 with status UP (replication=false)
并且打开http://localhost:1001/,如下:
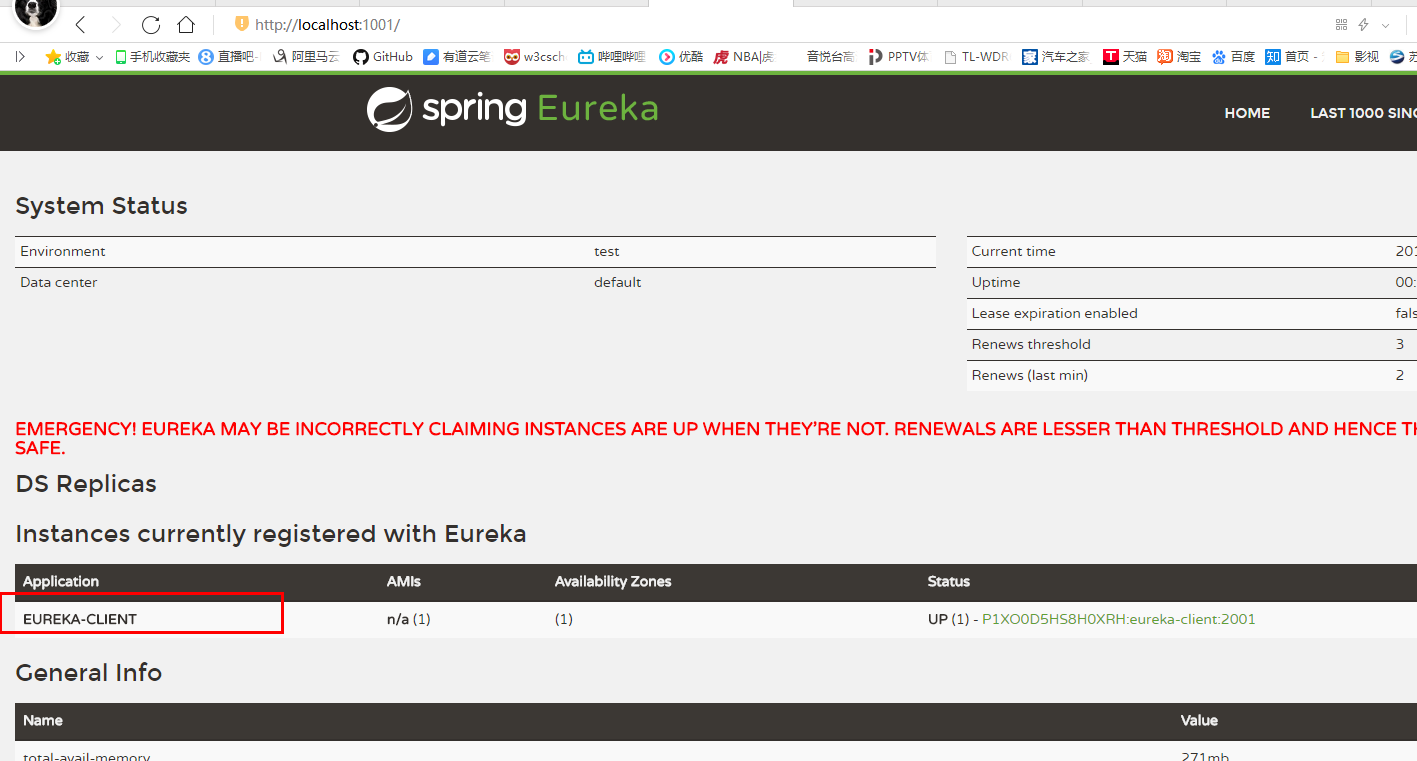
已经可以看到服务提供者了,注册成功。
高可用服务注册中心
从上面代码来看,服务注册中心在spring cloud整个架构中是非常重要的,因为所有的服务包括消费都需要注册到他这里,他就相当于老大,分配各种服务。由于我是在本地测试,因此目前只是单点的状态,实际情况肯定不是这样,那么万一某一个服务注册中心发生故障应该怎么预防呢?
eureka是这么解决的,其实整个架构中,服务或者说是节点都充当着两种角色,一种是服务方,一种则是消费方。因为一个服务会被其他服务调用,其他服务也会调用这个服务。同样服务注册中心也不例外,将自己作为服务向其他服务注册中心注册自己,这样在一组注册中心中,互相注册,当一个挂了,其他的补上。举个例子说明:
在咱们上面实现的eureka-server新增两个配置文件:
1、application-node1.properties
# 服务注册中心应用名
spring.application.name=eureka-server
# 服务注册中心端口
server.port=1002
# 服务注册中心主机名
eureka.instance.hostname=node1
eureka.client.serviceUrl.defaultZone=http://node2:1003/eureka/
2、application-node2.properties
# 服务注册中心应用名
spring.application.name=eureka-server
# 服务注册中心端口
server.port=1003
# 服务注册中心主机名
eureka.instance.hostname=node2
eureka.client.serviceUrl.defaultZone=http://node1:1002/eureka/
3、更改本机hosts配置
路径:C:\Windows\System32\drivers\etc
# Copyright (c) 1993-2009 Microsoft Corp.
#
# This is a sample HOSTS file used by Microsoft TCP/IP for Windows.
#
# This file contains the mappings of IP addresses to host names. Each
# entry should be kept on an individual line. The IP address should
# be placed in the first column followed by the corresponding host name.
# The IP address and the host name should be separated by at least one
# space.
#
# Additionally, comments (such as these) may be inserted on individual
# lines or following the machine name denoted by a '#' symbol.
#
# For example:
#
#      102.54.94.97     rhino.acme.com          # source server
#       38.25.63.10     x.acme.com              # x client host

# localhost name resolution is handled within DNS itself.
#    127.0.0.1       localhost
#    ::1             localhost

# Added by Docker for Windows
192.168.0.103 host.docker.internal
192.168.0.103 gateway.docker.internal
# End of section
127.0.0.1 node1
127.0.0.1 node2
新加两个host,其实对应还是本机,只是为了演示。
4、打包
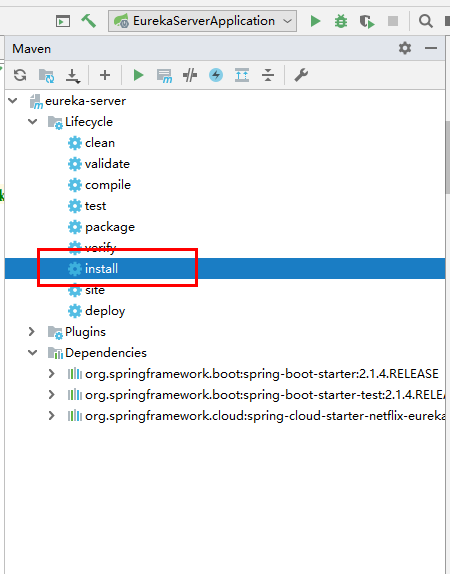
5、执行
cd到jar包对应的路径,执行命令如下:
java -jar eureka-server-0.0.1-SNAPSHOT.jar --spring.profiles.active=node1
java -jar eureka-server-0.0.1-SNAPSHOT.jar --spring.profiles.active=node2
第一条命令就是启application-node1.properties中的配置,第二条则是启application-node2.properties中的配置。node1注册到node2中,node2注册到node1中。
6、运行结果
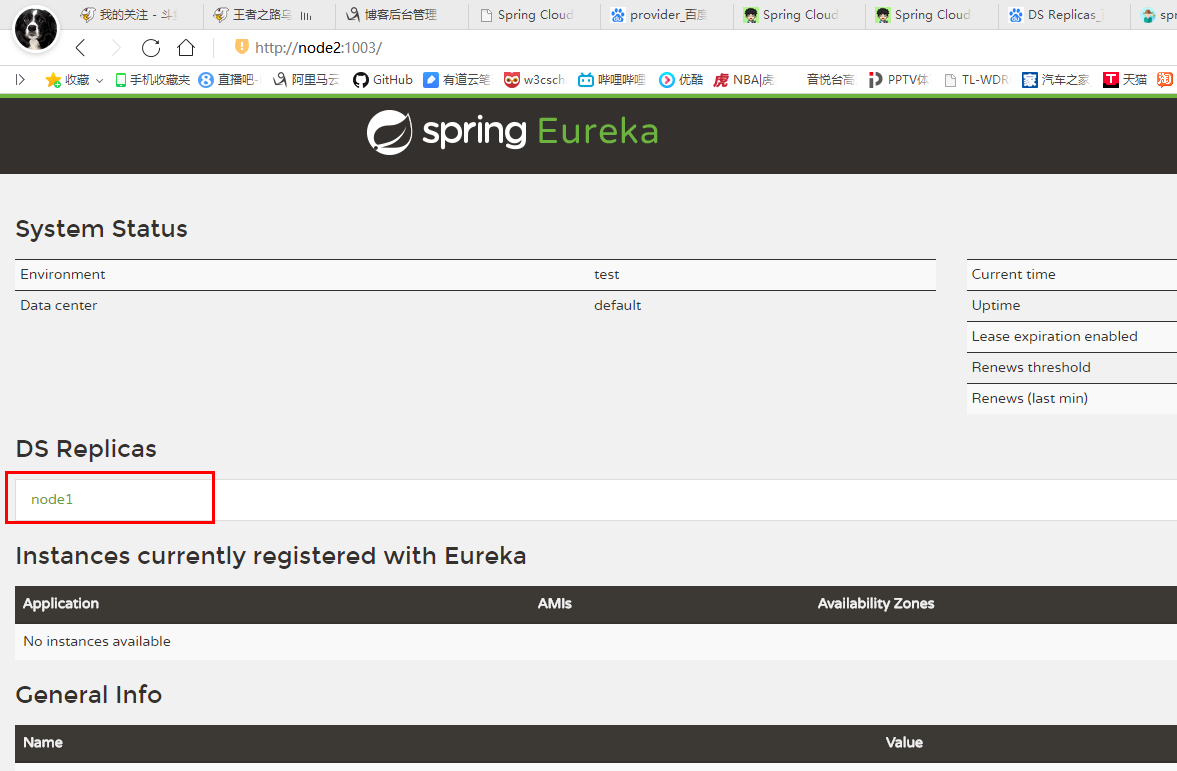
表示node1注册到node2中了。
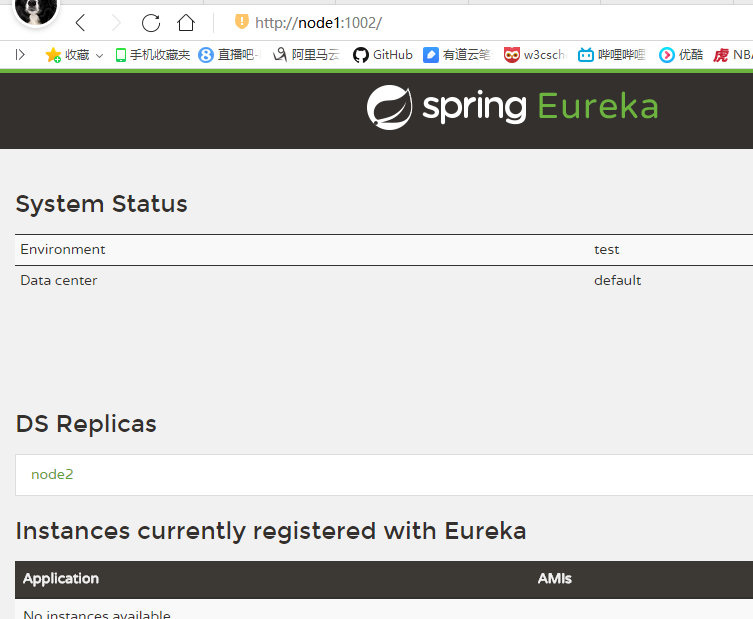
表示node2注册到node1中。
既然服务注册中心已经实现了相互注册,服务提供者也得做相应的改变:
只需要更改application.properties即可,
# 服务名称
spring.application.name=eureka-client
# 端口号
server.port=2001
# 服务注册中心地址
eureka.client.serviceUrl.defaultZone=http://node1:1002/eureka/,http://node2:1003/eureka/