原理
在UnityShader中实现字符画,实际工作就是把原图像分成矩阵块,分析每个每个块内的图像,并替换为字符。
图像的分析方法最简单的就是灰度值,在字符密度较大时能以很简单的方式达到效果。更准确的方法是对块内像素与准备好的字符取样图像素对比,得出最相近的字符,由于这个方法效率较低,更适合生成静态图片。
文中实现了一个根据灰度判断的方法,和一个采取了及其简单的形状判断与直接映射查找字符的方法(上面黄色背景图片的边缘)。
替换字符的方法是根据原图像小块所采用的字符,对一张准备好的字符图采样。
C#后处理脚本
首先是后处理脚本基类
using UnityEngine;
using System.Collections;

[ExecuteInEditMode]
[RequireComponent (typeof(Camera))]
public class PostEffectsBase : MonoBehaviour {

	protected void CheckResources() {
		bool isSupported = CheckSupport();

		if (isSupported == false) {
			NotSupported();
		}
	}

	protected bool CheckSupport() {
		if (SystemInfo.supportsImageEffects == false)
			return false;

		return true;
	}


	protected void NotSupported() {
		enabled = false;
	}

	protected void Start() {
		CheckResources();
	}

	protected Material CheckShaderAndCreateMaterial(Shader shader, Material material) {
		if (shader == null) {
			return null;
		}

		if (shader.isSupported && material && material.shader == shader)
			return material;

		if (!shader.isSupported) {
			return null;
		}
		else {
                    material = new Material(shader)
                    {
                        hideFlags = HideFlags.DontSave
                    };
                    if (material)
			return material;
		    else
			return null;
		}
	}
}
接着是字符画需要的后处理脚本,这里可以设置字符像素尺寸、字符颜色等信息,这里的图像已经通过字符像素尺寸进行了降采样处理,输入到shader中的是一张马赛克图。
using UnityEngine;
using System.Collections;


[ExecuteInEditMode]
public class ASCIIart : PostEffectsBase {


    public Shader ASCIIartShader;
    private Material ASCIIartMaterial = null;


    public Material material {
	get {
		ASCIIartMaterial = CheckShaderAndCreateMaterial(ASCIIartShader, ASCIIartMaterial);
		return ASCIIartMaterial;
	    }
    }

    // 字符正方形边长
    [Range(1,100)]
    public int texelPerChar;
    //伽马校正
    public float gamaMutipler = 1;
    //背景色
    public Color bgColor;
    //字符色
    public Color charColor;

    protected new void Start()
    {
        base.Start();
        material.SetColor("_BGColor", bgColor);
        material.SetColor("_CharColor", charColor);
    }
    void OnRenderImage (RenderTexture src, RenderTexture dest) {
	if (material != null) {
            material.SetFloat("_TexelPerChar", texelPerChar);
            material.SetFloat("_GamaMutipler", gamaMutipler);


            int rtW = src.width/ texelPerChar;
	    int rtH = src.height/ texelPerChar;

            RenderTexture buffer0 = RenderTexture.GetTemporary(rtW, rtH, 0);
            buffer0.filterMode = FilterMode.Point;

            Graphics.Blit(src, buffer0);
            Graphics.Blit(buffer0, src);
            RenderTexture.ReleaseTemporary(buffer0);

            Graphics.Blit(src, dest, material, 0);
        }
        else {
	    Graphics.Blit(src, dest);
	}
    }
}
Shader实现
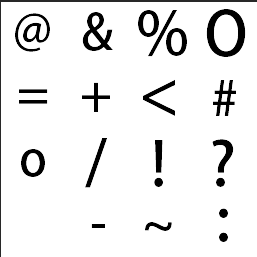
字符取样方式和取样图设计有关,本文并没有设置相关变量,有需求的还要额外定义变量,文中取样图片如下:
下面是只对灰度进行处理的Shader:
Shader "Post/ASCII art"
{
    Properties
    {
        _MainTex ("MainTex", 2D) = "white" { }
        _CharTex ("CharTex", 2D) = "white" { }
        _BGColor ("背景色", Color) = (0.2,0.3,0.5,1)
        _CharColor ("字体色", Color) = (0,0,0,1)
    }

    SubShader
    {
        CGINCLUDE
        #include "UnityCG.cginc"

        sampler2D _MainTex;
        half4 _MainTex_TexelSize;
        sampler2D _CharTex;
        float _TexelPerChar;
        float4 _BGColor;
        float4 _CharColor;
        float _GamaMutipler;

        struct v2f
        {
            float4 pos : SV_POSITION;
            half2 uv : TEXCOORD0;
        };

        v2f ASCIIvertex(appdata_img v)
        {
            v2f o;
            o.pos = UnityObjectToClipPos(v.vertex);
            o.uv = v.texcoord;
            return o;
        }

        fixed4 ASCIIfrag(v2f i) : SV_Target
        {
            //每个字符占用的UV值
			float2 uvPerChar = _TexelPerChar * _MainTex_TexelSize.xy;
            //所在字符的起点UV
            float2 startUV = floor(i.uv / uvPerChar) * uvPerChar + _MainTex_TexelSize.xy;
            //所在字符的坐标比例(0-1)
            float2 oppositeUV = (i.uv - startUV)/uvPerChar;
            fixed4 mainColor = tex2D(_MainTex, startUV);
            //如果项目是非线性空间,需要1/2.2的Gama校正
	    //mainColor = pow(mainColor,_GamaMutipler);
            //计算灰度值
            fixed luminosity = dot(mainColor.rgb,fixed3(0.299,0.587,0.114));
            //计算灰度阶数
            int luminosityStep = floor(luminosity * 4* 4) - 1;
            //计算灰度图的坐标原点
            float2 charStartUV = float2(fmod(luminosityStep,4),floor(luminosityStep / 4))/4;
            float2 charUV = charStartUV + oppositeUV/_CharCount;
            float4 color = tex2D(_CharTex, charUV);
            color = lerp(_BGColor,_CharColor, 1 - color.r);
            return color;
        }
        ENDCG

        ZTest Always
        Cull Off
        ZWrite Off

        Pass
        {
            Name "ASCII art"

            CGPROGRAM
            #pragma vertex ASCIIvertex
            #pragma fragment ASCIIfrag
            ENDCG
        }
    }
    FallBack "Diffuse"
}
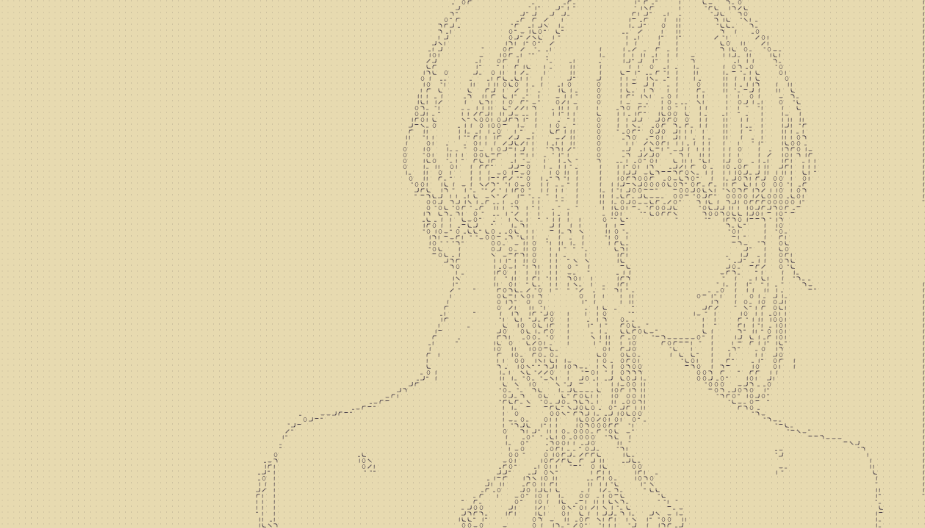
效果:
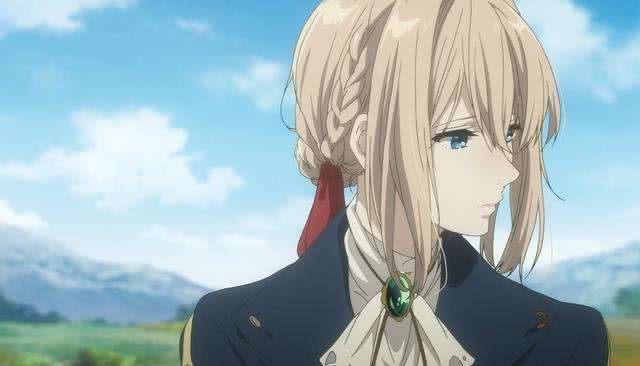
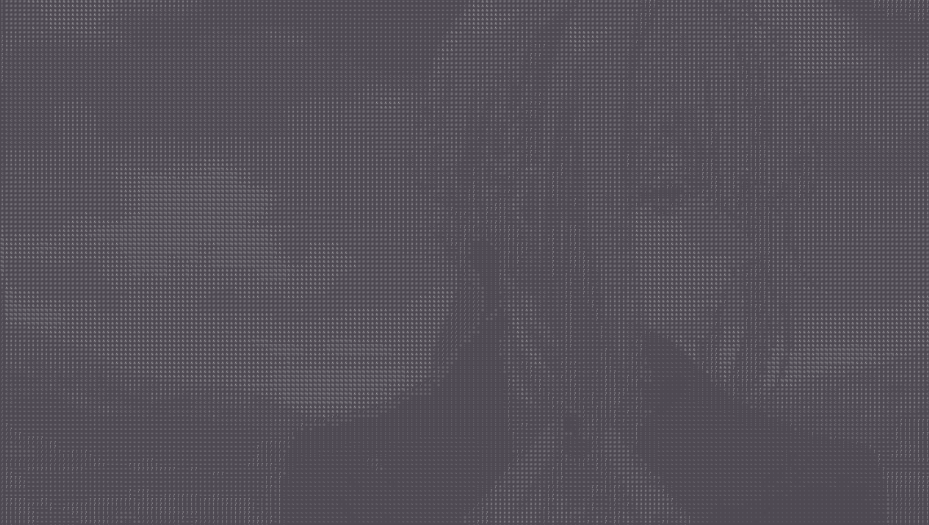
另外一种聊天中常见的字符画,如下图所示,比起明暗这种字符画更注重形体
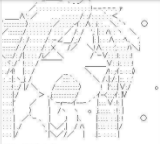
为模拟这种字符画,建一张简单的贴图,由于工作量问题,这里不考虑平均灰度的影响,且仅采用2X2的采样区,共需要字符数量是2的2X2次幂(16个),如果3X3就需要512个字符,下面是用到的形状图:

下面的shader需要在后处理脚本中增加一个_LuminosityThreshold变量,用来控制灰度阈值
Shader "Post/ASCII art Gird"
{
    Properties
    {
        _MainTex ("MainTex", 2D) = "white" { }
        _CharTex ("CharTex", 2D) = "white" { }
        _BGColor ("背景色", Color) = (0.2,0.3,0.5,1)
        _CharColor ("字体色", Color) = (0,0,0,1)
        _LuminosityThreshold ("LuminosityThreshold", Float) = 0.5
    }

    SubShader
    {
        CGINCLUDE
        #include "UnityCG.cginc"

        sampler2D _MainTex;
        half4 _MainTex_TexelSize;
        sampler2D _CharTex;
        half4 _CharTex_TexelSize;
        float _TexelPerChar;
        float _LuminosityThreshold;
        float4 _BGColor;
        float4 _CharColor;
        float _GamaMutipler;

        struct v2f
        {
            float4 pos : SV_POSITION;
            half2 uv : TEXCOORD0;
        };

        v2f ASCIIvertex(appdata_img v)
        {
            v2f o;
            o.pos = UnityObjectToClipPos(v.vertex);
            o.uv = v.texcoord;
            return o;
        }

        fixed4 ASCIIfrag(v2f i) : SV_Target
        {
            //每1个字符的像素
	    float2 uvPerChar = _TexelPerChar * _MainTex_TexelSize.xy;
            //每2个字符的像素
	    float2 uvPer2Char = 2 * uvPerChar;
            //原图网格起点,4个网格为一组,额外偏移1像素
            float2 startUV = floor(i.uv / uvPer2Char) * uvPer2Char + _MainTex_TexelSize.xy;
            //找到原图上相对起点的坐标的比例,因为2x2为一组,要除2被字符像素长宽值,以映射到0-1的值
            float2 oppositeUV = (i.uv - startUV)/uvPer2Char;
            //计算4个灰度值
            fixed4 mainColor0 = tex2D(_MainTex, startUV);
            fixed4 mainColor1 = tex2D(_MainTex, startUV + float2(1,0) * uvPerChar);
            fixed4 mainColor2 = tex2D(_MainTex, startUV+ float2(0,1) * uvPerChar);
            fixed4 mainColor3 = tex2D(_MainTex, startUV+ float2(1,1) * uvPerChar);
            fixed luminosity0 = dot(mainColor0.rgb,fixed3(0.299,0.587,0.114));
            fixed luminosity1 = dot(mainColor1.rgb,fixed3(0.299,0.587,0.114));
            fixed luminosity2 = dot(mainColor2.rgb,fixed3(0.299,0.587,0.114));
            fixed luminosity3 = dot(mainColor3.rgb,fixed3(0.299,0.587,0.114));

            // fixed luminosity = (luminosity0 + luminosity1 + luminosity2 + luminosity3)/4;
            //由形状图排版和4个灰度阶数求灰度图上的坐标
            int x = 0,y = 0;
            if (luminosity0 > _LuminosityThreshold) y+=2;
            if (luminosity1 > _LuminosityThreshold) y+=1;
            if (luminosity2 > _LuminosityThreshold) x+=2;
            if (luminosity3 > _LuminosityThreshold) x+=1;

            //计算灰度图的坐标原点
            float2 charStartUV = float2(x,y)/4;
            float2 charUV = charStartUV + oppositeUV/4;
            // _CharColor = lerp(_CharColor,_BGColor, luminosity);
            float4 color = tex2D(_CharTex, charUV);
            color = lerp(_CharColor,_BGColor, color.r);
            return color;
        }
        ENDCG

        ZTest Always
        Cull Off
        ZWrite Off

        Pass
        {
            Name "ASCII art"

            CGPROGRAM
            #pragma vertex ASCIIvertex
            #pragma fragment ASCIIfrag
            ENDCG
        }
    }
    FallBack "Diffuse"
}
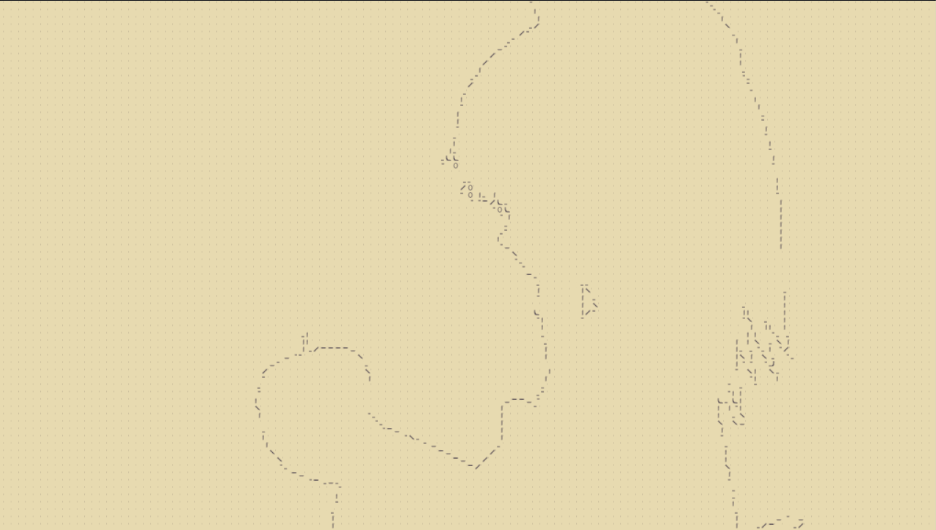
这里并没有灰度对比,但可以简单的绘制出边缘形状,效果为下方左图
在字符画绘制之前,先提取出图片边缘得到方右图