使用 kubeadm 搭建Kubernetes 1.14单节点集群实战(基于Oracle Linux 7.6)
前提:
a,安装Oracle VirtualBox,创建Oracle Linux 7.6虚机。
Oracle VirtualBox下载地址:https://www.virtualbox.org/wiki/Downloads
Oracle Linux 7.6下载地址:https://edelivery.oracle.com
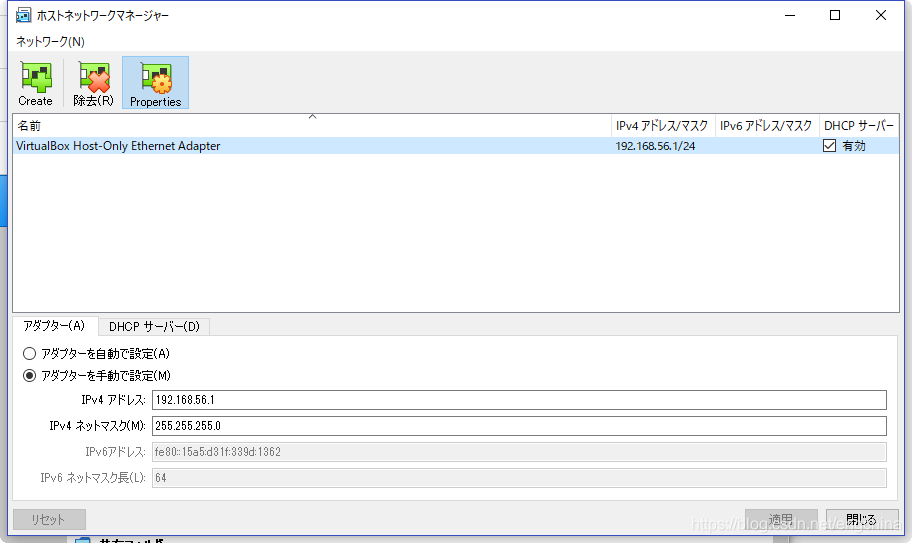
b,在VirtualBox中,通过host network manager创建Host-Only Ethernet Adapter。
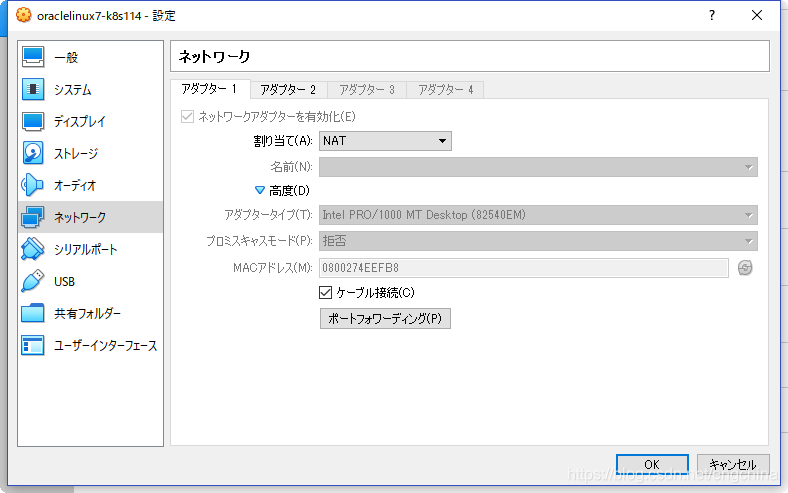
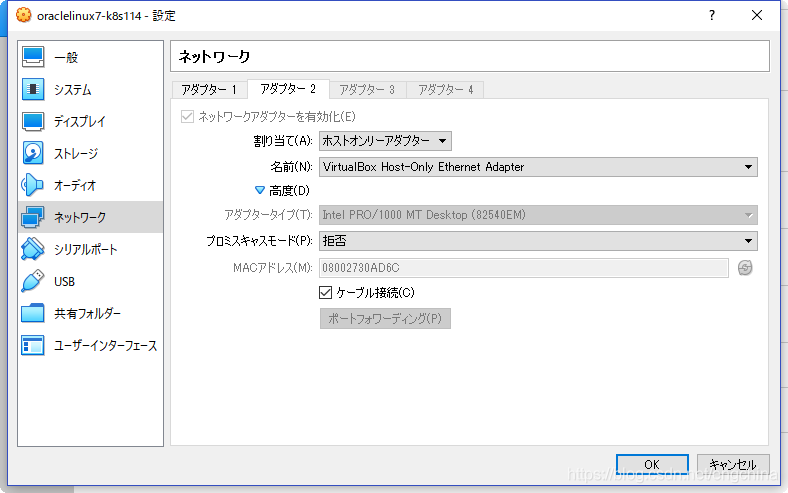
c,创建虚拟机的网络,设置NAT和Host-Only两种。(NAT连外网)
详细步骤:
1,系统配置和更新。使用root用户执行。
yum-config-manager --enable ol7_addons
yum-config-manager --enable ol7_preview
yum -y update
reboot
2,iptables设置。使用root用户执行。
iptables -P FORWARD ACCEPT
iptables-save > /etc/sysconfig/iptables
3,安装和调试docker。使用root用户执行。
yum install -y docker-engine
systemctl enable docker
systemctl start docker
usermod -a -G docker k8s114
su - k8s114
docker run hello-world
成功时的结果
Hello from Docker!
This message shows that your installation appears to be working correctly.

To generate this message, Docker took the following steps:
 1. The Docker client contacted the Docker daemon.
 2. The Docker daemon pulled the "hello-world" image from the Docker Hub.
    (amd64)
 3. The Docker daemon created a new container from that image which runs the
    executable that produces the output you are currently reading.
 4. The Docker daemon streamed that output to the Docker client, which sent it
    to your terminal.

To try something more ambitious, you can run an Ubuntu container with:
 $ docker run -it ubuntu bash

Share images, automate workflows, and more with a free Docker ID:
 https://hub.docker.com/

For more examples and ideas, visit:
 https://docs.docker.com/get-started/
4,配置防火墙。使用root用户执行。
systemctl enable firewalld
systemctl start firewalld
firewall-cmd --add-masquerade --permanent
firewall-cmd --add-port=10250/tcp --permanent
firewall-cmd --add-port=8472/udp --permanent
firewall-cmd --add-port=6443/tcp --permanent
firewall-cmd --reload
5,配置netfilter。使用root用户执行。
modprobe br_netfilter
echo "br_netfilter" > /etc/modules-load.d/br_netfilter.conf
cat <<EOF > /etc/sysctl.d/k8s.conf
net.bridge.bridge-nf-call-ip6tables = 1
net.bridge.bridge-nf-call-iptables = 1
EOF
sysctl --system
6,配置enforce。使用root用户执行。
/usr/sbin/setenforce 0
sed -i 's/SELINUX=enforcing/SELINUX=permissive/g' /etc/selinux/config
7,追加kubernetes的repository。使用root用户执行。
cat <<EOF > /etc/yum.repos.d/kubernetes.repo
[kubernetes]
name=Kubernetes
baseurl=https://packages.cloud.google.com/yum/repos/kubernetes-el7-x86_64
enabled=1
gpgcheck=1
repo_gpgcheck=1
gpgkey=https://packages.cloud.google.com/yum/doc/yum-key.gpg https://packages.cloud.google.com/yum/doc/rpm-package-key.gpg
exclude=kube*
EOF
8,安装kubelet,kubeadm,kubectl。使用root用户执行。
yum install -y kubelet kubeadm kubectl --disableexcludes=kubernetes9,配置swap。无视swap on的错误。使用root用户执行。(kubernetes不推荐使用虚拟内存,不使用虚拟内存时需要足够多的物理内存。所以作为学习用时还是使用虚拟内存性能好些。)
cat <<EOF > /etc/sysconfig/kubelet
KUBELET_EXTRA_ARGS=--fail-swap-on=false
EOF
10,安装kubernetes 1.14。使用root用户执行。
使用Host-Only的网卡。(即enp0s8)
将来使用calico网络,所以--pod-network-cidr指定的是192.168.0.0/16。
IP_ADDR=$(ip addr show enp0s8 | grep -Po 'inet \K[\d.]+')
echo $IP_ADDR
kubeadm init --pod-network-cidr=192.168.0.0/16 --apiserver-advertise-address=$IP_ADDR --kubernetes-version stable-1.14 --ignore-preflight-errors=Swap
11,设置开始自动启动kubelet,查看kubelet状态。使用root用户执行。
systemctl enable kubelet
systemctl status kubelet
12,使用kubernetes 1.14集群的用户设置。使用root用户执行。(示例中的用户名是k8s114)
su - k8s114
mkdir -p $HOME/.kube
sudo cp -i /etc/kubernetes/admin.conf $HOME/.kube/config
sudo chown $(id -u):$(id -g) $HOME/.kube/config
echo "source <(kubectl completion bash)" >> ~/.bashrc
echo "alias k=kubectl" >> ~/.bashrc
13,安装calico网络。使用k8s114用户执行。
kubectl apply -f \
https://docs.projectcalico.org/v3.6/getting-started/kubernetes/installation/hosted/kubernetes-datastore/calico-networking/1.7/calico.yaml
14,设置Master节点也可以做为Node工作。使用k8s114用户执行。
kubectl taint nodes --all node-role.kubernetes.io/master-15,查看。使用k8s114用户执行。
15-1,查看nodes
kubectl get nodes结果
NAME     STATUS   ROLES    AGE   VERSION
k8s114   Ready    master   30m   v1.14.0
15-2,查看所用pods
kubectl get pods --all-namespaces结果
NAMESPACE     NAME                                       READY   STATUS    RESTARTS   AGE
default       nginx-65f88748fd-drh7q                     1/1     Running   0          26m
kube-system   calico-kube-controllers-7bfdd87774-jr5kw   1/1     Running   0          29m
kube-system   calico-node-6gmhb                          1/1     Running   0          29m
kube-system   coredns-fb8b8dccf-xtgpq                    1/1     Running   0          30m
kube-system   coredns-fb8b8dccf-zqk55                    1/1     Running   0          30m
kube-system   etcd-k8s114                                1/1     Running   0          29m
kube-system   kube-apiserver-k8s114                      1/1     Running   0          29m
kube-system   kube-controller-manager-k8s114             1/1     Running   0          29m
kube-system   kube-proxy-s9x57                           1/1     Running   0          30m
kube-system   kube-scheduler-k8s114                      1/1     Running   0          30m
16,发布一个nginx deployment,进行检证。使用k8s114用户执行。
发布
kubectl create deployment nginx --image=nginx查看deployments
kubectl get deployments查看deployments的结果
NAME    READY   UP-TO-DATE   AVAILABLE   AGE
nginx   1/1     1            1           28m
查看pods
kubectl get pods -o wide查看pods的结果
NAME                     READY   STATUS    RESTARTS   AGE   IP               NODE     NOMINATED NODE   READINESS GATES
nginx-65f88748fd-drh7q   1/1     Running   0          29m   192.168.40.196   k8s114   <none>           <none>
用curl访问nginx应用(IP是查看pods的结果的IP值)
curl 192.168.40.196curl的结果
<!DOCTYPE html>
<html>
<head>
<title>Welcome to nginx!</title>
<style>
    body {
        width: 35em;
        margin: 0 auto;
        font-family: Tahoma, Verdana, Arial, sans-serif;
    }
</style>
</head>
<body>
<h1>Welcome to nginx!</h1>
<p>If you see this page, the nginx web server is successfully installed and
working. Further configuration is required.</p>

<p>For online documentation and support please refer to
<a href="http://nginx.org/">nginx.org</a>.<br/>
Commercial support is available at
<a href="http://nginx.com/">nginx.com</a>.</p>

<p><em>Thank you for using nginx.</em></p>
</body>
恭喜,kubernetes 1.14正常安装完成。
结尾!