后续我将会按照一个具体的demo, 一步一步的跟进容器的启动过程。
首先构建一个Main, 用于启动容器。
public class Main {
    public static void main(String[]arg){
        ApplicationContext applicationContext = new ClassPathXmlApplicationContext("classpath:spring-context.xml");

        ((ClassPathXmlApplicationContext) applicationContext).start();
        while (true){}
    }
}
下面开始Debug, 一步一步抽丝剥茧,揭开其神秘的面纱。
通过一系列的调用,最终到了ClassPathXmlApplicationContext类中的如下方法:
public ClassPathXmlApplicationContext(
			String[] configLocations, boolean refresh, @Nullable ApplicationContext parent)
			throws BeansException {
		super(parent);
        // 设置配置路径等信息
		setConfigLocations(configLocations);
		if (refresh) {
			refresh();
		}
	}
在这里,比较关键的是refresh()方法,我们看下,里面的内容:
public void refresh() throws BeansException, IllegalStateException {
		synchronized (this.startupShutdownMonitor) {
			// Prepare this context for refreshing.
			prepareRefresh();

			// Tell the subclass to refresh the internal bean factory.
            // 获取BeanFactory
			ConfigurableListableBeanFactory beanFactory = obtainFreshBeanFactory();

			// Prepare the bean factory for use in this context.
			prepareBeanFactory(beanFactory);

			try {
				// Allows post-processing of the bean factory in context subclasses.
				postProcessBeanFactory(beanFactory);

				// Invoke factory processors registered as beans in the context.
				invokeBeanFactoryPostProcessors(beanFactory);

				// Register bean processors that intercept bean creation.
				registerBeanPostProcessors(beanFactory);

				// Initialize message source for this context.
				initMessageSource();

				// Initialize event multicaster for this context.
				initApplicationEventMulticaster();

				// Initialize other special beans in specific context subclasses.
				onRefresh();

				// Check for listener beans and register them.
				registerListeners();

				// Instantiate all remaining (non-lazy-init) singletons.
				finishBeanFactoryInitialization(beanFactory);

				// Last step: publish corresponding event.
				finishRefresh();
			}

			catch (BeansException ex) {
				if (logger.isWarnEnabled()) {
					logger.warn("Exception encountered during context initialization - " +
							"cancelling refresh attempt: " + ex);
				}

				// Destroy already created singletons to avoid dangling resources.
				destroyBeans();

				// Reset 'active' flag.
				cancelRefresh(ex);

				// Propagate exception to caller.
				throw ex;
			}

			finally {
				// Reset common introspection caches in Spring's core, since we
				// might not ever need metadata for singleton beans anymore...
				resetCommonCaches();
			}
		}
	}
refresh()方法有很多的内容,我们先看这一节需要重点分析的内容,资源的定位,下面我们进入到obtainFreshBeanFactory这个方法中。最后会进入到AbstractRefreshableApplicationContext中:
protected final void refreshBeanFactory() throws BeansException {
	// 如果Beanfactory已经存在,则销毁并关闭
    if (hasBeanFactory()) {
			destroyBeans();
			closeBeanFactory();
		}
		try {
            // 创建beanFactory并设置一些属性
			DefaultListableBeanFactory beanFactory = createBeanFactory();
			beanFactory.setSerializationId(getId());
			customizeBeanFactory(beanFactory);
            // 载入BeanDefinition, 这里面包含了Resource的定位,以及BeanDefinition的解析和注册
            // 因此重点看下该方法
			loadBeanDefinitions(beanFactory);
			synchronized (this.beanFactoryMonitor) {
				this.beanFactory = beanFactory;
			}
		}
		catch (IOException ex) {
			throw new ApplicationContextException("I/O error parsing bean definition source for " + getDisplayName(), ex);
		}
	}
进入到loadBeanDefinitions方法后,我们发现在AbstractXMlApplictionContext中,有如下代码片段:
protected void loadBeanDefinitions(DefaultListableBeanFactory beanFactory) throws BeansException, IOException {
		// Create a new XmlBeanDefinitionReader for the given BeanFactory.
        // 为上一步构建的beanFactory创建一个beanDefinitionReader类,后续对BeanDefinition的载入是由该类来完成
		XmlBeanDefinitionReader beanDefinitionReader = new XmlBeanDefinitionReader(beanFactory);

		// Configure the bean definition reader with this context's
		// resource loading environment.
		beanDefinitionReader.setEnvironment(this.getEnvironment());
		beanDefinitionReader.setResourceLoader(this);
		beanDefinitionReader.setEntityResolver(new ResourceEntityResolver(this));

		// Allow a subclass to provide custom initialization of the reader,
		// then proceed with actually loading the bean definitions.
		initBeanDefinitionReader(beanDefinitionReader);
        //通过beanDefinitonReader载入BeanDefinitions
		loadBeanDefinitions(beanDefinitionReader);
	}
继续跟进,我们发现在AbstractBeanDefinitionReader中有具体的加载过程:
public int loadBeanDefinitions(String location, @Nullable Set<Resource> actualResources) throws BeanDefinitionStoreException {
		ResourceLoader resourceLoader = getResourceLoader();
		if (resourceLoader == null) {
			throw new BeanDefinitionStoreException(
					"Cannot load bean definitions from location [" + location + "]: no ResourceLoader available");
		}

		if (resourceLoader instanceof ResourcePatternResolver) {
			// Resource pattern matching available.
			try {
                // 获取Resource, 终于发现了,我们这一节的重点, Resource的定位。 下面我们进去看看,到底怎么加载的
				Resource[] resources = ((ResourcePatternResolver) resourceLoader).getResources(location);
				int count = loadBeanDefinitions(resources);
				if (actualResources != null) {
					Collections.addAll(actualResources, resources);
				}
				if (logger.isTraceEnabled()) {
					logger.trace("Loaded " + count + " bean definitions from location pattern [" + location + "]");
				}
				return count;
			}
			catch (IOException ex) {
				throw new BeanDefinitionStoreException(
						"Could not resolve bean definition resource pattern [" + location + "]", ex);
			}
		}
		else {
			// Can only load single resources by absolute URL.
			Resource resource = resourceLoader.getResource(location);
			int count = loadBeanDefinitions(resource);
			if (actualResources != null) {
				actualResources.add(resource);
			}
			if (logger.isTraceEnabled()) {
				logger.trace("Loaded " + count + " bean definitions from location [" + location + "]");
			}
			return count;
		}
	}
此后,我们到了DefaultResourceLoader类中的:
public Resource getResource(String location) {
		Assert.notNull(location, "Location must not be null");

		for (ProtocolResolver protocolResolver : this.protocolResolvers) {
			Resource resource = protocolResolver.resolve(location, this);
			if (resource != null) {
				return resource;
			}
		}

		if (location.startsWith("/")) {
			return getResourceByPath(location);
		}
		else if (location.startsWith(CLASSPATH_URL_PREFIX)) {
            // 处理带有classpath表示的Resource,我们的Demo就会走这个分支,然后返回这个Resource
			return new ClassPathResource(location.substring(CLASSPATH_URL_PREFIX.length()), getClassLoader());
		}
		else {
			try {
				// Try to parse the location as a URL...
                // 处理URL标识的Resource
				URL url = new URL(location);
				return (ResourceUtils.isFileURL(url) ? new FileUrlResource(url) : new UrlResource(url));
			}
			catch (MalformedURLException ex) {
				// No URL -> resolve as resource path.
				return getResourceByPath(location);
			}
		}
	}
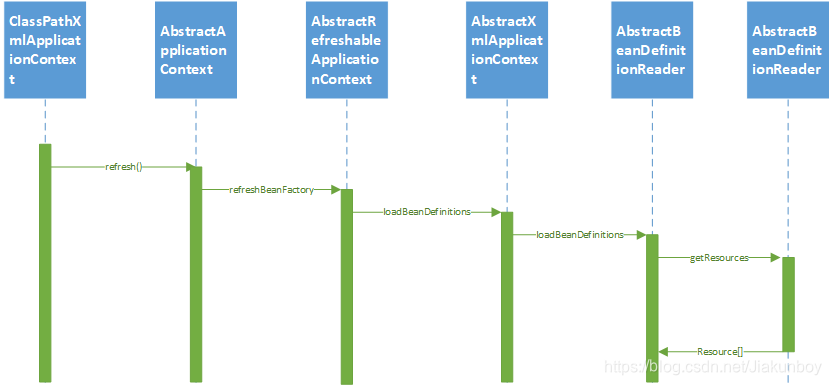
自此,Resource的定位过程完毕。 一句话总结的话,就是在容器启动的过程中,根据用户配置的路径,找到对应的Resource. 下面是具体的Spring中实现的调用链图。
接下来,将会读取资源文件中的数据,完成BeanDefinition的载入。