前面几章我们写的按键驱动程序虽然已经足够完善,但是这个驱动只有知道/dev/key设备节点和write()格式的人才能使用,不具有适应性
故本节引入标准的输入子系统,来编写通用的输入类设备。输入子系统是对所有的标准输入类设备的统一的管理系统,使用这个模型可以跨平台的处理所有的输入类设备
一、输入子系统分层
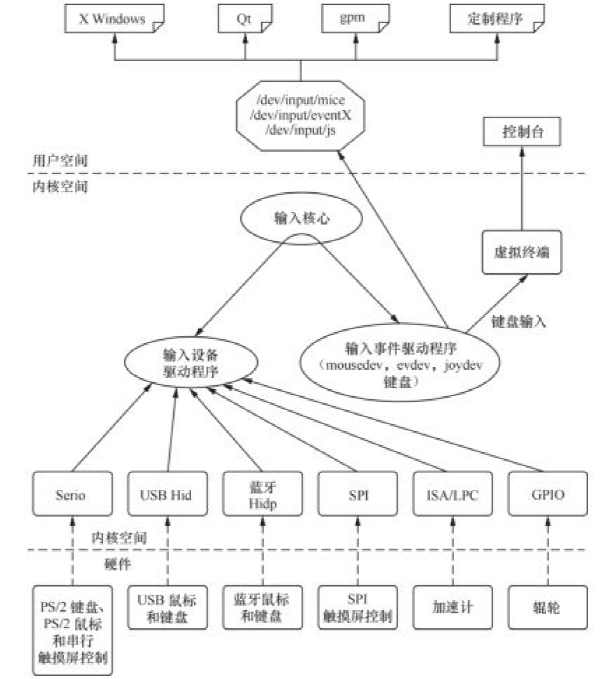
输入子系统将一个输入设备的输入过程分成了设备驱动(input device driver)和事件驱动(input event driver)两层。设备驱动负责从底层硬件采集数据,事件驱动负责给用户程序提供接口。通过分层设计,将不同的设备统一到几种驱动接口上。同一种事件驱动可以用来处理多个同类设备;同一个设备也可以和多种事件驱动相衔接。而事件驱动和设备驱动则由输入核心层进行连接,匹配。分层结构如下图:
输入子系统核心层定义在drivers/input/input.c中
由于输入子系统也是字符设备驱动程序,因此它一定也会有创建类、注册字符设备的过程,而且会有file_operations等结构体,我们可以从此进行分析
二、input.c分析
在input_init()函数中所做的和按键驱动程序中所做的大致相同,如创建类、注册名为input的字符设备
static int __init input_init(void)
{
    ...
    err = class_register(&input_class);
    ...
    err = register_chrdev(INPUT_MAJOR, "input", &input_fops);
    ...
}
其file_operations结构体定义如下:
static const struct file_operations input_fops = {
    .owner = THIS_MODULE,
    .open = input_open_file,
    .llseek = noop_llseek,
};
当我们应用程序open()时,会调用file_operations input_fops对应的open()函数
static int input_open_file(struct inode *inode, struct file *file)
{
        ...
    handler = input_table[iminor(inode) >> 5];
    if (handler)
        new_fops = fops_get(handler->fops);
        ...
    old_fops = file->f_op;
    file->f_op = new_fops;

    err = new_fops->open(inode, file);
        ...
}
由上述代码可知:
1. input_table[]根据次设备号存储handler
2. open()函数使用新的fops(设备驱动中的fops)代替了旧的fops,这个操作也就解释了为什么file_operations结构体中没有读写函数
3. open()函数在替换之后,调用了新的fops的open()函数
handler是我们之前没有分析的,它定义为:
static struct input_handler *input_table[8];
至于数组大小为什么是8,这是因为目前常用的handler只有三种:evdev,mousedev,joydev。而且evdev是通用的handler,定义8个应该够用了
handler结构体定义为:
/**
 * struct input_handler - implements one of interfaces for input devices
 * ...
 */
struct input_handler {
    void *private;

    void (*event)(struct input_handle *handle, unsigned int type, unsigned int code, int value);
    bool (*filter)(struct input_handle *handle, unsigned int type, unsigned int code, int value);
    bool (*match)(struct input_handler *handler, struct input_dev *dev);
    int (*connect)(struct input_handler *handler, struct input_dev *dev, const struct input_device_id *id);
    void (*disconnect)(struct input_handle *handle);
    void (*start)(struct input_handle *handle);

    const struct file_operations *fops;
    int minor;
    const char *name;

    const struct input_device_id *id_table;

    struct list_head    h_list;
    struct list_head    node;
};
根据注释信息,handler应该就是输入事件驱动程序的结构体
在input_handler结构体中使用了input_handle结构体,其定义如下:
/**
 * struct input_handle - links input device with an input handler
 * ...
 */
struct input_handle {
    void *private;

    int open;
    const char *name;

    struct input_dev *dev;
    struct input_handler *handler;

    struct list_head    d_node;
    struct list_head    h_node;
};
根据注释信息,input_handle用于连接input_dev和input_handler,三者关系在下面分析
分析完了input.c文件,我们来一一分析input_handler、input_handle以及两者的连接过程
三、input_dev
input_dev使用方法遵循:分配、设置、注册
分配:
struct input_dev *input_allocate_device(void)
设置(首先设置事件类,然后设置具体事件):
void input_set_capability(struct input_dev *dev, unsigned int type, unsigned int code)
{
    switch (type) {
    case EV_KEY:    // 按键事件类,可指定按键如KEY_1、KEY_Q、KEY_ENTER等
        __set_bit(code, dev->keybit);
        break;

    case EV_REL:    // 相对位移事件类,可指定相对位移如REL_X、REL_Y等
        __set_bit(code, dev->relbit);
        break;

    case EV_ABS:    // 绝对位移事件类,可指定绝对位移如ABS_X、ABS_Y等
        __set_bit(code, dev->absbit);
        break;

    ...
    }

    __set_bit(type, dev->evbit);
}
注册:
int input_register_device(struct input_dev *dev)
{
...
    /* 通用的同步事件 */
    __set_bit(EV_SYN, dev->evbit);

...
    /* 注册的设备名字为input0, 1, 2, ... */
    dev_set_name(&dev->dev, "input%ld",
             (unsigned long) atomic_inc_return(&input_no) - 1);

    /* 添加device */
    error = device_add(&dev->dev);
...
    /* 把dev结构放到链表里面 */
    list_add_tail(&dev->node, &input_dev_list);

    /* 对每一个input_handler都调用input_attach_handler()函数 */
    list_for_each_entry(handler, &input_handler_list, node)
        /* 匹配dev和handler */
        input_attach_handler(dev, handler);
...
}
其中的input_attach_handler(dev, handler);对应input_handle,因为之前说过input_handle用于连接input_dev和input_handler
在注册完成后,若input_dev获得数据,需要向核心层上报事件,上报事件使用如下函数:
// 上报事件
void input_event(struct input_dev *dev, unsigned int type, unsigned int code, int value)

// 上报绝对坐标
void input_report_abs(struct input_dev *dev, unsigned int code, int value)

// 上报相对坐标
void input_report_rel(struct input_dev *dev, unsigned int code, int value)

// 上报键值
void input_report_key(struct input_dev *dev, unsigned int code, int value)

// 上报同步事件
void input_sync(struct input_dev *dev)
代码中后四个函数均使用input_event()函数实现,input_event()函数调用过程如下:
input_event()
  -> input_handle_event()
    -> input_pass_event()
      -> handler->event(handle, type, code, value);
上报事件最终会调用handler->event()函数
之前说过evdev是通用的handler,在此我便以/drivers/input/evdev.c进行分析
evdev_read()会进行休眠,evdev_event()在上报事件被调用后会唤醒休眠进程,从而完成read()操作
注销:
// 注销
void input_unregister_device(struct input_dev *dev)

// 释放
void input_free_device(struct input_dev *dev)
四、input_handler
注册:
int input_register_handler(struct input_handler *handler)
{
...
    INIT_LIST_HEAD(&handler->h_list);

    /* 设置input_table */
    if (handler->fops != NULL) {
        if (input_table[handler->minor >> 5]) {
            retval = -EBUSY;
            goto out;
        }
        input_table[handler->minor >> 5] = handler;
    }

    /* 把handler放入input_handler_list */
    list_add_tail(&handler->node, &input_handler_list);

    /* 对每一个dev调用input_attach_handler匹配handler */
    list_for_each_entry(dev, &input_dev_list, node)
        input_attach_handler(dev, handler);
...
}
注销:
void input_unregister_handler(struct input_handler *handler)
五、input_dev和input_handler的连接过程
两者匹配使用的是input_attach_handler()函数:
static int input_attach_handler(struct input_dev *dev, struct input_handler *handler)
{
...
    id = input_match_device(handler, dev);
...
    error = handler->connect(handler, dev, id);
...
}
input_match_device()函数:
static const struct input_device_id *input_match_device(struct input_handler *handler,
                            struct input_dev *dev)
{
    for (id = handler->id_table; id->flags || id->driver_info; id++) {

        // 默认的匹配过程,使用handler->id_table和dev->id进行匹配

        if (!handler->match || handler->match(handler, dev))
            return id;
    }
}
在代码中,匹配成功退出调用handler的connect()函数,否则调用handler的match()函数
在此还是以evdev为例,其连接函数为evdev_connect()定义如下:
static int evdev_connect(struct input_handler *handler, struct input_dev *dev,
             const struct input_device_id *id)
{
...
    /* 分配evdev */
    evdev = kzalloc(sizeof(struct evdev), GFP_KERNEL);
...
    /* 设置handle */
    evdev->handle.dev = input_get_device(dev);
    evdev->handle.name = dev_name(&evdev->dev);
    evdev->handle.handler = handler;
    evdev->handle.private = evdev;
...
    /* 注册handle */
    error = input_register_handle(&evdev->handle);

    error = evdev_install_chrdev(evdev);
    error = device_add(&evdev->dev);
...
}
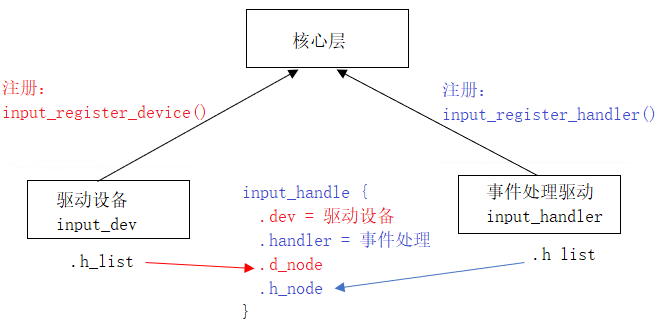
input_dev、input_handler和input_handle三者关系如下:
六、总结
1. input_init()初始化输入子系统
1.1 调用register_chrdev(13, "input", &input_fops);
2. open()输入子系统文件:int input_open_file()
2.1 替换替换file_oprations
2.2 执行new_fops->open()函数
3. 注册input_handler:input_register_handler()
3.1 添加handler到input_table[]数组
3.2 添加handler到input_handler_list链表
3.3 调用input_attach_handler()
4. 注册input_dev:input_register_device()
4.1 添加dev到input_dev链表
4.2 调用input_attach_handler()
5. 匹配:input_attach_handler()
5.1 匹配dev->id和handler->id_table
5.2 成功,调用input_handler->connect()
6. 连接:input_handler->connect()
6.1 创建input_handle,三者连接
7. event发生(如按键中断),在中断函数中上报事件:input_event()
7.1 调用input_handler->event()