拓扑图
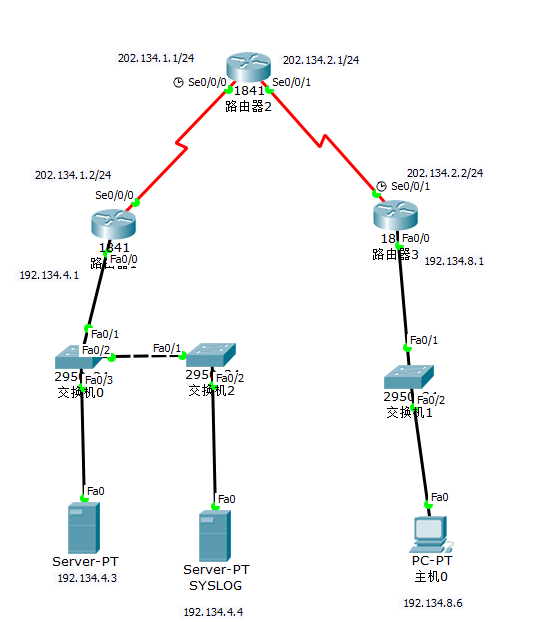
广域网ip地址
| 设备 |
接口 |
Ip |
| Router2 |
S0/0/0 |
202.134.1.1/24 |
| S0/0/1 |
202.134.2.1/24 |
|
| Router1 |
S0/0/0 |
202.134.1.2/24 |
| Router3 |
S0/0/1 |
202.134.2.2/24 |
网络设备地址规划
| 设备 |
接口 |
Ip |
| Router1 |
F0/0 |
192.134.4.1/22 |
| Router3 |
F0/0 |
192.134.8.1/22 |
| Pc0 |
Fa0 |
192.134.8.6 |
| NTPServer |
Fa0 |
192.134.4.3 |
| LogServerf |
Fa0 |
192.134.4.4 |
任务1、基本配置,测试联通性
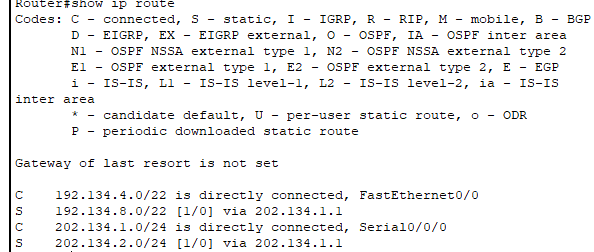
R1的路由配置
Router(config)#ip route 202.134.2.0 255.255.255.0 202.134.1.1
Router(config)#ip route 192.134.8.0 255.255.252.0 202.134.1.1
R2的路由配置
Router(config)#ip route 192.134.4.0 255.255.252.0 202.134.1.2
Router(config)#ip route 192.134.8.0 255.255.252.0 202.134.2.2
R3的路由配置
Router(config)#ip route 192.134.4.0 255.255.252.0 202.134.2.1
Router(config)#ip route 202.134.1.0 255.255.255.0 202.134.2.1
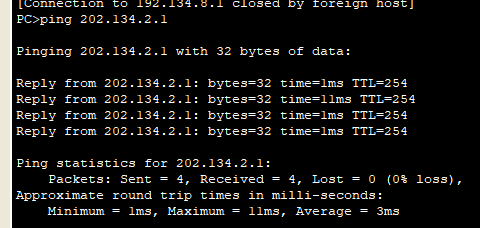
从 PC-A ping PC-C

任务 2 加强路由安全
第一步 在 R1R3 设置最短密码长度为 5
R1(config)# security passwords min-length 5
R3(config)# security passwords min-length 5
第二步 在 R1、R3 配置 enable secret password
R1(config)# enable secret abc123
R3(config)# enable secret abc123
第三步 密码加密
R1(config)# service password-encryption
R3(config)# service password-encryption
第四步 配置 R1R3 的配置接口
R1(config)# line console 0
R1(config-line)# password abc123
R1(config-line)# exec-timeout 5 0
R1(config-line)# login
R1(config-line)# logging synchronous
R3(config)# line console 0
R3(config-line)# password abc123
R3(config-line)# exec-timeout 5 0
R3(config-line)# login
R3(config-line)# logging synchronous
第五步 在 R1 配置远程
R1(config)# line vty 0 4
R1(config-line)# password abc123
R1(config-line)# exec-timeout 5 0
R1(config-line)# login authentication default
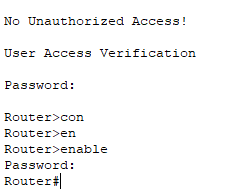
第六步 配置 R1、R3 的登入显示
R1(config)# banner motd $No Unauthorized Access!$
R3(config)# banner motd $No Unauthorized Access!$
验证
任务 3 配置 R1、R3 的本地验证
第一步配置本地用户数据库
R1(config)# username musimusi privilege 15 secret abc123
R3(config)# username musimusi privilege 15 secret abc123
第二步 启用 AAA 服务
R1(config)# aaa new-model
R3(config)# aaa new-model
第三步 利用 AAA 服务我们的本地数据库
使用没有备份方法的本地身份验证创建默认登录验证方法列表
R1(config)# aaa authentication login default local none
R3(config)# aaa authentication login default local none
验证

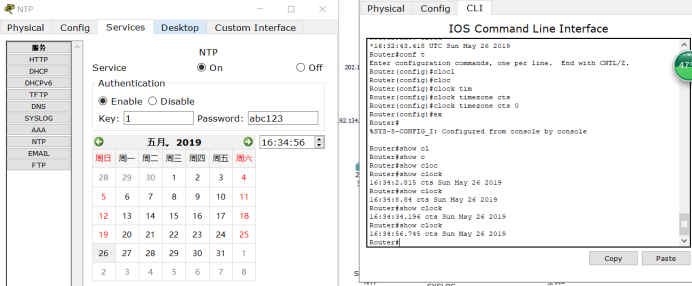
任务 4 配置 NTP
第一步 在 PC-A 启用 NTP 验证

第二步 把 R1 设为 NTP 客户机
R1(config)# ntp authenticate
R1(config)# ntp authentication-key 1 md5 abc123
R1(config)# ntp trusted-key 1
R1(config)# ntp server 192.168.4.3 key 1
配置路由器定时从 NTP 更新时钟。
R1(config)# ntp update-calendar
查看时间同步:
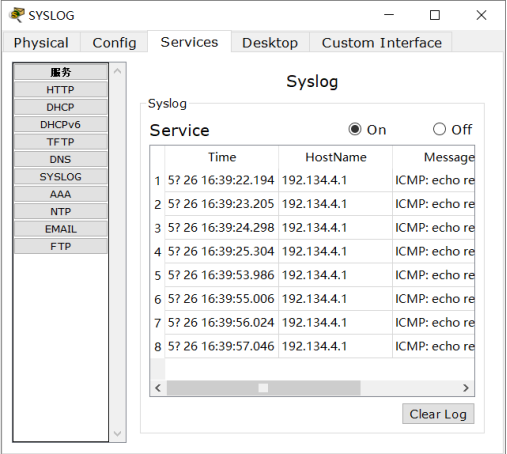
任务 5 在 R1 配置为 Syslog 客户机
第一步 配置 R1 的时间标记日志信息配置和 R1 使其从 syslog 服务器获取日志信息
R1(config)# service timestamps log datetime msec
R1(config)# logging 192.134.4.4
通过PC0pingR1 查看ICMP的日志,验证syslog获取了日志信息

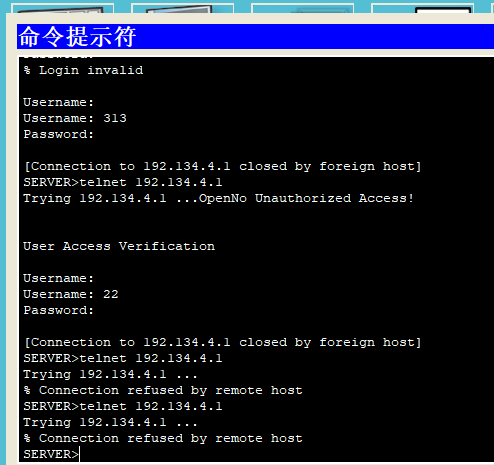
任务 6 使路由避免登入攻击
Router(config)#login block-for 30 attempts 5 within 30
通过设置静默状态可以实现多次密码错误后进入静默状态,从而telnet不到R1
我这里设的是30秒的静默状态,30秒后即可在telnet R1

任务 7 在 R3 配 SSH
在 R3 配置域名,配置 R3 远程和在 R3 配置 RSA 加密密钥对
Router(config)#hostname R3
R3(config)#ip domain name musi
R3(config)#crypto key generate rsa
R3(config)#lin
R3(config)#line vty 0 4
R3(config-line)#logging synchronous
R3(config-line)#login local
R3(config-line)#transport input ssh
R3(config)#username musi privilege 0 secret abc123
R3(config)#enable secret abc123
配置之后在pc使用ssh -l musi 192.134.8.1登录R3

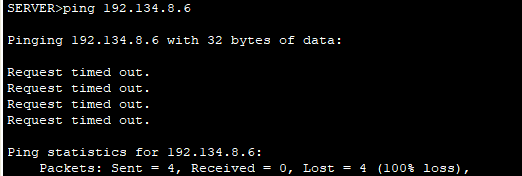
任务八 在 R1 配置 CBAC
创建一个 OUT-IN IP ACL 阻隔所有 外网流量
R1(config)# ip access-list extended OUT-IN
R1(config-ext-nacl)# deny ip any any
R1(config-ext-nacl)# exit
R1(config)# interface s0/0/0
R1(config-if)# ip access-group OUT-IN in
PC-A ping 不通 PC-C
创建一个检测规则(IN-OUT-IN)来检测 ICMP,Telnet 和 HTTP 流量。
R1(config)# ip inspect name IN-OUT-IN icmp
R1(config)# ip inspect name IN-OUT-IN telnet
R1(config)# ip inspect name IN-OUT-IN http
R1(config)# interface s0/0/0
R1(config-if)# ip inspect IN-OUT-IN out
PC-ApingPC-C 时 ICMP 响应包会被检测并允许通过。

在 R3 配置 ZPF
第一步 测试连通性 PC-C 能 ping 和 telnet 到 R2

第二步 配置防火墙区域
R3(config)# zone security IN-ZONE
R3(config)# zone security OUT-ZONE
R3(config)# access-list 101 permit ip 192.168.8.0 0.0.3.255 any
R3(config)# class-map type inspect match-all IN-NET-CLASS-MAP
R3(config-cmap)# match access-group 101
R3(config-cmap)# exit
R3(config)# policy-map type inspect IN-2-OUT-PMAP
R3(config-pmap)# class type inspect IN-NET-CLASS-MAP
R3(config-pmap-c)# inspect
应用防火墙策略
R3(config)# zone-pair security IN-2-OUT-ZPAIR source IN-ZONE destination
OUT-ZONE
R3(config-sec-zone-pair)# service-policy type inspect IN-2-OUT-PMAP
R3(config)# interface fa0/1
R3(config-if)# zone-member security IN-ZONE
R3(config-if)# interface s0/0/1
R3(config-if)# zone-member security OUT-ZONE
测试防火墙功能
PC-Cping、telnet 得通 R2,R2ping 不通 PC-C


任务十 保证交换机参数安全
第一步 在所有交换机密文密码配置
S1(config)# enable secret abc123
第二步 加密明文密码
S1(config)# service password-encryption
第三步 配置所有交换机的 console 接入
S1(config)# line console 0
S1(config-line)# password abc123
S1(config-line)# exec-timeout 5 0
S1(config-line)# login
S1(config-line)# logging synchronous
第四步 在每台交换机配置 telnet
S1(config)# line vty 0 4
S1(config-line)# password abc123
S1(config-line)# exec-timeout 5 0
S1(config-line)# login
第五步 设置 S1,S2 的 T 口安全参数s2同
S1(config)# interface FastEthernet 0/2
S1(config-if)# switchport mode trunk
将 S1 和 S2 主干端口本地 VLAN 设置到未使用的 VLAN 99
S1(config)# interface Fa0/2
S1(config-if)# switchport trunk native vlan 99
S1(config-if)# end
S2(config)# interface Fa0/1
S2(config-if)# switchport trunk native vlan 99
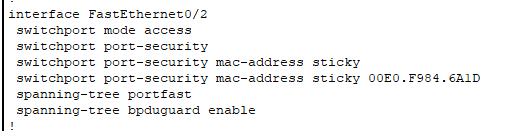
第六步 设置端口安全参数
S1(config)# interface FastEthernet 0/3
S1(config-if)# switchport mode access
S1(config-if)# interface FastEthernet 0/1
S1(config-if)# switchport mode access
S2(config)# interface FastEthernet 0/2
S2(config-if)# switchport mode access
S3(config)# interface FastEthernet 0/1
S3(config-if)# switchport mode access
S3(config-if)# interface FastEthernet 0/2
S3(config-if)# switchport mode access
S1(config)# interface FastEthernet 0/5
S1(config-if)# spanning-tree portfast
S1(config)# interface FastEthernet 0/5
S1(config-if)# spanning-tree bpduguard enable
S1(config)# interface FastEthernet 0/5
S1(config-if)# shutdown
S1(config-if)# switchport port-security
S1(config-if)# switchport port-security mac-address sticky
S1(config-if)# no shutdown
(以上端口相同配置)
验证端口安全
S2#show run