 实现背景
实现背景
最近学习《vue实战》,第二篇进阶篇有一个练习


刚好最近在研究vue移动端框架vant
两者结合,实现这么个小项目
实现代码
新建 vue单文件 L0529L.vue
<template>
  <div class="dom">
    <div class="tmnr">{{showtm+1}}. {{timu[showtm]['tmcontent']}}</div>
    <component0529
      :info="ziInfo"
      :showtm="showtm"
      @chooseRadio="changeAnswer"
      @chooseCheckbox="changeAnswer"
      @chooseInput="changeAnswer"
    ></component0529>
    <div class="buttondom">
      <van-button type="primary" v-show="showtm>0" @click="shangtm" :disabled="showtm===0">上一题</van-button>
      <van-button
        type="primary"
        v-show="showtm<timu.length-1"
        @click="nexttm"
        :disabled="nextdisable"
      >下一题</van-button>
      <van-button type="warning" @click="chongzhi">重置</van-button>
    </div>
  </div>
</template>

<script>
import component0529 from "./views/component0529";

export default {
  name: "",
  data() {
    return {
      showtm: 0,
      timu: [
        {
          id: 1,
          type: "radio",
          tmcontent: "题目内容1-单选",
          xx: [
            { id: "A", nr: "选项A-单选" },
            { id: "B", nr: "选项B-单选" },
            { id: "C", nr: "选项C-单选" }
          ],
          cannext: false,
          answer: ""
        },
        {
          id: 2,
          type: "checkbox",
          tmcontent: "题目内容2-复选",
          xx: [
            { id: "A", nr: "选项A", ischeck: false },
            { id: "B", nr: "选项B", ischeck: false },
            { id: "C", nr: "选项C", ischeck: false },
            { id: "D", nr: "选项D", ischeck: false }
          ],
          cannext: false,
          answer: []
        },
        {
          id: 3,
          type: "input",
          tmcontent: "题目内容3-问答",
          cannext: false,
          answer: ""
        }
      ]
    };
  },
  computed: {
    ziInfo() {
      return this.timu[this.showtm];
    },
    nextdisable() {
      var a = false;
      if (this.showtm == this.timu.length - 1) a = true;
      var t = this.timu[this.showtm]["type"];
      switch (t) {
        case "radio":
          if (this.timu[this.showtm]["answer"] == "") a = true;
          break;
        case "checkbox":
          if (
            this.timu[this.showtm]["answer"].length != 2 &&
            this.timu[this.showtm]["answer"].length != 3
          )
            a = true;
          break;
        case "input":
          var c = this.timu[this.showtm]["answer"];
          if (c.length < 100) a = true;
          break;
      }
      return a;
    }
  },
  components: {
    component0529
  },
  methods: {
    nexttm() {
      this.showtm++;
    },
    shangtm() {
      this.showtm--;
    },
    chongzhi() {
      if (this.timu[this.showtm]["type"] == "checkbox") {
        this.timu[this.showtm]["answer"].length = 0;
        for (var i = 0; i < this.timu[this.showtm]["xx"].length; i++) {
          this.timu[this.showtm]["xx"][i]["ischeck"] = false;
        }
      } else {
        this.timu[this.showtm]["answer"] = "";
      }
    },
    changeAnswer(ans) {
      this.timu[this.showtm]["answer"] = ans;
    }
  }
};
</script>

<style scoped>
.dom{
  padding: 14px;
}
.tmnr{
  margin: 10px 0px;
  text-align: left;
}
.buttondom {
  position: absolute;
  bottom: 10px;
  text-align: center;
  width: 100%;
}
</style>
引入组件 component0529.vue 代码:
<template>
  <ul>
    <li v-if="info.type==='checkbox'">
      <van-checkbox
        v-for="infoa in childInfo.xx"
        v-model="infoa.ischeck"
        @change="changeCheckbox"
      >{{infoa.nr}}</van-checkbox>
    </li>
    <li v-else-if="info.type==='radio'">
      <van-radio-group v-model="childInfo.answer" @change="changeRadio">
        <van-radio v-for="infoa in childInfo.xx" :name="infoa.id">{{infoa.nr}}</van-radio>
      </van-radio-group>
    </li>
    <li v-else-if="info.type==='input'">
      <van-cell-group>
        <van-field
          v-model="childInfo.answer"
          type="textarea"
          placeholder="请输入不少于100字"
          rows='1'
          autosize
          border="true"
        />
      </van-cell-group>
    </li>
  </ul>
</template>

<script>
export default {
  props: ["info", "showtm"],
  data() {
    return {};
  },
  computed: {
    childInfo() {
      var an = this.info["answer"],
        type = this.info["type"];

      if (type == "checkbox") {
        for (var i = 0; i < this.info.xx.length; i++) {
          var x = this.info.xx[i];
          if (an.join(",").indexOf(x.id) > -1) x.ischeck = true;
        }
      }

      return this.info;
    }
  },
  methods: {
    changeRadio() {
      var a = this.childInfo.answer;
      this.$emit("chooseRadio", a);
    },
    changeCheckbox() {
      var a = [];
      for (var i = 0; i < this.childInfo.xx.length; i++) {
        if (this.childInfo.xx[i]["ischeck"]) a.push(this.childInfo.xx[i]["id"]);
      }

      this.$emit("chooseCheckbox", a);
    },
    changeInput() {
      this.$emit("chooseInput", this.childInfo.answer);
    }
  },
  components: {}
};
</script>

<style scoped>
ul li .van-radio,
.van-checkbox {
  margin: 16px 0px;
}
</style>
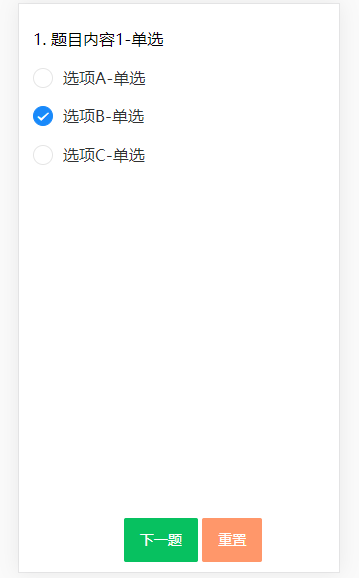
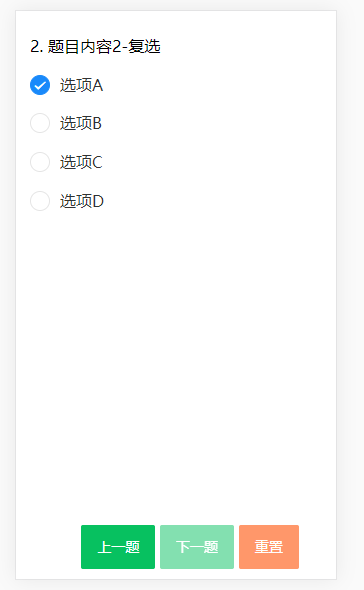
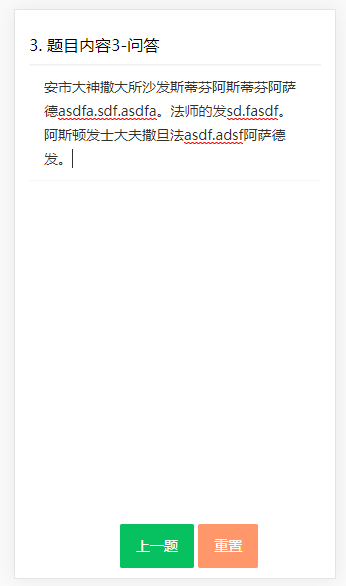
实现页面展示
解释逻辑
1.在L0529L.vue 定义好相关问卷题目,设计好题目类型,内容,选项,选择或者输入的答案等
2.定义一个当前题目id==showtm,用这个参数决定当前显示的是哪道题。
3、将题目传递给子组件component0529.vue,在这里面处理显示选项信息或者输入框
4、子组件信息操作选择完成或者输入了相关信息,修改对应父组件中问题的答案
5、刚接触vue,逻辑方面有些冗余啰嗦,以后有更好的实现想法再进行修改