加密与解密
加密 发送方: 明文 -----》 密文
解密 接收方 : 密文 -----》明文
加密的方式 :
对称加密 :
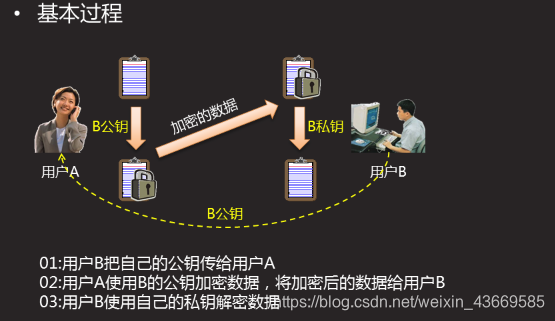
非对称加密:
常用的加密算法:
MD5完整性校验:
[root@zhenji ~]# md5sum /root/a.txt # 只要a.txt 的文件内容不变,则hash 不变,,如果内容变了,则hash值也变
e5828c564f71fea3a12dde8bd5d27063 /root/a.txt
[root@zhenji ~]# sha1sum /root/a.txt
7bae8076a5771865123be7112468b79e9d78a640 /root/a.tx
GPG加密/解密
[root@zhenji ~]# which gpg
/usr/bin/gpg
[root@zhenji ~]# rpm -qf /usr/bin/gpg
gnupg2-2.0.22-5.el7_5.x86_64
1.1相关概念
1.2 gpg软件的介绍
1.3 GPG数据加密解密例子
gpg 对称加/解密
[root@zhenji ~]# useradd usera
[root@zhenji ~]# useradd userb
[root@zhenji ~]# ssh -X usera@localhost
[usera@zhenji ~]$ vim test.txt
[usera@zhenji ~]$ cat test.txt
i love you
[usera@zhenji ~]$ gpg -c test.txt # 将用gpg 将test.txt 加密 ,提示输入加密密吗
[usera@zhenji ~]$ ls
test.txt test.txt.gpg 加密文件
[usera@zhenji ~]$ ls -a ~
[usera@zhenji ~]$ mv test.txt.gpg /tmp/ 移动加密文件
登陆另外一个用户
[root@zhenji ~]# ssh -X userb@localhost
[userb@zhenji ~]$ ls /home/usera/
ls: 无法打开目录/home/usera/: 权限不够
[userb@zhenji ~]$ gpg -d /tmp/test.txt.gpg > ~/a1.txt #提示输入解密密吗
[userb@zhenji ~]$ cat a1.txt
i love you
gpg 非对称加/解密
[root@pc117 ~]# mv /dev/random /dev/random1
[root@pc117 ~]# ln -s /dev/urandom /dev/random
userb 接收方 解密数据
]# rm -rf ~/.gnupg
1 创建密钥对 ]# gpg --gen-key
[userb@pc117 ~]$ gpg --gen-key
gpg (GnuPG) 2.0.22; Copyright (C) 2013 Free Software Foundation, Inc.
This is free software: you are free to change and redistribute it.
There is NO WARRANTY, to the extent permitted by law.
gpg: 已创建目录‘/home/userb/.gnupg’
gpg: 新的配置文件‘/home/userb/.gnupg/gpg.conf’已建立
gpg: 警告:在‘/home/userb/.gnupg/gpg.conf’里的选项于此次运行期间未被使用
gpg: 钥匙环‘/home/userb/.gnupg/secring.gpg’已建立
gpg: 钥匙环‘/home/userb/.gnupg/pubring.gpg’已建立
请选择您要使用的密钥种类:
(1) RSA and RSA (default)
(2) DSA and Elgamal
(3) DSA (仅用于签名)
(4) RSA (仅用于签名)
您的选择?
RSA 密钥长度应在 1024 位与 4096 位之间。
您想要用多大的密钥尺寸?(2048)
您所要求的密钥尺寸是 2048 位
请设定这把密钥的有效期限。
0 = 密钥永不过期
<n> = 密钥在 n 天后过期
<n>w = 密钥在 n 周后过期
<n>m = 密钥在 n 月后过期
<n>y = 密钥在 n 年后过期
密钥的有效期限是?(0)
密钥永远不会过期
以上正确吗?(y/n)y
You need a user ID to identify your key; the software constructs the user ID
from the Real Name, Comment and Email Address in this form:
"Heinrich Heine (Der Dichter) <[email protected]>"
真实姓名:userb
电子邮件地址:[email protected]
注释:userbkey
您选定了这个用户标识:
“userb (userbkey) <[email protected]>”
更改姓名(N)、注释(C)、电子邮件地址(E)或确定(O)/退出(Q)?O
您需要一个密码来保护您的私钥。
我们需要生成大量的随机字节。这个时候您可以多做些琐事(像是敲打键盘、移动
鼠标、读写硬盘之类的),这会让随机数字发生器有更好的机会获得足够的熵数。
我们需要生成大量的随机字节。这个时候您可以多做些琐事(像是敲打键盘、移动
鼠标、读写硬盘之类的),这会让随机数字发生器有更好的机会获得足够的熵数。
gpg: /home/userb/.gnupg/trustdb.gpg:建立了信任度数据库
gpg: 密钥 30D97FCC 被标记为绝对信任
公钥和私钥已经生成并经签名。
gpg: 正在检查信任度数据库
gpg: 需要 3 份勉强信任和 1 份完全信任,PGP 信任模型
gpg: 深度:0 有效性: 1 已签名: 0 信任度:0-,0q,0n,0m,0f,1u
pub 2048R/30D97FCC 2019-05-28
密钥指纹 = FCF6 CB16 D44A B929 8DAB 452F ED44 43AB 30D9 7FCC
uid userb (userbkey) <[email protected]>
sub 2048R/9A57C81B 2019-05-28
[userb@pc117 ~]$
2 导出公钥 ]# gpg --export -a > userb.pub
3 把公钥文件共享( mv / scp )
]# mv userb.pub /tmp/
usera 发送方 加密数据
]# rm -rf ~/.gnugp
1 导入公钥 ]# gpg --import /tmp/userb.pub
]# ls ~/.gnupg
2 使用公钥加密 gpg -e
[usera@pc117 ~]$ gpg -e -r userb test2.txt
gpg: 9A57C81B:没有证据表明这把密钥真的属于它所声称的持有者
pub 2048R/9A57C81B 2019-05-28 userb (userbkey) <[email protected]>
主钥指纹: FCF6 CB16 D44A B929 8DAB 452F ED44 43AB 30D9 7FCC
子钥指纹: 621E 1263 CB39 21D3 D0A3 09A1 2881 64C1 9A57 C81B
这把密钥并不一定属于用户标识声称的那个人。如果您真的知道自
己在做什么,您可以在下一个问题回答 yes。
无论如何还是使用这把密钥吗?(y/N)y
3 发送加密文件 ]# mv / scp
]# mv test2.txt.gpg /tmp/
4 接收方userb 用户使用私钥解密 ]# gpg -d
]# gpg -d /tmp/test2.txt.gpg > ~/b.txt
]# cat ~/b.txt
创建
1.3.3 GPG软件签名与验证
1 使用私钥签名
userb]# gpg -b a1.txt
]# ls a1.txt.sig
2 共享签名文件 公钥匙文件 原文件
userb]# cp a1.txt /tmp/
userb]# cp a1.txt.sig /tmp/
公钥文件已经共享过了
3 导入公钥
公钥 usera 已经导入过了
4 使用公钥验证签名文件
usera]# gpg --verify /tmp/a1.txt.sig 完好
[root@pc117 ~]# sed -i '1aAAAAAA' /tmp/a1.txt
usera]# gpg --verify /tmp/a1.txt.sig损坏
[root@pc117 ~]# sed -i '2d' /tmp/a1.txt
usera]# gpg --verify /tmp/a1.txt.sig 完好
二、AIDE入侵检测系统
2.1 AIDE介绍
2.2 配置AIDE入侵检测服务 17:05
]# yum -y install aide
]# sed -i '99,$s/^/#/' /etc/aide.conf
]# vim /etc/aide.conf
/root/ FIPSR
:wq
]# aide --init
]# cp /var/lib/aide/aide.db.new.gz /tmp/
]# cd /var/lib/aide/
]# mv aide.db.new.gz aide.db.gz
2.3 对监测的/root 目录做 监测项 的操作
rm -rf plj.000001
rm -rf plj.000002
vim redis.sh
vim 3c.txt
2.4 做“入侵” 监测
]# aide --check
/root/.bash_logout atime in future
/root/.bash_profile atime in future
/root/.bashrc atime in future
/root/.bash_history atime in future
/root/.bash_history mtime in future
/root/.bash_history ctime in future
/root/my-httpd.pp atime in future
/root/my-httpd.pp mtime in future
/root/my-httpd.pp ctime in future
/root/.ssh mtime in future
/root/.ssh ctime in future
/root/my-httpd.te atime in future
/root/my-httpd.te mtime in future
/root/my-httpd.te ctime in future
/root/.cache/abrt mtime in future
/root/.cache/abrt ctime in future
/root/.cache/abrt/lastnotification mtime in future
/root/.cache/abrt/lastnotification ctime in future
/root/.ssh/known_hosts atime in future
/root/.ssh/known_hosts mtime in future
/root/.ssh/known_hosts ctime in future
AIDE 0.15.1 found differences between database and filesystem!!
Start timestamp: 2019-05-28 16:45:41
Summary:
Total number of files: 1983
Added files: 1
Removed files: 2
Changed files: 2
---------------------------------------------------
Added files:
---------------------------------------------------
added: /root/3c.txt
---------------------------------------------------
Removed files:
---------------------------------------------------
removed: /root/plj.000001
removed: /root/plj.000002
---------------------------------------------------
Changed files:
---------------------------------------------------
changed: /root/.viminfo
changed: /root/redis.sh
---------------------------------------------------
Detailed information about changes:
---------------------------------------------------
File: /root/.viminfo
Size : 6583 , 6559
Mtime : 2019-06-02 23:15:41 , 2019-05-28 16:43:14
Ctime : 2019-06-02 23:15:41 , 2019-05-28 16:43:14
Inode : 33575008 , 33680404
SHA256 : rqn0CANhMf3xx576u2xCtHxylYxXmqWr , Ercty6KlnzFOjfnJ6Zwm4WapUBiN9eIA
File: /root/redis.sh
Size : 312 , 335
Mtime : 2019-03-01 12:00:30 , 2019-05-28 16:42:58
Ctime : 2019-03-01 12:00:30 , 2019-05-28 16:42:58
Inode : 40580346 , 33680401
SHA256 : jaHA74sC1f94wVWg5pCTOxR0J3UsyRSb , VRyl4RT3CZjjxp3oNk6vBpSNHmfwCae5
[root@host53 ~]#
三、扫描与抓包
3.0 相关概念
3.1 nmap 扫描
基本用法
]# nmap [扫描类型] [选项] <扫描目标 ...>
]# man nmap
常用的扫描类型
-sS,TCP SYN扫描(半开)
-sT,TCP 连接扫描(全开)
-sU,UDP扫描
-sP,ICMP扫描
-A,目标系统全面分析
选项 -n -p
扫描目标:ip地址
192.168.4.53
192.168.4.1-254
192.168.4.0/24
192.168.4.50-51
192.168.4.51,53,55
主机名 www.taobao.com
[root@pc117 ~]# rpm -q nmap
nmap-6.40-7.el7.x86_64
[root@pc117 ~]# which nmap
/bin/nmap
]# nmap -sP -n 172.40.54.100-110
]# nmap -sS -n 172.40.54.102
]# nmap -A 172.40.54.102
]# nmap -p 21-22 192.168.4.0/24
]# nmap -p 21-80 172.40.54.102
]# nmap -p 3306,27017 172.40.54.102
]# nmap -sS -n 192.168.4.53
]# nmap -sT -n 192.168.4.53
3.2 tcpdump抓包 (命令行)
[root@zhenji ~]# which tcpdump
/usr/sbin/tcpdump
[root@zhenji ~]# rpm -qf /sbin/tcpdump
tcpdump-4.9.2-3.el7.x86_64 安装的软件包
抓包命令:
tcpdump -i 网口
[root@zhenji ~]# tcpdump -c 2 #只抓两条数据的包
[root@zhenji ~]# tcpdump -c 2 -A # -A 转换为acsii 码
[root@zhenji ~]# tcpdump -c 2 -A -w soft.cap # 将抓的包写进soft.cap,
[root@zhenji ~]# tcpdump -A -r soft.cap # 阅读soft.cap
tcpdump抓包命令
类型: host (主机) net (网络) port (端口) portrange
方向:src(源地址)dst(目标地址)
协议: tcp,udp ip wlan arp
多个条件组合: and or not
[root@zhenji ~]# tcpdump -A icmp and host 176.130.7.79
抓ftp 包: 如果数据未加密容易泄露数据
主机53
[root@host53 ~]# setenforce 0
[root@host53 ~]# useradd student
[root@host53 ~]# echo 123456 | passwd --stdin student
[root@host53 ~]# systemctl restart vsftpd
[root@host53 ~]# tcpdump -A -w ftp.scp port 21
在真机操作:
[root@zhenji ~]# ftp 192.168.4.53
Connected to 192.168.4.53 (192.168.4.53).
220 (vsFTPd 3.0.2)
Name (192.168.4.53:root): student
331 Please specify the password.
Password:
230 Login successful.
主机53 查看抓包
[root@host53 ~]# tcpdump -A -r ftp.scp | grep -i user
.l......USER student
[root@host53 ~]# tcpdump -A -r ftp.scp | grep -i PASS
.l.Y....PASS 123456
wireshark抓包 (图形抓包软件)
[root@zhenji ~]# yum -y install wireshark wireshark-gnome.x86_64(图形界面)
[root@zhenji ~]# scp [email protected]:/root/ftp.cap /root