版权声明:如若转载,烦请联系作者。 https://blog.csdn.net/ZYD45/article/details/88537925
ExtJS6 提供了日历控件,但是官网的demo贼坑,只讲了ajax使用,经过不懈努力地,无头苍蝇式尝试,终于摸到了使用门槛。
首先
在具体项目里,引用calendar的包。

其次
设定好calendar的store,这个很重要。因为,整个日历控件,最主要的就是store对应的事务。你在日历控件上看到的如下图中,每一条,都是一个event

这里采用的store是 memory 内存的模式,不用ajax。我这里有四种事务,有的时候是,某一类事务更新,有的时候是全更新
{
    type: 'calendar-calendars',
    autoLoad: true,
    asynchronousLoad: true, //允许异步加载
    proxy: {
        type: 'memory',
        data: [{
            id: 1,
            title: 'Plan',
            color: '#f69218',
            eventStore: {
                model: 'Task.model.calendar.CalMonthEvent', //自定义的model改变了一些东西可以用原本的model,不配置就是原生的
                asynchronousLoad: true,
                proxy: {
                    type: 'memory',
                    data: null,
                    reader: {
                        type: 'json',
                    }
                }
            }
        }, {
            id: 2,
            title: 'Act',
            color: '#02b8d0',
            eventStore: {
                model: 'Task.model.calendar.CalMonthEvent',
                asynchronousLoad: true,
                proxy: {
                    type: 'memory', //采用内存模式
                    data: null,
                    reader: {
                        type: 'json',
                    }
                }
            }
        }, {
            id: 4,
            title: 'ToExcSummary',
            color: '#6f95e1',
            eventStore: {
                model: 'Task.model.calendar.CalMonthEvent',
                asynchronousLoad: true,
                proxy: {
                    type: 'memory',
                    data: null,
                    reader: {
                        type: 'json',
                    }
                }
            }
        }, {
            id: 5,
            title: 'ExSummary', //已批小结
            color: '#8bc34a',
            eventStore: {
                model: 'Task.model.calendar.CalMonthEvent',
                asynchronousLoad: true,
                proxy: {
                    type: 'memory',
                    data: null
                }
            }
        }]
    }
设置好后,把他放入calendar控件中
{
    xtype: 'calendar-weekview',//可以采用calendar的其他视图 这里采用周视图
    flex: 1,
    gestureNavigation: false,
    store:{
    type: 'calendar-calendars',
    autoLoad: true,
    asynchronousLoad: true, //允许异步加载
    proxy: {
        type: 'memory',
        data: [{
            id: 1,
            title: 'Plan',
            color: '#f69218',
            eventStore: {
                model: 'Task.model.calendar.CalMonthEvent', //自定义的model改变了一些东西可以用原本的model,不配置就是原生的
                asynchronousLoad: true,
                proxy: {
                    type: 'memory',
                    data: null,
                    reader: {
                        type: 'json',
                    }
                }
            }
        }, {
            id: 2,
            title: 'Act',
            color: '#02b8d0',
            eventStore: {
                model: 'Task.model.calendar.CalMonthEvent',
                asynchronousLoad: true,
                proxy: {
                    type: 'memory', //采用内存模式
                    data: null,
                    reader: {
                        type: 'json',
                    }
                }
            }
        }, {
            id: 4,
            title: 'ToExcSummary',
            color: '#6f95e1',
            eventStore: {
                model: 'Task.model.calendar.CalMonthEvent',
                asynchronousLoad: true,
                proxy: {
                    type: 'memory',
                    data: null,
                    reader: {
                        type: 'json',
                    }
                }
            }
        }, {
            id: 5,
            title: 'ExSummary', //已批小结
            color: '#8bc34a',
            eventStore: {
                model: 'Task.model.calendar.CalMonthEvent',
                asynchronousLoad: true,
                proxy: {
                    type: 'memory',
                    data: null
                }
            }
        }]
    }

}
动态赋值
给calendar对象的eventStore对象 动态赋值,注意 是eventStore
var store = calendar-weeksview对象.getStore();
store.getAt(0)._eventStore.loadData(r[0]);//计划
store.eventSource.activeLoad = false;
store.getAt(1)._eventStore.loadData(r[1].concat(r[2]));//r[1]未批注活动 r[2]批注过的活动
store.eventSource.activeLoad = false;
store.getAt(2)._eventStore.loadData(r[3]);//未批注的小结
store.eventSource.activeLoad = false;
store.getAt(3)._eventStore.loadData(r[4]);//已批注的小结
为何每个loadData前,都有个 xxx.activeLoad = true——主要是,
在执行了第一句 loadData后,就在此时 store.eventSource对象,神不知鬼不觉地,将activeLoad 变成了 true
而底层的刷新event的方法里,又有个方法是检验这个值的
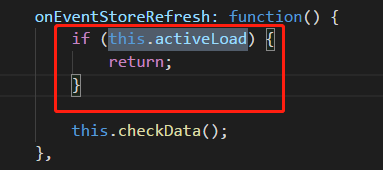
如果不加上,就会造成部分事务不被显示的问题,如下图


总不能改底层吧,虽然改了可能也没啥影响,但是还是在自己的代码上动脑筋
每次loadData完,重更下 activeLoad属性即可
一个简单的demo:(注意使用时 把 里面 的startDate和endDate 改一下)