1. LNMP架构介绍:
当我们讲LAMP的时候PHP是作为一个模块在Apache中,但是在LNMP中,PHP是一个服务,当用户请求的时候nginx会把它交给php 然后对mysql进行交互!像这种静态的,例如图片或者html,nginx会直接处理,从而加快访问速度! 谈到速度,其实如果一个普通的站点你是看不到什么效果的,但是如果要是访问一个纯静态站点,nginx就能体现出它的优势!nginx的另外一个优势得益于它的高并发支持!

2. 安装mysql 和之前的mysql 安装是一致的。
附:mysql的安装方法:
Mysql 的几个常用安装包:rpm、源码、二进制免编译。
可以在 r.aminglinux.com 中去查看课程所用到的安装包。
1. 检查当前linux 系统版本 #uname -a
2. 进入默认的安装下载路径。 #cd /usr/local/src/
3. 在r.aminglinux.com 网站中找到系统对应的二进制编码包。然后进行下载:wget *** 回车
如果提示wget 没有安装,用yum install wget 命令安装。
(提示:安装wget的过程中,网络不通。请到后台启动VM NAT或VM DHCP服务)
4.下载MYSQL 5.6二进制文件。
wget
http://mirrors.163.com/mysql/Downloads/MySQL-5.6/mysql-5.6.43-linux-glibc2.12-x86_64.tar.gz
5.下载的地址是在 /usr/local/src 目录下面。在此目录下面解压缩下载的二进制编码文件。
tar zxvf mysql-5.6.43-linux-glib2.12-x86_64.tar.gz
6. 移动并创建mysql 目录 /usr/local/mysql
mv mysql-5.6.43-linux-glib2.12-x86_64 /usr/local/mysql
7. 进入到 /usr/local/mysql 目录里面。创建mysql 用户
useradd mysql
8. 遇到错误,需要搜索安装的包。命令:yum list | grep perl |grep -i dumper .实在搞不定去www.baidu.com www.google.com r.aminglinux.com
9. 实际上是依赖perl-Data-Dumper 包。先安装之。
yum install -y perl-Data-Dumper
10. 运行初始化程序:
./scripts/mysql_install_db --user=mysql --datadir=data/mysql
11. 提示会需要安装libaio,然后再运行上述命令./scripts/mysql_install_db --user=mysql --datadir=data/mysql
yum install -y libaio
12.如何检验安装成功? 这个检测命令必须在刚刚执行完成之后做。
echo $? 结果:0
13. 如何反查安装包的来源? rpm -qf /etc/my.cnf 查询包的来源
14. 拷贝配置文件到my.cnf : cp support-files/my-default.cnf /etc/my.cnf
也可以不拷贝该文件,直接修改datadir=./usr/local/mysql socket = /tmp/mysql.sock
15. 配置启动脚本。
cp support-files/mysql.server /etc/init.d/mysqld
16. 对启动脚本进行编译。只修改basedir=/usr/local/mysql datadir=/data/mysql
17. 把服务添加到系统默认启动列表中去。
chkconfig --list 检查列表
chkconfig --add mysqld
18. 启动服务:两种方式
1. /etc/init.d/mysqld start
2. service mysqld start
19. 在启动过程中,如果遇到如下的错误。请检查一下.datadir 的路径,在/etc/my.cnf 文件中。把datadir下的路径更改为./data/mysql 就可以了!
3.安装php


![]()
安装完成之后,同样执行make && make install 命令操作。

安装下来之后我们发现其实比之前安装PHP要多了两个目录 sbin 和 var
-
sbin:实际上就是启动php-fpm服务的目录
-
var:实际上就是存放PHP日志的,当然这个我们可以指定的
-
log: php日志目录;
-
run:进程PID目录
-
php-fpm 选项参数用法:-i -m -t
[root@ying01 php-5.6.32]# /usr/local/php-fpm/sbin/php-fpm -i //查看PHP信息
[root@ying01 php-5.6.32]# /usr/local/php-fpm/sbin/php-fpm -m //查看PHP模块
[root@ying01 php-5.6.32]# /usr/local/php-fpm/sbin/php-fpm -t //测试PHP配置语法
4. 配置PHP
进入到 PHP解压缩包。具体位置是在 /usr/local/src/php-5.6.39. 把php.ini-production 这个文件拷贝到/usr/local/php-fpm/etc/php.ini 中。

 it
it
进入网站:
http://coding.net/u/aminglinux/p/aminglinux-book/git/blob/master/d15z/php-fpm.conf && book.aminglinux.com
把这个文件拷贝到PHP的安装目录下面。

拷贝镜像脚本:![]()
加入到启动列表:

启动服务:service php-fpm start


5. nginx 介绍:
因为nginx处理静态文件的能力要比apache好很多,所以很多企业在建站的时候一般都是用java写的,然后会选择tomcat,但是tomcat处理静态文件的能力不是太好就会叠加选择nginx。
nginx特点:
-
体积小
-
处理能力强
-
并发高
-
可扩展性好
Nginx应用场景:web服务、反向代理、负载均衡
Nginx著名分支,淘宝基于Nginx开发的Tengine,使用上和Nginx一致,服务名,配置文件名都一样,和Nginx的最大区别在于Tenging增加了一些定制化模块,在安全限速方面表现突出,另外它支持对js,css合并 Nginx核心+lua(开发语言)相关的组件和模块组成了一个支持lua的高性能web容器openresty,参考http://jinnianshilongnian.iteye.com/blog/2280928

6. 安装Nginx
1. 进入到源代码下载目录: cd /usr/local/src 下载nginx安装包
 n
n
2. 对下载的nginx文件进行解压缩: tar zxf nginx-1.14.2.tar.gz ;

进入nginx-1.14.2下目录。初始化:.configure --prefix=/usr/local/ngnix

3. 初始化之后 make && make insatll 安装nginx
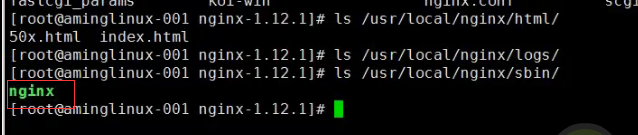
4.在安装好的nginx文件夹下面,有四个文件:
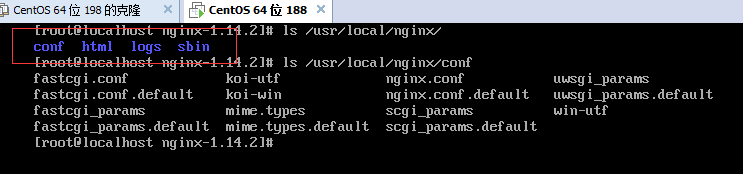

/usr/local/nginx目录下的子目录:
子目录
释义
conf
nginx配置文件
html
主页样例文件
logs
站点日志
sbin
核心进程文件
nginx -t 选项: 测试配置语法错误
[root@ying01 nginx-1.4.7]# /usr/local/nginx/sbin/nginx -t
nginx: the configuration file /usr/local/nginx/conf/nginx.conf syntax is ok
nginx: configuration file /usr/local/nginx/conf/nginx.conf test is successful

5.3 Nginx配置
-
设置nginx脚本
在init.d目录下,新建nginx脚本文件
[root@ying01 nginx-1.4.7]# vim /etc/init.d/nginx
以下为脚本内容.....
#!/bin/bash# chkconfig: - 30 21# description: http service.# Source Function Library
. /etc/init.d/functions# Nginx Settings
NGINX_SBIN="/usr/local/nginx/sbin/nginx"
NGINX_CONF="/usr/local/nginx/conf/nginx.conf"
NGINX_PID="/usr/local/nginx/logs/nginx.pid"
RETVAL=0
prog="Nginx"start()
{
echo -n $"Starting $prog: "
mkdir -p /dev/shm/nginx_temp
daemon $NGINX_SBIN -c $NGINX_CONF
RETVAL=$?
echo
return $RETVAL
}
stop()
{
echo -n $"Stopping $prog: "
killproc -p $NGINX_PID $NGINX_SBIN -TERM
rm -rf /dev/shm/nginx_temp
RETVAL=$?
echo
return $RETVAL
}
reload()
{
echo -n $"Reloading $prog: "
killproc -p $NGINX_PID $NGINX_SBIN -HUP
RETVAL=$?
echo
return $RETVAL
}
restart()
{
stop
start
}
configtest()
{
$NGINX_SBIN -c $NGINX_CONF -t
return 0
}
case "$1" in
start)
start
;;
stop)
stop
;;
reload)
reload
;;
restart)
restart
;;
configtest)
configtest
;;
*)
echo $"Usage: $0 {start|stop|reload|restart|configtest}"
RETVAL=1
esacexit $RETVAL
然后增加权限,以及启动服务;
[root@ying01 nginx-1.4.7]# chmod 755 /etc/init.d/nginx
[root@ying01 nginx-1.4.7]# chkconfig --add nginx
[root@ying01 nginx-1.4.7]# chkconfig nginx on
编辑配置文件
进入nginx/conf/目录下,把默认的配置文件作为备份;
[root@ying01 nginx-1.4.7]# cd /usr/local/nginx/conf/
[root@ying01 conf]# ls
fastcgi.conf koi-utf nginx.conf uwsgi_params
fastcgi.conf.default koi-win nginx.conf.default uwsgi_params.default
fastcgi_params mime.types scgi_params win-utf
fastcgi_params.default mime.types.default scgi_params.default
[root@ying01 conf]# mv nginx.conf nginx.conf.1 //把原配置文件作为备份
[root@ying01 conf]# ls
fastcgi.conf koi-utf nginx.conf.1 uwsgi_params
fastcgi.conf.default koi-win nginx.conf.default uwsgi_params.default
fastcgi_params mime.types scgi_params win-utf
fastcgi_params.default mime.types.default scgi_params.default
新建nginx.conf配置文件,并按下面写入内容
[root@ying01 conf]# vim nginx.conf
以下为配置内容.....
user nobody nobody;
worker_processes 2;
error_log /usr/local/nginx/logs/nginx_error.log crit;
pid /usr/local/nginx/logs/nginx.pid;
worker_rlimit_nofile 51200;
events
{
use epoll;
worker_connections 6000;
}
http
{
include mime.types;
default_type application/octet-stream;
server_names_hash_bucket_size 3526;
server_names_hash_max_size 4096;
log_format combined_realip '$remote_addr $http_x_forwarded_for [$time_local]'
' $host "$request_uri" $status'
' "$http_referer" "$http_user_agent"';
sendfile on;
tcp_nopush on;
keepalive_timeout 30;
client_header_timeout 3m;
client_body_timeout 3m;
send_timeout 3m;
connection_pool_size 256;
client_header_buffer_size 1k;
large_client_header_buffers 8 4k;
request_pool_size 4k;
output_buffers 4 32k;
postpone_output 1460;
client_max_body_size 10m;
client_body_buffer_size 256k;
client_body_temp_path /usr/local/nginx/client_body_temp;
proxy_temp_path /usr/local/nginx/proxy_temp;
fastcgi_temp_path /usr/local/nginx/fastcgi_temp;
fastcgi_intercept_errors on;
tcp_nodelay on;
gzip on;
gzip_min_length 1k;
gzip_buffers 4 8k;
gzip_comp_level 5;
gzip_http_version 1.1;
gzip_types text/plain application/x-javascript text/css text/htm
application/xml;
server
{
listen 80;
server_name localhost;
index index.html index.htm index.php;
root /usr/local/nginx/html;
location ~ \.php$
{
include fastcgi_params;
fastcgi_pass unix:/tmp/php-fcgi.sock;
fastcgi_index index.php;
fastcgi_param SCRIPT_FILENAME /usr/local/nginx/html$fastcgi_script_name;
}
}
}
相关名词,释义
user nobody nobody; 运行服务的用户是谁
worker_processes 2;定义子进程的数量
worker_rlimit_nofile
51200;最多可以打开多少个文件
worker_connections 6000;允许最大的连接数
server; 下面对应的就是虚拟主机配置
server_name localhost;定义网站的域名
root /usr/local/nginx/html;定义网站的根目录
location ~ .php$;配置解析PHP
fastcgi_pass unix:/tmp/php-fcgi.sock;监听端口或者监听socket,通过此命令去执行
fastcgi_pass 127.0.0.1:9000;(或者携程这种方式,服务器IP地址+端口)
-
启动nginx服务
[root@ying01 conf]# /usr/local/nginx/sbin/nginx -t
nginx: the configuration file /usr/local/nginx/conf/nginx.conf syntax is ok
nginx: configuration file /usr/local/nginx/conf/nginx.conf test is successful

[root@ying01 conf]# /etc/init.d/nginx start //开启服务
Starting nginx (via systemctl): [ 确定 ]
![]()
[root@ying01 conf]# ps aux |grep nginx //查看相关服务
root 63447 0.0 0.0 24844 784 ? Ss 17:20 0:00 nginx: master process /usr/local/nginx/sbin/nginx -c /usr/local/nginx/conf/nginx.conf
nobody 63448 0.0 0.1 27148 3356 ? S 17:20 0:00 nginx: worker process
nobody 63449 0.0 0.1 27148 3356 ? S 17:20 0:00 nginx: worker process
root 63451 0.0 0.0 112720 980 pts/0 S+ 17:20 0:00 grep --color=auto nginx

配置完nginx,进行测试
[root@ying01 conf]# curl localhost
<!DOCTYPE html><html><head><title>Welcome to nginx!</title>
<style>
body {
width: 35em;
margin: 0 auto;
font-family: Tahoma, Verdana, Arial, sans-serif;
}
</style></head><body><h1>Welcome to nginx!</h1><p>If you see this page, the nginx web server is successfully installed and
working. Further configuration is required.</p>
<p>For online documentation and support please refer to
<a href="http://nginx.org/">nginx.org</a>.<br/>
Commercial support is available at
<a href="http://nginx.com/">nginx.com</a>.</p>
<p><em>Thank you for using nginx.</em></p></body></html>

-
解析PHP
[root@ying01 conf]# vim /usr/local/nginx/html/1.php //新建1.php页面,写入以下内容
以下为1.php内容...
<?phpecho "hello world";
测试解析PHP
[root@ying01 conf]# curl localhost/1.php //进行测试,成功解析
hello world[root@ying01 conf]#
