
简要描述下大纲分布:
spring-boot:核心内容
spring-boot-actuator:核心监控功能(SpringBoot的一大亮点)
spring-boot-actuator-autoconfigure:核心监控功能自动配置(自动配置是SpringBoot的最主要的特性,智能配置)
spring-boot-autoconfigure:核心功能自动配置
spring-boot-cli:客户端命令行支持
spring-boot-devtools:开发工具支持,比如本地调试远程程序,重启,热部署等。
spring-boot-docs:SpringBoot的一些文档
spring-boot-parent:所有的SpringBoot版本的父依赖,只有个pom文件,依赖来源spring-boot-dependencies.
spring-boot-dependencies:SpringBoot的依赖项管理
spring-boot-properties-migrator:属性配置迁移
spring-boot-starters:SpringBoot的启动器方便集成许多开源的中间件,在我使用SpringBoot的项目中也会教大家开发自己的starters。
spring-boot-test :SpringBoot测试
spring-boot-test-autoconfigure : SpringBoot测试自动配置
spring-boot-tools : 工具
spring-boot篇
环境准备:jdk8+,maven版本3.5+
如果环境不一致则可能导致以下两张图的问题(亲身经历,切记不要强行装牛逼)
spring-boot的模块图示


spring.factories文件
# PropertySource Loaders
#属性资源加载器
org.springframework.boot.env.PropertySourceLoader=\
org.springframework.boot.env.PropertiesPropertySourceLoader,\
org.springframework.boot.env.YamlPropertySourceLoader

# Run Listeners
#运行监听器
org.springframework.boot.SpringApplicationRunListener=\
org.springframework.boot.context.event.EventPublishingRunListener

# Error Reporters
#失败分析器(下面有具体的失败分析器列表),用于报告错误日志输出
org.springframework.boot.SpringBootExceptionReporter=\
org.springframework.boot.diagnostics.FailureAnalyzers

# Application Context Initializers
#应用上下文初始化器
org.springframework.context.ApplicationContextInitializer=\
org.springframework.boot.context.ConfigurationWarningsApplicationContextInitializer,\
org.springframework.boot.context.ContextIdApplicationContextInitializer,\
org.springframework.boot.context.config.DelegatingApplicationContextInitializer,\
org.springframework.boot.web.context.ServerPortInfoApplicationContextInitializer

# Application Listeners
#应用监听器
org.springframework.context.ApplicationListener=\
org.springframework.boot.ClearCachesApplicationListener,\
org.springframework.boot.builder.ParentContextCloserApplicationListener,\
org.springframework.boot.context.FileEncodingApplicationListener,\
org.springframework.boot.context.config.AnsiOutputApplicationListener,\
org.springframework.boot.context.config.ConfigFileApplicationListener,\
org.springframework.boot.context.config.DelegatingApplicationListener,\
org.springframework.boot.context.logging.ClasspathLoggingApplicationListener,\
org.springframework.boot.context.logging.LoggingApplicationListener,\
org.springframework.boot.liquibase.LiquibaseServiceLocatorApplicationListener

# Environment Post Processors
#初始化环境后执行器
org.springframework.boot.env.EnvironmentPostProcessor=\
org.springframework.boot.cloud.CloudFoundryVcapEnvironmentPostProcessor,\
org.springframework.boot.env.SpringApplicationJsonEnvironmentPostProcessor,\
org.springframework.boot.env.SystemEnvironmentPropertySourceEnvironmentPostProcessor

# Failure Analyzers
#失败分析器
org.springframework.boot.diagnostics.FailureAnalyzer=\
org.springframework.boot.diagnostics.analyzer.BeanCurrentlyInCreationFailureAnalyzer,\
org.springframework.boot.diagnostics.analyzer.BeanDefinitionOverrideFailureAnalyzer,\
org.springframework.boot.diagnostics.analyzer.BeanNotOfRequiredTypeFailureAnalyzer,\
org.springframework.boot.diagnostics.analyzer.BindFailureAnalyzer,\
org.springframework.boot.diagnostics.analyzer.BindValidationFailureAnalyzer,\
org.springframework.boot.diagnostics.analyzer.UnboundConfigurationPropertyFailureAnalyzer,\
org.springframework.boot.diagnostics.analyzer.ConnectorStartFailureAnalyzer,\
org.springframework.boot.diagnostics.analyzer.NoSuchMethodFailureAnalyzer,\
org.springframework.boot.diagnostics.analyzer.NoUniqueBeanDefinitionFailureAnalyzer,\
org.springframework.boot.diagnostics.analyzer.PortInUseFailureAnalyzer,\
org.springframework.boot.diagnostics.analyzer.ValidationExceptionFailureAnalyzer,\
 org.springframework.boot.diagnostics.analyzer.InvalidConfigurationPropertiesFailureAnalyzer,\
org.springframework.boot.diagnostics.analyzer.InvalidConfigurationPropertyNameFailureAnalyzer,\
org.springframework.boot.diagnostics.analyzer.InvalidConfigurationPropertyValueFailureAnalyzer

# FailureAnalysisReporters
#失败分析器报告
org.springframework.boot.diagnostics.FailureAnalysisReporter=\
org.springframework.boot.diagnostics.LoggingFailureAnalysisReporter
对于工作中一直的问题都是简单的看下书籍知道点大概以为懂了全世界,后来的我发现不懂源码仿佛就是个白痴永远停留在程序猿之外,我一直有个疑问就是这些东西到底是怎么个流程。怎么就被加载了。现在开始我们的征程吧。
SpringBoot的启动加载时序图(一共2部分)
由于时序图展示空间限制,SpringBoot启动的过程分为两步时序图
- 第一步时序图从main方法启动到加载完毕配置文件。
- 第二步时序图从进入spring容器到启动内置服务器默认为tomcat


第一部分(只展示需要用的源码防止阅读时候失去兴趣)
第一步时序图从main方法启动到加载完毕配置文件。
0)禁止restart监听事件以防干扰正常debug源码。1)运行之前了解下SpringApplication
- SpringApplication主要的作用
- 依赖于根路径创建spring容器的上下文(ApplicationContext)实例
- 注册spring核心包中的 CommandLinePropertySource抽象类将命令行参数作为spring属性最终实例化spring容器中的PropertySource泛型抽象类
- 刷新应用上下文,加载所有单例bean实例
加载资源-官方推荐从@Configuration注解类加载,如果不想这样加载可以通过AnnotatedBeanDefinitionReader,XmlBeanDefinitionReader, GroovyBeanDefinitionReader,ClassPathBeanDefinitionScanner加载也同样支持。- 触发所有CommandLineRunner功能函数式接口的bean,run方法支持多参数
- SpringApplication全部属性

	/**非web环境下默认的应用上下文类的名字*/
	public static final String DEFAULT_CONTEXT_CLASS = "org.springframework.context."
			+ "annotation.AnnotationConfigApplicationContext";
	 /**web环境下默认的应用上下文类的名字*/
	public static final String DEFAULT_SERVLET_WEB_CONTEXT_CLASS = "org.springframework.boot."
			+ "web.servlet.context.AnnotationConfigServletWebServerApplicationContext";

	/**reactive 的web环境默认的应用上下文类的名字*/
	public static final String DEFAULT_REACTIVE_WEB_CONTEXT_CLASS = "org.springframework."
			+ "boot.web.reactive.context.AnnotationConfigReactiveWebServerApplicationContext";
	/**默认的banner图的位置(banner.txt)*/
	public static final String BANNER_LOCATION_PROPERTY_VALUE = SpringApplicationBannerPrinter.DEFAULT_BANNER_LOCATION;

	/**
	 * 默认的banner图位置属性spring.banner.location
	 */
	public static final String BANNER_LOCATION_PROPERTY = SpringApplicationBannerPrinter.BANNER_LOCATION_PROPERTY;

	private static final String SYSTEM_PROPERTY_JAVA_AWT_HEADLESS = "java.awt.headless";

	private static final Log logger = LogFactory.getLog(SpringApplication.class);

	private Set<Class<?>> primarySources;

	private Set<String> sources = new LinkedHashSet<>();

	private Class<?> mainApplicationClass;
	/**
	 * OFF,禁止输出banner,CONSOLE,将banner图输出到系统控制台,LOG,将banner输出到log文件,
	 * 默认输出到控制台
	*/
	private Banner.Mode bannerMode = Banner.Mode.CONSOLE;
	/**
	 * 是否开启log日志信息,默认开启
	*/
	private boolean logStartupInfo = true;
    /**
	 * 添加命令行属性
	*/
	private boolean addCommandLineProperties = true;

	private boolean addConversionService = true;

	private Banner banner;
     /**
	 * 资源加载器,所有的配置文件都需要他加载
	 */
	private ResourceLoader resourceLoader;

	private BeanNameGenerator beanNameGenerator;

	private ConfigurableEnvironment environment;

	private Class<? extends ConfigurableApplicationContext> applicationContextClass;

	private WebApplicationType webApplicationType;

	private boolean headless = true;
     /**
	 * 注册关闭钩子,是否开启守护线程在虚拟机关闭的时候,防止SpringBoot应用遗漏线程未关闭
	 */
	private boolean registerShutdownHook = true;
     /**
	 * 应用上下文初始化器
	 */
	private List<ApplicationContextInitializer<?>> initializers;
    /**
	 * 应用监听器
	 */
	private List<ApplicationListener<?>> listeners;
      /**
	 * 默认的配置文件的属性
	 */
	private Map<String, Object> defaultProperties;
    /**
	 * 其他的配置文件,比如你指定的其他资源文件
	 */
	private Set<String> additionalProfiles = new HashSet<>();
   /**
	 * 允许bean定义被重写
	 */
	private boolean allowBeanDefinitionOverriding;
     /**
	 * 是否是diy定制环境默认false
	 */
	private boolean isCustomEnvironment = false;
     /**
	 * 懒加载初始化默认为false
	 */
	private boolean lazyInitialization = false;
- SpringApplication的第一步run方法
- 第二步initialize初始化SpringApplication属性。
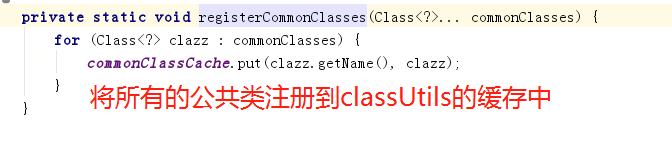
这里的classutils如何推断的呢?他是根据在启动类加载classUtils文件的时候,初始化静态代码块,commonClassCache属性(存在的意义主要是为了在远程调用的时候高效的反序列化,类名字作为key,匹配的类作为value值。)
- 第三步设置初始化器
该初始化器的实现类列表如下(一共有10个,但是只有7个名字获取到所以只实例化对应的7个):项目启动的时候默认加载顺序:
- spring-boot-devtools(spring.factories)–应用上下文初始化器1个
- spring-boot(spring.factories)–应用上下文初始化器4个
- spring-boot-autoconfigure(spring.factories)–应用上下文初始化器2个
接下来看下具体的对应初始化,加载配置文件方法如下图(上述的三个包会依次按照上面顺序执行):
spring-boot核心包加载的spring.factories所有属性
spring-boot-autoconfigure自动配置引入
小结:上面只举了应用上下文初始化器的例子,实际上所有的spring.factories属性文件都会加载一一解析返回。由于内容较多,原理同上,所以就不一一举例了。上面第三步的原理汇总可以如下图展示,然后根据name名字和类加载器通过反射从哪个调用栈中获取:
- 第四步setListeners
原理同第三步只不过这次的入参为应用监听器。
- 第五步推断main方法应用主类
this.mainApplicationClass = this.deduceMainApplicationClass();
- 第六步StopWatch
开启stopWatch.start:该对象并不是线程安全的,也并非控制什么必须在生产应用。相反,官方设计的初衷是为了监控性能在开发的时候
该类主要三个功能,开启添加个任务task,判断当前是否有任务,以及停止任务输出该任务的执行时间。
- 第7步和第8步:获取应用上下文运行监听器,并开启监听。
可以看下如下关系图
第8步:第7步获取的实现类监听遍历全部启动
由于之前封装的监听事件都存放于SpringApplicationRunListeners,执行SpringApplicationRunListener启动操作的时候,实现类
接着调用Restarter类执行线程
由于我们禁止了重启操作所以我们接下来按照正常的流程执行:- 第9步:准备环境
ApplicationArguments applicationArguments = new DefaultApplicationArguments(args);
ConfigurableEnvironment environment = this.prepareEnvironment(listeners, applicationArguments);
ConfigurableEnvironment environment = this.getOrCreateEnvironment();
这一步跟上图一样如果有了则返回,如果没有则创建
this.configureEnvironment((ConfigurableEnvironment)environment, applicationArguments.getSourceArgs());
如时序图所示第10步:
listeners.environmentPrepared((ConfigurableEnvironment)environment);
从上图中我们可以看到我们的事件不需要restart监听器维护,则继续往下找为
第10.3步~10.6步如下图,主要依然是解析配置文件进行环境启动成功后的才可以启动bean实例的加载


第二张时序图(启动spring容器和SpringBoot中的内置服务器tomcat)
第0步:this.configureIgnoreBeanInfo(environment);配置可忽略的bean
第1步:Banner printedBanner = this.printBanner(environment);
获取打印的banner图第2步:ConfigurableApplicationContext context = this.createApplicationContext();
创建可配置的应用上下文
第3步:根据spring.factories获取异常报告
第4步:准备上下文
第5步:重新刷新上下文
步骤解读:
- this.prepareRefresh();准备重新刷新的上下文
- ConfigurableListableBeanFactory beanFactory = this.obtainFreshBeanFactory();告诉子类刷新内部的bean工厂
- this.prepareBeanFactory(beanFactory);准备在上下文中使用的bean工厂
- this.postProcessBeanFactory(beanFactory);允许bean工厂 后执行器在上下文的子类中
- this.invokeBeanFactoryPostProcessors(beanFactory);调用在注册在上下文中的工厂bean处理器
- this.registerBeanPostProcessors(beanFactory);注册拦截bean创建的bean处理器。
- this.initMessageSource();为上下文初始化消息源
- this.initApplicationEventMulticaster();为上下文转化初始化事件
- this.onRefresh();在指定的上下文子类中,初始化其他特殊的bean
由于SpringBoot的子类实现了onRefresh所以会执行- this.registerListeners();检查监听器的bean并注册到spring容器中
- this.finishBeanFactoryInitialization(beanFactory);实例化所有圣墟非拦截在初始化的单例bean
- this.finishRefresh();最后一步:发布匹配对应的事件
发布spring对应的事件,
异常的情况步骤:- this.destroyBeans();销毁已经创建的单例
- this.cancelRefresh(var9);重置激活标志
finally的情况步骤:- 重置一些spring核心中的缓存,因为可能永远不会用到
上下文注册关闭钩子(在应用程序异常可以保证守护线程可以完全将应用线程退出)
- 第6步:重新刷新之后调用、stopWatch.stop关掉定制监控
- 第7步:监听器启动应用上下文
- 第8步:调用运行器
- 第9步: listeners.running(context);


根据上面的内容现在我们小结下:
SpringBoot启动原理简单可以理解如下:
第一部分加载环境(主要一个类SpringApplication):
- 属于new SpringApplication()构造器主要初始化资源加载器,bannerMode开关,命令行属性,gui图形化属性,注册关闭钩子,日志启动器,然后以
应用上下文初始化器,应用监听器,推断应用主类初始化完毕。

第二部分整合spring容器和内置web服务器
- 根据第一部分的可配置环境参数和可配置上下文参数,进行封装忽略的bean配置,需要打印的banner图,实例化可配置上下文和实例化可配置环境,根据spring.factories获取收集异常报告的分析器
然后通过ServletWebServerApplicationContext继承spring容器的AbstractApplicationContext抽象类整合将环境参数和上下文参数注入到spring容器中,并完成事件发布。在刷新应用上下文的过程中,子类ServletWebServerApplicationContext实现了内置web服务器的集成和启动。
主要源码如下:


