版权声明:本文为博主原创文章,经博主允许,可自由共享,尽量不要用于商业用途。 https://blog.csdn.net/matrixbbs/article/details/90640361
发布与调用REST服务
- 可以用SOAP
- 也可以用REST,本例仍然以REST为例
表述性状态转移===REST
- 是一种架构风格
- 也是一种轻量级的基于HTTP协议的Web Service风格
- 是一种设计原则
- 也是一种设计思想
整体示例搭建思路
-
搭建服务器
- 发布并提供REST服务,用8080,即默认端口
- 发布REST服务,仍然用@RestController注解,响应的是JSON格式的数据
- 访问路径是:http://localhost:8080/person/fhzheng,注意,这里的最后一个串是URL中的name参数
- 项目名:spring-rest-server
-
搭建客户端
- 测试并调用REST服务,用8085,端口,在application.properties完成相应的设置即可
- 使用RestTemplate类来调用服务,这个类是Spring Framework提供的
- 测试方式三种
- 1 使用main直接跑方法来访问REST服务
- 2 使用JUNIT测试方法来访问REST服务
- 3 使用WEB中的控制器来访问REST服务
- 项目名:spring-rest-client
共同的部分—两个项目中都会用到,重复定义
本实例中,在服务器项目中,将它定义为一个内部类,直接用即可
- 流转对象定义:Person.java
package com.fhzheng.demo;
// 流转数据对象
public class Person{
	String name;
	Integer age;
	public String getName() {
		return name;
	}
	public void setName(String name) {
		this.name = name;
	}
	public Integer getAge() {
		return age;
	}
	public void setAge(Integer age) {
		this.age = age;
	}
}
1 服务器项目实现

具体服务器代码
package com.fhzheng.demo;

import org.springframework.boot.SpringApplication;
import org.springframework.boot.autoconfigure.SpringBootApplication;
import org.springframework.http.MediaType;
import org.springframework.web.bind.annotation.GetMapping;
import org.springframework.web.bind.annotation.PathVariable;
import org.springframework.web.bind.annotation.RestController;

@SpringBootApplication
@RestController
public class SpringRestServerApplication {

	// 启动器
	public static void main(String[] args) {
		SpringApplication.run(SpringRestServerApplication.class, args);
	}

	// 控制器
	@GetMapping(value="/person/{name}",produces = MediaType.APPLICATION_JSON_VALUE)
	public Person person(@PathVariable String name) {
		Person p = new Person();
		p.setName(name);
		p.setAge(33);
		return p;
	}

	// 流转数据对象
	static class Person{
		String name;
		Integer age;
		public String getName() {
			return name;
		}
		public void setName(String name) {
			this.name = name;
		}
		public Integer getAge() {
			return age;
		}
		public void setAge(Integer age) {
			this.age = age;
		}
	}

}
2 客户端项目实现

具体代码实现
Person.java之前已经提供了
MyService.java
package com.fhzheng.demo;

import org.springframework.beans.factory.annotation.Autowired;
import org.springframework.boot.web.client.RestTemplateBuilder;
import org.springframework.context.annotation.Bean;
import org.springframework.stereotype.Service;
import org.springframework.web.client.RestTemplate;


@Service
public class MyService {

	@Autowired
	private RestTemplateBuilder builder;

	@Bean
	public RestTemplate restTemplate() {
		return builder.rootUri("http://localhost:8080").build();
	}

	public Person useBuilder() {
		Person p = restTemplate().getForObject("/person/fhzheng999", Person.class);
		return p;
	}
}
RestTemplateMain .java
package com.fhzheng.demo;

import org.springframework.web.client.RestTemplate;

public class RestTemplateMain {

	/**
	 * 	用一个普通方法,直接完成对REST服务的请求
	 * @param args
	 */
	public static void main(String[] args) {

		RestTemplate tpl = new RestTemplate();
		Person p = tpl.getForObject("http://localhost:8080/person/fhzheng777", Person.class);
		System.out.println(p.getName()+"---"+p.getAge());
	}

}
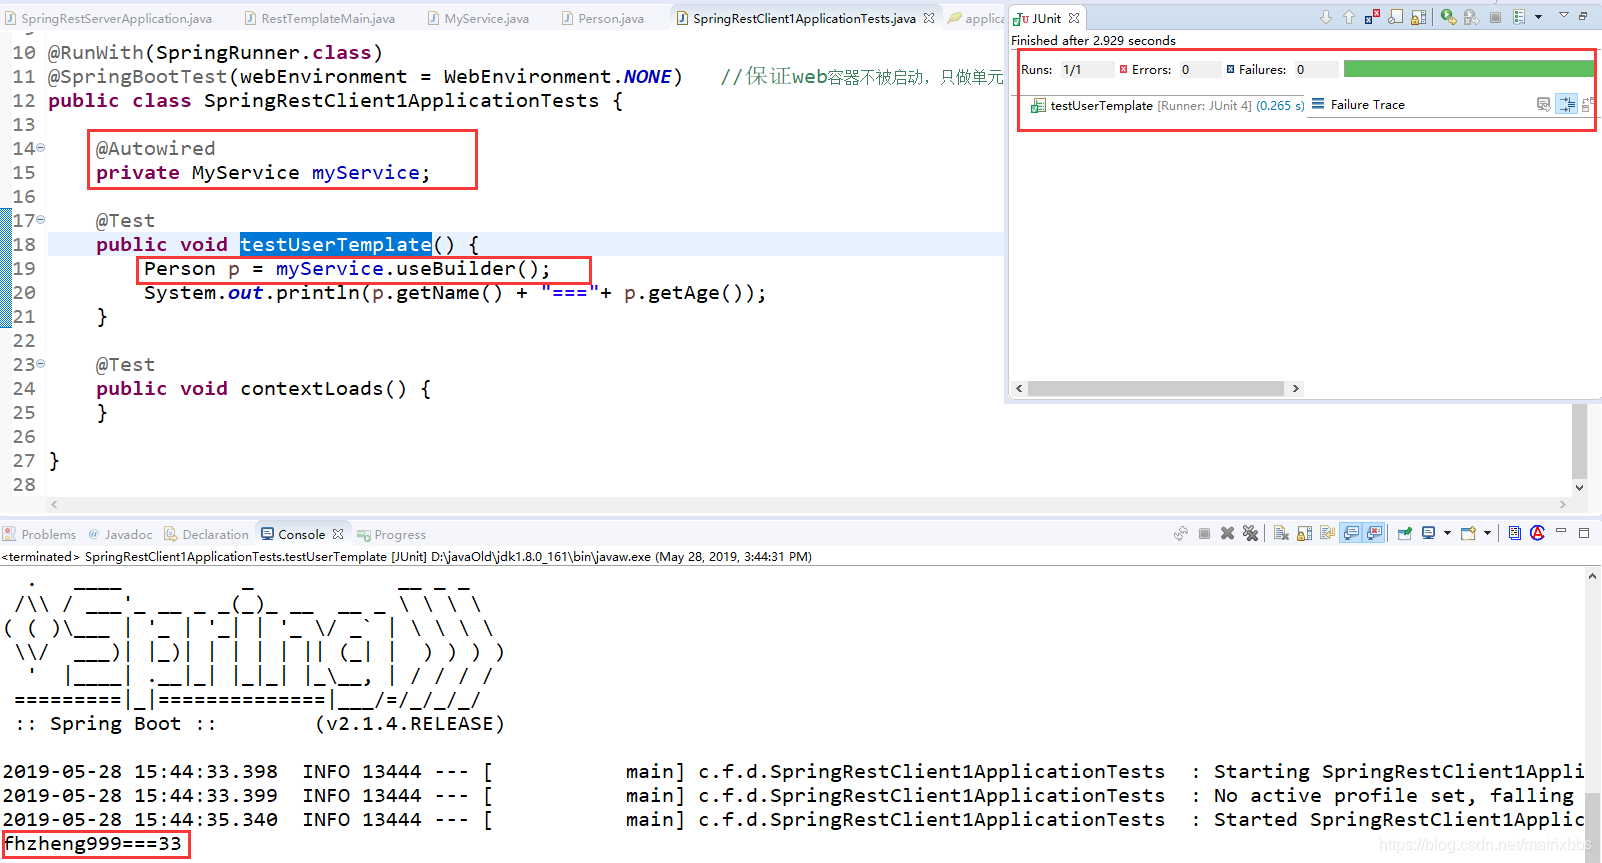
JUNIT测试代码SpringRestClient1ApplicationTests.java
package com.fhzheng.demo;

import org.junit.Test;
import org.junit.runner.RunWith;
import org.springframework.beans.factory.annotation.Autowired;
import org.springframework.boot.test.context.SpringBootTest;
import org.springframework.boot.test.context.SpringBootTest.WebEnvironment;
import org.springframework.test.context.junit4.SpringRunner;

@RunWith(SpringRunner.class)
@SpringBootTest(webEnvironment = WebEnvironment.NONE)	//保证web容器不被启动,只做单元测试
public class SpringRestClient1ApplicationTests {

	@Autowired
	private MyService myService;

	@Test
	public void testUserTemplate() {
		Person p = myService.useBuilder();
		System.out.println(p.getName() + "==="+ p.getAge());
	}

	@Test
	public void contextLoads() {
	}

}
application.properties配置文件内容
这里的服务器采用的是默认端口发布服务,即8080
客户端调用服务,客户端发布端口为8085
# server
server.port = 8085
客户端启动器和控制器实现
package com.fhzheng.demo;

import org.springframework.boot.SpringApplication;
import org.springframework.boot.autoconfigure.SpringBootApplication;
import org.springframework.web.bind.annotation.GetMapping;
import org.springframework.web.bind.annotation.RestController;
import org.springframework.web.client.RestTemplate;

@SpringBootApplication
@RestController
public class SpringRestClient1Application {

	public static void main(String[] args) {
		SpringApplication.run(SpringRestClient1Application.class, args);
	}

	// 控制器
	/**
	 * 	用跨域方式,完成对REST服务的请求
	 * 	注意,WEB服务启动起来时,客户端端口号不能和服务器端端口号重叠,保证跨域状态
	 * @return
	 */
	@GetMapping(value="/client")
	public Person clientGetPerson() {
		RestTemplate tpl = new RestTemplate();
		Person p = tpl.getForObject("http://localhost:8080/person/fhzheng777", Person.class);
		System.out.println(p.getName()+"---"+p.getAge());
		return p;
	}
}
运行结果
服务端运行测试

客户端运行测试
1 main测试结果

2 JUNIT测试结果
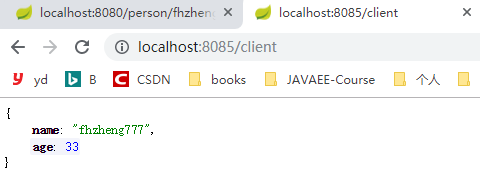
3 客户端WEB测试运行结果
后记
- RestTemplate只是众多的REST客户端中的一个。还有很多,诸如:
- Feign框架
- Restlet框架
- CXF框架
它们都可以实现对REST服务的调用,使用它们,简单说就是:简化了发起HTTP请求以及处理响应的过程,并且支持REST。为什么说简化了呢
什么是RestTemplate
从 3.0 版本开始,Spring 提供了 RestTemplate 作为用于访问 Rest 服务的客户端,RestTemplate 提供了多种便捷访问远程 Http 服务的方法,能够大大提高客户端的编写效率。我们自己封装的HttpClient,通常都会有一些模板代码,比如建立连接,构造请求头和请求体,然后根据响应,解析响应信息,最后关闭连接。RestTemplate是Spring中对HttpClient的再次封装,简化了发起HTTP请求以及处理响应的过程,抽象层级更高,减少消费者的模板代码,使冗余代码更少。其实仔细想想Spring Boot下的很多XXXTemplate类,它们也提供各种模板方法,只不过抽象的层次更高,隐藏了更多细节而已。顺便提一下,Spring Cloud有一个声明式服务调用Feign,是基于Netflix Feign实现的,整合了Spring Cloud Ribbon与 Spring Cloud Hystrix,并且实现了声明式的Web服务客户端定义方式。
本质上Feign是在RestTemplate的基础上对其再次封装,由它来帮助我们定义和实现依赖服务接口的定义。