一、重启Kong Gateway
-
在每一台kong服务器执行如下命令:
kong restart -c /etc/kong/kong.conf --nginx-conf /etc/kong/nginx-kong.template -p /usr/local/kong -
验证kong有没有启动成功,执行如下命令:
查看Kong集群信息kong cluster members 或 curl http://localhost:8001 -
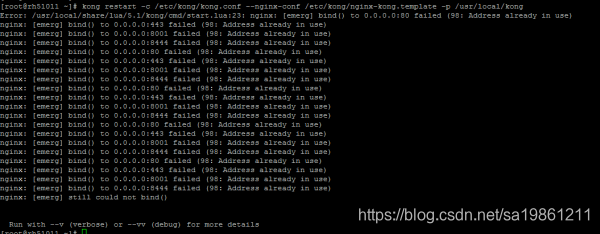
如果重启失败,需要先停掉kong,执行如下命令:
kong stop -vvv -
如果出现如下错误,杀掉nginx进程,再重启。
二、重启Kong Dashboard
7.1 重启Gateway Dashboard
supervisorctl restart kong-dashboard
7.2 检查有没有启动成功
使用curl命令或Windows浏览器
curl api01.com
三、Kong常见问题及解决方法
所有操作均需要使用root权限执行,使用sudo -i切换到root用户。
1、 Kong集群信息不同步
问题表现: 多次调用同一接口,有时正常有时异常
检测方法: 使用 kong cluster members 命令查看当前集群中节点数目以及状态,如果节点数与配置中数量不一致或者最后一列不为alive,状态则需要重启Kong。
解决方法:
kong restart -c /etc/kong/kong.conf --nginx-conf /etc/kong/nginx-kong.template -p /usr/local/kong
2、 接口无法正常提供服务
问题表现: 访问API(80/443)或者管理接口(8001)返回"Connection refused"类似信息
检测方法: 使用lsof -i:PORT或netstat -tunlp |grep -E ':(80|443|8001)'查看相应端口是否正常开放,如果没有开启请重启Kong。
解决方法:
kong restart -c /etc/kong/kong.conf --nginx-conf /etc/kong/nginx-kong.template -p /usr/local/kong
3、 业务接口返回500
问题表现: Client调用没有返回值,使用httpie/curl等命令行工具测试,http status_code返回500。
解决方法: 先保存当前的接口信息,然后删除(API/Dashboard)接口重建。
4、 Dashboard无法访问
问题表现: 浏览器打开对应的Dashboard域名后返回空白或错误页面
检测方法: 使用supervisorctl status kong-dashboard查看第二列状态是否为’RUNNING’状态
解决方法: 重启Dashboard
supervisorctl restart kong-dashboard
5、 PostgreSQL死锁
问题表现:
- 使用kong restart -c /etc/kong/kong.conf --nginx-conf /etc/kong/nginx-kong.template -p /usr/local/kong命令时会卡住很久后失败。
- 操作Kong mamanger API对配置进行添加/更改时会超时。
- 在db-master服务器上有大量insert waitting或者delete waitting等进程。解决方法:
解决方法一(尽量先尝试使用这种):
-
通过pg_stat_activity表查出锁表的进程PID;
-
然后再通过如下语句杀死对应进程。
参考:https://yq.aliyun.com/articles/86631select pg_terminate_backend(PID)
解决方法二(极端情况下):
-
先在db-master上备份当前DB,命令如下:
sudo -u postgres pg_dump kong > /tmp/kong.sql -
执行ansible脚本重建数据库
ansible-playbook main.yml --limit database --tags db --inventory inventory/xxxx --ask-pass --ask-vault-pass -e 'kong_pg_initdb=true' –verbose
xxxx是要使用的环境文件(stg, prod等)
3. 回到db-master上恢复当前数据库,命令如下:
sudo -u postgres psql kong < /tmp/kong.sql
-
在gateway服务器上重启Kong,命令如下:
kong restart -c /etc/kong/kong.conf --nginx-conf /etc/kong/nginx-kong.template -p /usr/local/kong
说明:如果执行完第3步就恢复了,这第4步不需要执行。
5. 验证Kong mamanger API/业务API是否正常。
7、 Kong去掉PostgreSQL Keepalived高可用
-
在Kong 配置里加上kong_pg_ha布尔值变量,用于开启或关闭 KeepAlived 高可用。

配置文件位置:

-
先在db-master上备份当前DB,命令如下:
sudo -u postgres pg_dump kong > /tmp/kong.sql -
调用Ansible 重跑tags为 db和kong 的任务
ansible-playbook main.yml --tags db -i inventory/idc-dmz-stg -k --verbose --diff --ask-vault-pass -e 'kong_pg_initdb=true' ansible-playbook main.yml --tags kong -i inventory/idc-dmz-stg -k --verbose --diff --ask-vault-pass -
回到db-master上恢复当前数据库,命令如下:
sudo -u postgres psql kong < /tmp/kong.sql -
在gateway服务器上重启Kong,命令如下:
kong restart -c /etc/kong/kong.conf --nginx-conf /etc/kong/nginx-kong.template -p /usr/local/kong
说明:如果执行完第3步就恢复了,这第4步不需要执行。
- 验证Kong mamanger API/业务API是否正常。
8、启用gzip压缩
方案一:在Kong上启用gzip压缩(不建议)
因为目前的IDC Kong为0.10社区版,本身不支持gzip压缩,如果要实现压缩需要修改通用的ngixn配置模板,引入ngx_http_gzip_module模块,然后对Kong进行重新编译和部署(咨询过原厂,因0.10版是过渡版,不确认是否可以成功),而且即使成功了,也是针对的所有的API启用gzip,不能实现对特定api的gzip压缩。
因为影响比较大,且不确定可以成功,因此不建议在kong上实现gzip压缩。
配置方法:
将/usr/local/share/lua/5.1/kong/templates/nginx.lua配置文件的http块进行修改,添加gzip配置。
配置如下:
http {
    gzip on;
    gzip_disable "msie6";
    gzip_min_length 1000;
    gzip_proxied expired no-cache no-store private auth;

    # do not add text/html to gzip_types because it's added by default and will generate
    # nginx: [warn] duplicate MIME type "text/html"
    # http://stackoverflow.com/a/6475493/703144
    gzip_types application/json application/x-javascript application/xml application/xml+rss text/css text/javascript text/plain text/xml;

    include 'nginx-kong.conf';
}
没有启用任何转换插件,似乎工作得很好。
参考文档:
- https://github.com/Kong/kong/issues/409
- https://github.com/Kong/kong/pull/481
- https://github.com/Kong/kong/issues/1200
- https://github.com/Kong/kong/issues/3242
- http://nginx.org/en/docs/http/ngx_http_gzip_module.html
方案二:在kong上加gzip压缩头,在F5上启用gzip压缩(推荐)
1、 在IDC kong上加个proxy_set_header Accept-Encoding ‘gzip’;头
2、 在内网F5上启用gzip压缩。
F5配置参考:
9、Kong访问静态文件
方法一:通过添加location或server实现
1、添加location
location ~ .*\.txt$ {
   		allow	127.0.0.1;
   		deny	all;
   		root   /etc/kong/root;
   	}
2、添加custom server
server {
        listen 8002;
        server_name kong;

    location ~ .*\.txt$ {
       root   /etc/kong/root;
    }
}
3、创建文件
cd /etc/kong
mkdir root
chmod 644 root
vim my.txt
chmod 444 6616286876
4、重启Kong
kong reload -c /etc/kong/kong.conf --nginx-conf /etc/kong/nginx-kong.template -p /usr/local/kong
方法二:通过request-termination插件来实现
-
添加API
curl -i -X POST http://localhost:8001/apis/ \ -d 'name=my-txt' \ -d 'hosts=ssl-example.com' \ -d 'uris=/my.txt' \ -d 'methods=GET' \ -d 'upstream_url=https://localhost:443' \ -d 'strip_uri=false' \ -d 'preserve_host=false' \ -d 'https_only=true' \ -d 'http_if_terminated=true' \ -d 'retries=0' -
添加request-termination插件
curl -X POST http://localhost:8001/apis/my-txt/plugins \
    --data "name=request-termination"  \
    --data "config.status_code=200" \
    --data "config.body=123467890" \
    --data "config.content_type=text/plain;charset=utf-8"
10、遇到的各种坑和解决方案
10.1 Kong服务器CPU负载过高问题
Kong的版本: 0.9.9 Community Edition
问题描述:
Kong的服务器CPU负载超过100%,经过Kong的API出现响应慢的情况。
根本原因:
多个系统一起上线,导致Kong的流量暴涨,造成Kong服务器CPU负载过高。
解决方案:
**短期方案:**增加节点。
长期方案:
升级Kong,使用最新的版本。
使用keepalive、upstream、route 可以降低SSL通信的CPU消耗。
10.2 Kong服务器CPU负载过高问题
问题描述:
Kong的服务器CPU负载突然增长到100%。
根本原因:
Kong企业版配置了Response Rate Limiting插件后,Response Rate Limiting默认策略是cluster模式(使用数据库进行计数),因为企业版Response Rate Limiting插件写入到数据库的数据不会进行清理,随着数据量越来越大,读写操作会耗费大量CPU资源。
解决方案:
将Response Rate Limiting插件的config.policy配置修改为local模式(计数器将存储在节点上的本地内存中)。