版权声明:本文为博主原创文章,未经博主允许不得转载。 https://blog.csdn.net/qq_39089503/article/details/90343388
1.修改gradle文件
这边是gradle3.3
buildscript {
    repositories {
        mavenCentral()
    }
    dependencies {
        //gradle脚本需要使用的资源
        classpath("org.springframework.boot:spring-boot-gradle-plugin:1.5.2.RELEASE")
    }
}

repositories {
    mavenCentral()
}

apply plugin: 'java'
apply plugin: 'org.springframework.boot'
apply plugin: 'war'


sourceCompatibility = 1.8
targetCompatibility = 1.8


dependencies {
    // web 和 test
    compile("org.springframework.boot:spring-boot-starter-web")
    testCompile("org.springframework.boot:spring-boot-starter-test")
    // 设置内嵌tomcat
    providedRuntime('org.springframework.boot:spring-boot-starter-tomcat')
    // spring boot:run
    runtime('org.springframework.boot:spring-boot-devtools')
    // mysql8需要高版本的
    compile('mysql:mysql-connector-java:5.1.46')
    // mybatis
    compile('org.mybatis.spring.boot:mybatis-spring-boot-starter:2.0.1')
    // fastjson
    compile('com.alibaba:fastjson:1.2.5')

}
主要是加这两个
//内置的tomcat设置为provided
providedRuntime('org.springframework.boot:spring-boot-starter-tomcat')
//通过bootRun启动而不是run application
runtime('org.springframework.boot:spring-boot-devtools')
2.修改application
@SpringBootApplication
@MapperScan("org.cth.gmweb.mapper")
public class GmwebApplication extends SpringBootServletInitializer {

    @Override
    protected SpringApplicationBuilder configure(SpringApplicationBuilder builder) {
        return builder.sources(GmwebApplication.class);
    }

	public static void main(String[] args) {
		SpringApplication.run(GmwebApplication.class, args);
	}

}
3.操作
application.properties中是这样的:
server.port=8088
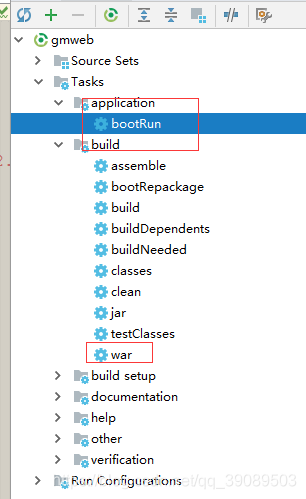
使用bootRun启动项目,测试(localhost:8088/test)
使用war打包,在项目build\libs下找到war包,放置在tomcat的webapps目录下,启动tomcat,测试(ip:8088/项目名/test)
-----------------------19-06-23-------------------------
maven项目:
1.修改application 同上
2.修改pom文件
<packaging>war</packaging>
...
<!-- 内部tomcat-->
<dependency>
    <groupId>org.springframework.boot</groupId>
    <artifactId>spring-boot-starter-tomcat</artifactId>
    <scope>provided</scope>
</dependency>