文章目录
Spring Boot【入门篇】
1.Spring Boot 简介
简化Spring应用开发的一个框架;
整个Spring技术栈的一个大整合;
J2EE开发的一站式解决方案;
2.Spring Boot 微服务
简化Spring应用开发的一个框架;
整个Spring技术栈的一个大整合;
J2EE开发的一站式解决方案;
详细请查询微服务文档:https://martinfowler.com/articles/microservices.html#MicroservicesAndSoa
3.Spring Boot环境准备
环境约束
- jdk1.8:Spring Boot 推荐jdk1.7及以上;java version “1.8.0_112”
- maven3.x:maven 3.3以上版本;Apache Maven 3.3.9
- IntelliJIDEA2017:IntelliJ IDEA 2017.2.2 x64、STS
- SpringBoot 1.5.9.RELEASE:1.5.9;
3.1、maven设置
给maven 的settings.xml配置文件的profiles标签添加
<profile>
  <id>jdk‐1.8</id>
  <activation>
    <activeByDefault>true</activeByDefault>
    <jdk>1.8</jdk>
  </activation>
  <properties>
    <maven.compiler.source>1.8</maven.compiler.source>
    <maven.compiler.target>1.8</maven.compiler.target>
    <maven.compiler.compilerVersion>1.8</maven.compiler.compilerVersion>
  </properties>
</profile>
4.Spring Boot HelloWorld
实现一个功能一个功能: 浏览器发送hello请求,服务器接受请求并处理,响应Hello World字符串;
4.1、创建一个maven工程;(jar)
4.2、导入spring boot相关的依赖
  <parent>
        <groupId>org.springframework.boot</groupId>
        <artifactId>spring‐boot‐starter‐parent</artifactId>
        <version>1.5.9.RELEASE</version>
    </parent>
    <dependencies>
        <dependency>
            <groupId>org.springframework.boot</groupId>
            <artifactId>spring‐boot‐starter‐web</artifactId>
        </dependency>
    </dependencies>
4.3、编写一个主程序;启动Spring Boot应用
/**
 *  @SpringBootApplication 来标注一个主程序类,说明这是一个Spring Boot应用
 */
@SpringBootApplication
public class HelloWorldMainApplication {
    public static void main(String[] args) {
        // Spring应用启动起来
        SpringApplication.run(HelloWorldMainApplication.class,args);
    }
}
4.4、编写相关的Controller、Service
@Controller
public class HelloController {
    @ResponseBody
    @RequestMapping("/hello")
    public String hello(){
        return "Hello World!";
    }
}
4.5、运行主程序测试
4.6、简化部署
 <!‐‐ 这个插件,可以将应用打包成一个可执行的jar包;‐‐>
    <build>
        <plugins>
            <plugin>
                <groupId>org.springframework.boot</groupId>
                <artifactId>spring‐boot‐maven‐plugin</artifactId>
            </plugin>
        </plugins>
    </build>
将这个应用打成jar包,直接使用java -jar的命令进行执行;
5.Hello World探究
5.1、POM文件
5.1.1、父项目
<parent>
    <groupId>org.springframework.boot</groupId>
    <artifactId>spring‐boot‐starter‐parent</artifactId>
    <version>1.5.9.RELEASE</version>
</parent>
他的父项目是
<parent>
  <groupId>org.springframework.boot</groupId>
  <artifactId>spring‐boot‐dependencies</artifactId>
  <version>1.5.9.RELEASE</version>
  <relativePath>../../spring‐boot‐dependencies</relativePath>
</parent>
他来真正管理Spring Boot应用里面的所有依赖版本;
Spring Boot的版本仲裁中心;
以后我们导入依赖默认是不需要写版本;(没有在dependencies里面管理的依赖自然需要声明版本号)
5.1.2、启动器
spring-boot-starter-web:
spring-boot-starter:spring-boot场景启动器;帮我们导入了web模块正常运行所依赖的组件;
Spring Boot将所有的功能场景都抽取出来,做成一个个的starters(启动器),只需要在项目里面引入这些starter
相关场景的所有依赖都会导入进来。要用什么功能就导入什么场景的启动器
<dependency>
    <groupId>org.springframework.boot</groupId>
    <artifactId>spring‐boot‐starter‐web</artifactId>
</dependency>
5.2、主程序类,主入口类
/**
 *  @SpringBootApplication 来标注一个主程序类,说明这是一个Spring Boot应用
 */
@SpringBootApplication
public class HelloWorldMainApplication {
    public static void main(String[] args) {
        // Spring应用启动起来
        SpringApplication.run(HelloWorldMainApplication.class,args);
    }
}
@SpringBootApplication: Spring Boot应用标注在某个类上说明这个类是SpringBoot的主配置类,SpringBoot就应该运行这个类的main方法来启动SpringBoot应用;
@Target(ElementType.TYPE)
@Retention(RetentionPolicy.RUNTIME)
@Documented
@Inherited
@SpringBootConfiguration
@EnableAutoConfiguration
@ComponentScan(excludeFilters = {
      @Filter(type = FilterType.CUSTOM, classes = TypeExcludeFilter.class),
      @Filter(type = FilterType.CUSTOM, classes = AutoConfigurationExcludeFilter.class) })
public @interface SpringBootApplication {
@SpringBootConfiguration:Spring Boot的配置类;
标注在某个类上,表示这是一个Spring Boot的配置类;
@Configuration:配置类上来标注这个注解;
配置类 ----- 配置文件;配置类也是容器中的一个组件;@Component\
@EnableAutoConfiguration:开启自动配置功能;
以前我们需要配置的东西,Spring Boot帮我们自动配置;@EnableAutoConfiguration告诉SpringBoot开启自
动配置功能;这样自动配置才能生效;
@AutoConfigurationPackage
@Import(EnableAutoConfigurationImportSelector.class)
public @interface EnableAutoConfiguration {
@AutoConfigurationPackage:自动配置包
@Import(AutoConfigurationPackages.Registrar.class):
Spring的底层注解@Import,给容器中导入一个组件;导入的组件由
AutoConfigurationPackages.Registrar.class;
将主配置类(@SpringBootApplication标注的类)的所在包及下面所有子包里面的所有组件扫描到Spring容器;
@Import(EnableAutoConfigurationImportSelector.class);
给容器中导入组件?
EnableAutoConfigurationImportSelector:导入哪些组件的选择器;
将所有需要导入的组件以全类名的方式返回;这些组件就会被添加到容器中;
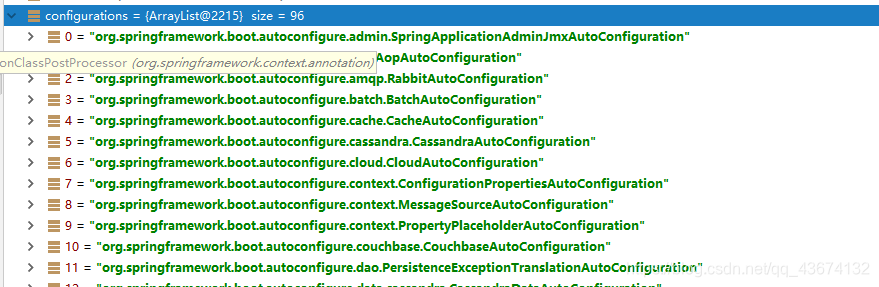
会给容器中导入非常多的自动配置类(xxxAutoConfiguration);就是给容器中导入这个场景需要的所有组件,
并配置好这些组件;
- 有了自动配置类,免去了我们手动编写配置注入功能组件等的工作;
SpringFactoriesLoader.loadFactoryNames(EnableAutoConfiguration.class,classLoader); - Spring
Boot在启动的时候从类路径下的META-INF/spring.factories中获取EnableAutoConfiguration指定的值,将这些值作为自动配置类导入到容器中,自动配置类就生效,帮我们进行自动配置工作;以前我们需要自己配置的东西,自动配置类都帮我们; - J2EE的整体整合解决方案和自动配置都在spring-boot-autoconfigure-1.5.9.RELEASE.jar;
6.使用Spring Initializer快速创建Spring Boot项目
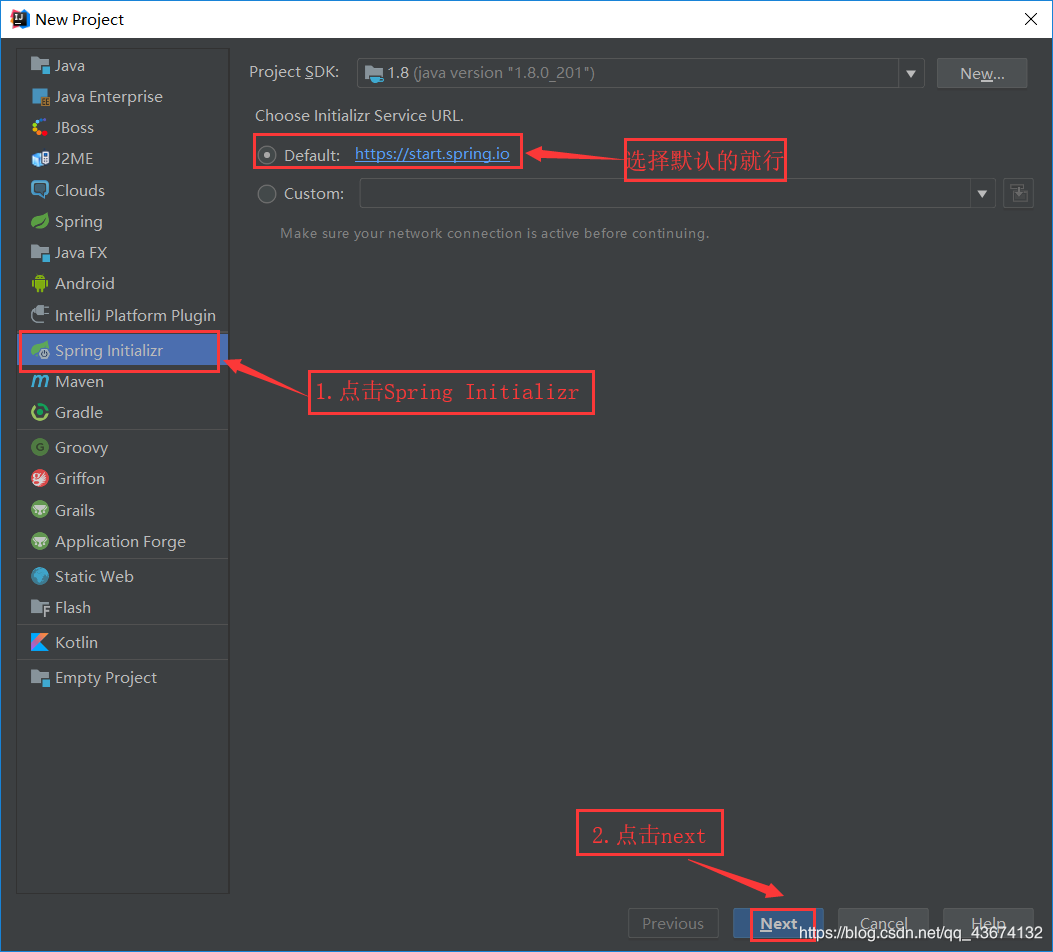
6.1、IDEA:使用 Spring Initializer快速创建项目
6.2.新建项目
选择 Spring Initializr ,然后选择默认的 url 点击【Next】:
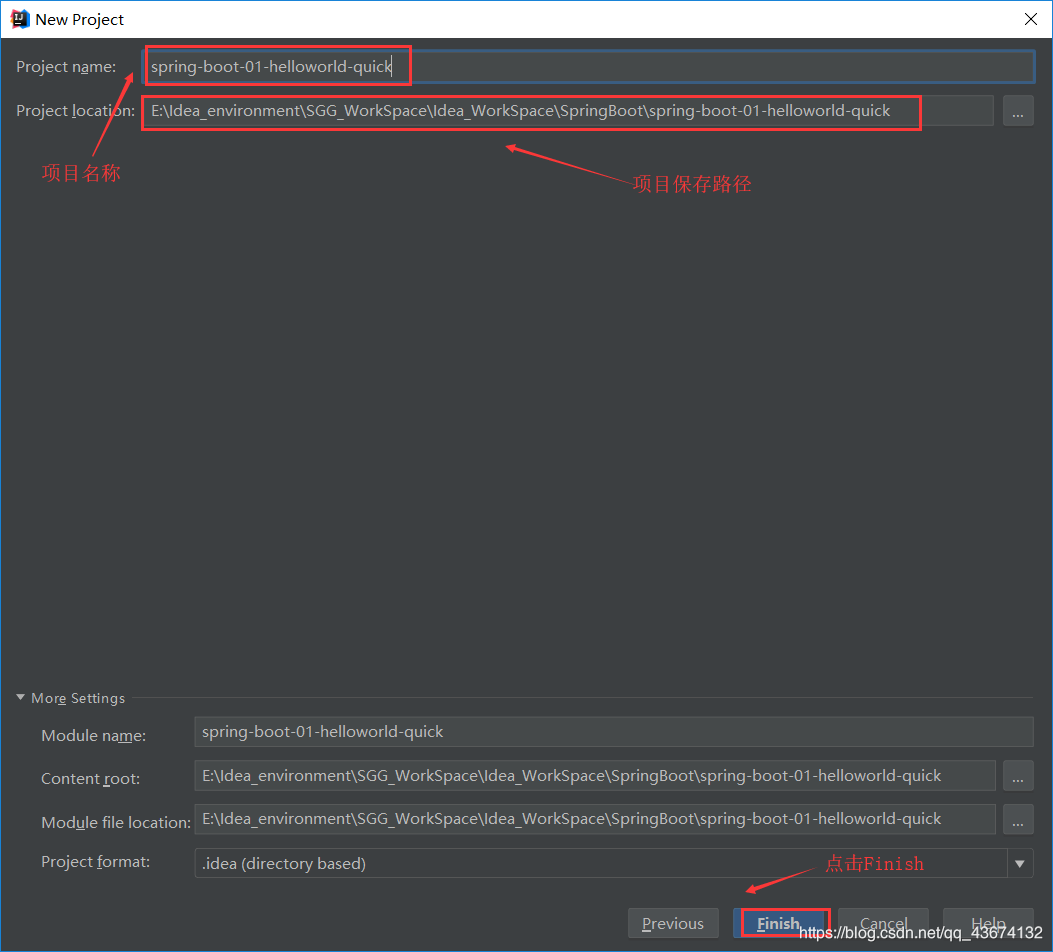
6.2、然后修改一下项目的信息:

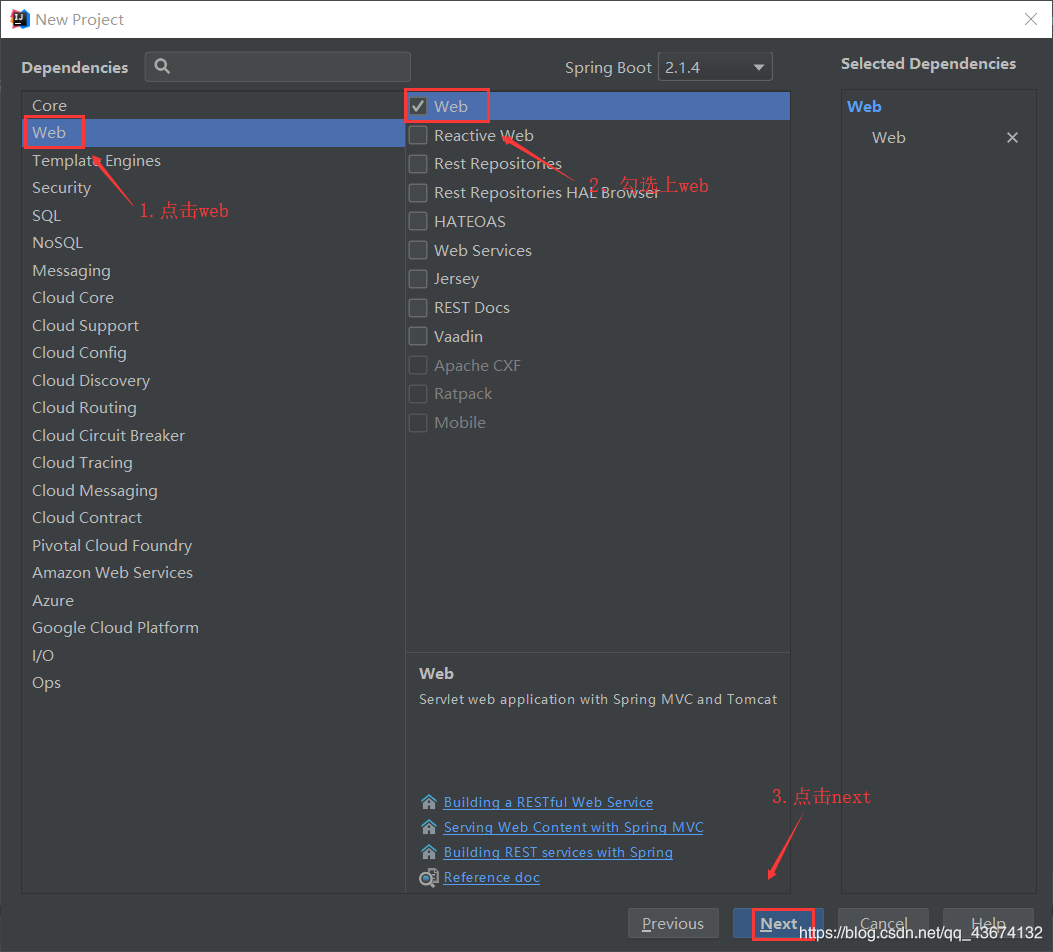
6.3、勾选上 Web 模板:
6.4、选择好项目的位置,点击【Finish】:
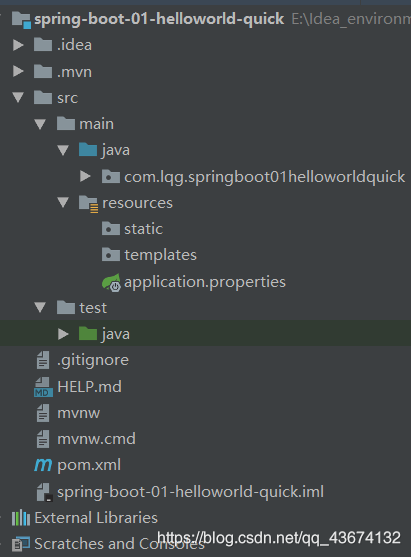
6.5、如果是第一次配置 Spring Boot 的话可能需要等待一会儿 IDEA 下载相应的 依赖包,默认创建好的项目结构如下:
6.6、编写相关的Controller、Service
package com.lqg.springboot01helloworldquick;

import org.springframework.web.bind.annotation.RequestMapping;
import org.springframework.web.bind.annotation.RestController;
//@Controller
//@ResponseBody
@RestController       //@RestController 注解: 该注解是 @Controller 和 @ResponseBody 注解的合体版
public class HelloContoller {
    @RequestMapping("/hello")
    public String hello(){
        return "Hello Spring Boot!";
    }
}
6.7、利用 IDEA 启动 Spring Boot
我们回到 SpringbootApplication 这个类中,然后右键点击运行:

6.8、注意:我们之所以在上面的项目中没有手动的去配置 Tomcat 服务器,是因为 Spring Boot 内置了 Tomcat
等待一会儿就会看到下方的成功运行的提示信息:
 .   ____          _            __ _ _
 /\\ / ___'_ __ _ _(_)_ __  __ _ \ \ \ \
( ( )\___ | '_ | '_| | '_ \/ _` | \ \ \ \
 \\/  ___)| |_)| | | | | || (_| |  ) ) ) )
  '  |____| .__|_| |_|_| |_\__, | / / / /
 =========|_|==============|___/=/_/_/_/
 :: Spring Boot ::        (v2.1.4.RELEASE)

2019-05-11 11:27:15.652  INFO 6224 --- [           main] s.SpringBoot01HelloworldQuickApplication : Starting SpringBoot01HelloworldQuickApplication on DESKTOP-12MVDLN with PID 6224 (E:\Idea_environment\SGG_WorkSpace\Idea_WorkSpace\SpringBoot\spring-boot-01-helloworld-quick\target\classes started by 凌枫lqg in E:\Idea_environment\SGG_WorkSpace\Idea_WorkSpace\SpringBoot\spring-boot-01-helloworld-quick)
2019-05-11 11:27:15.656  INFO 6224 --- [           main] s.SpringBoot01HelloworldQuickApplication : No active profile set, falling back to default profiles: default
2019-05-11 11:27:17.311  INFO 6224 --- [           main] o.s.b.w.embedded.tomcat.TomcatWebServer  : Tomcat initialized with port(s): 8080 (http)
2019-05-11 11:27:17.367  INFO 6224 --- [           main] o.apache.catalina.core.StandardService   : Starting service [Tomcat]
2019-05-11 11:27:17.368  INFO 6224 --- [           main] org.apache.catalina.core.StandardEngine  : Starting Servlet engine: [Apache Tomcat/9.0.17]
2019-05-11 11:27:17.544  INFO 6224 --- [           main] o.a.c.c.C.[Tomcat].[localhost].[/]       : Initializing Spring embedded WebApplicationContext
2019-05-11 11:27:17.544  INFO 6224 --- [           main] o.s.web.context.ContextLoader            : Root WebApplicationContext: initialization completed in 1811 ms
2019-05-11 11:27:17.805  INFO 6224 --- [           main] o.s.s.concurrent.ThreadPoolTaskExecutor  : Initializing ExecutorService 'applicationTaskExecutor'
2019-05-11 11:27:18.037  INFO 6224 --- [           main] o.s.b.w.embedded.tomcat.TomcatWebServer  : Tomcat started on port(s): 8080 (http) with context path ''
2019-05-11 11:27:18.040  INFO 6224 --- [           main] s.SpringBoot01HelloworldQuickApplication : Started SpringBoot01HelloworldQuickApplication in 3.06 seconds (JVM running for 8.445)
2019-05-11 11:28:26.179  INFO 6224 --- [nio-8080-exec-2] o.a.c.c.C.[Tomcat].[localhost].[/]       : Initializing Spring DispatcherServlet 'dispatcherServlet'
2019-05-11 11:28:26.179  INFO 6224 --- [nio-8080-exec-2] o.s.web.servlet.DispatcherServlet        : Initializing Servlet 'dispatcherServlet'
2019-05-11 11:28:26.200  INFO 6224 --- [nio-8080-exec-2] o.s.web.servlet.DispatcherServlet        : Completed initialization in 21 ms
6.9、可以看到我们的 Tomcat 运行在 8080 端口,我们来访问 “/hello” 地址试一下:

6.10创建好的项目文件夹中目录结构解释
static:保存所有的静态资源; js css images;
templates:保存所有的模板页面;(Spring Boot默认jar包使用嵌入式的Tomcat,默认不支持JSP页面);可以使用模板引擎(freemarker、thymeleaf);
application.properties:Spring Boot应用的配置文件;可以修改一些默认设置;