Vue入门
Vue工具介绍
CLI:Vue提供的一个官方的CLI,为单页面应用快速搭建繁杂的脚手架。
通过使用Vue提供的脚手架,我们可以快速搭建Vue环境,创建Vue项目。
Vue路由原理
在学习一个语言的情况下,首先我们需要做的是,理解该语言的原理和学会阅读并且使用该语言。
官方模板分析:
首先是创建了一个名为HelloWorld.vue的组件
![]()
上半部分的内容如下:
<template>
  <div class="hello">
    <h1>{{ msg }}</h1>
    <h2>Essential Links</h2>
    <el-button>默认按钮</el-button>
    <el-button type="primary">主要按钮</el-button>
    <el-button type="text">文字按钮</el-button>
  </div>
</template>

-----------------------------------------------------------------------
<script>
  export default {
    name: 'hello',
    data () {
      return {
        msg: 'Welcome to Your Vue.js App'
      }
    }
  }
</script>
元素分析:
template:html5的特性,在加载页面不会呈现,随后在运行使用JavaScript实例化。该标签具有全局属性【HTML所有元素共有属性】,可用于所有元素,不过可能对某些元素没有影响。
ES6标准
export default:
export:
导出属性,导出的模式始终处于严格模式
// 导出单个特性
export let name1, name2, …, nameN; // also var, const
export let name1 = …, name2 = …, …, nameN; // also var, const
export function FunctionName(){...}
export class ClassName {...}

// 导出列表
export { name1, name2, …, nameN };

// 重命名导出
export { variable1 as name1, variable2 as name2, …, nameN };

// 默认导出
export default expression;
export default function (…) { … } // also class, function*
export default function name1(…) { … } // also class, function*
export { name1 as default, … };

// Aggregating modules
export * from …;
export { name1, name2, …, nameN } from …;
export { import1 as name1, import2 as name2, …, nameN } from …;
export { default } from …;
export和export default分别为命令导出和默认导出
命令导出能够在一个模块中被多次定义,默认导出只能有一个,在导入期间,必须使用相应对象的相同名称。但是,可以使用任何名称导入默认导出。
export * from …;该语法不能从导入的模块导出默认导出值,如果需要导出默认值,使用下面代码。
export {default} from 'mod';在vue的官方模板中,设定默认导出如下:
<script>
  export default {
    name: 'hello',
    data () {
      return {
        msg: 'Welcome to Your Vue.js App'
      }
    }
  }
命名一个名为hello的默认导出,并且动态给msg赋值为Welcome to Your Vue.js App。
![]()
路由器文件夹中有一个index.js内容如下:
import Vue from 'vue'
import Router from 'vue-router'
import HelloWorld from '@/components/HelloWorld'

Vue.use(Router)

export default new Router({
  routes: [
    {
      path: '/',
      name: 'HelloWorld',
      component: HelloWorld
    }
  ]
})- 路由映射入门
案例:
HTML
<script src="https://unpkg.com/vue/dist/vue.js"></script>
<script src="https://unpkg.com/vue-router/dist/vue-router.js"></script>

<div id="app">
  <h1>Hello App!</h1>
  <p>
    <!-- use router-link component for navigation. -->
    <!-- specify the link by passing the `to` prop. -->
    <!-- `<router-link>` will be rendered as an `<a>` tag by default -->
    <router-link to="/foo">Go to Foo</router-link>
    <router-link to="/bar">Go to Bar</router-link>
  </p>
  <!-- route outlet -->
  <!-- component matched by the route will render here -->
  <router-view></router-view>
</div>
Javascript
// 0. If using a module system (e.g. via vue-cli), import Vue and VueRouter
// and then call `Vue.use(VueRouter)`.

1. Define route components.定义组件
// These can be imported from other files
const Foo = { template: '<div>foo</div>' }
const Bar = { template: '<div>bar</div>' }

2. Define some routes定义路由组
// Each route should map to a component. The "component" can
// either be an actual component constructor created via
// `Vue.extend()`, or just a component options object.
// We'll talk about nested routes later.
const routes = [
  { path: '/foo', component: Foo },
  { path: '/bar', component: Bar }
]

3. Create the router instance and pass the `routes` option创建路由
// You can pass in additional options here, but let's
// keep it simple for now.
const router = new VueRouter({
  routes // short for `routes: routes`
})

4. Create and mount the root instance.创建钩子
// Make sure to inject the router with the router option to make the
// whole app router-aware.
const app = new Vue({
  router
}).$mount('#app')

Now the app has started!
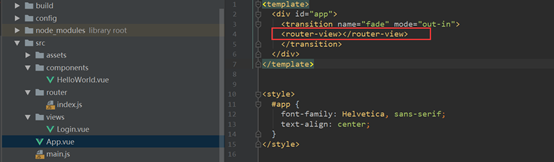
按照上述步骤分析模板路径:
1、定义组件:
![]()
2、定义路由组

红框部分分别是导入模块和组件引入路由
下面是创建路由
3、使用

映射部分: