前端是nginx,负责处理静态请求,后端有php,php用于处理动态请求,只要client访问动态请求,那么就会被nginx转发到后端的php上,而php的后面是mysql,动态内容都是保存在MySQL里面的,所以,如果时动态请求,php负责接收,然后再跑到mysql数据库上去寻找client需要的数据,找到数据后,返回给php,php再返回给nginx,nginx最后返回给client。
实验环境:
nginx:192.168.200.101
php:192.168.200.102
mysql:192.168.200.103
二、先搭建LNMP分离(三台都关闭防火墙跟selinux)
- nginx:
[root@localhost ~]# ls
anaconda-ks.cfg initial-setup-ks.cfg nginx-1.14.2.tar.gz
[root@localhost ~]# tar zxf nginx-1.14.2.tar.gz -C /usr/src/
[root@localhost ~]# cd /usr/src/nginx-1.14.2/
[root@localhost nginx-1.14.2]# useradd -M -s /usr/sbin nginx
[root@localhost nginx-1.14.2]# ./configure --prefix=/usr/local/nginx --user=nginx --group=nginx --with-http_stub_status_module --with-http_ssl_module --with-http_sub_module --with-http_ssl_module --with-http_gzip_static_module --with-http_flv_module && make && make install_stub_status_module --with-http_ssl_module --with-http_gzip_static_module --with-http_flv_module && make && make
[root@localhost nginx-1.14.2]# ln -s /usr/local/nginx/sbin/nginx /usr/local/bin/
[root@localhost ~]# vim /usr/local/nginx/conf/nginx.conf
location / {
root html;
index index.html index.htm index.php;
}
location ~ \.php$ {
root /var/www/html; //指定网站目录,在php上面创建的
fastcgi_pass 192.168.200.102:9000;
fastcgi_index index.php;
fastcgi_param SCRIPT_FILENAME $document_root$fastcgi_script_name;
#$document修改成这个变量 这个变量代表网站目录。
include fastcgi_params;
}
[root@localhost ~]# nginx -t
nginx: the configuration file /usr/local/nginx/conf/nginx.conf syntax is ok
nginx: configuration file /usr/local/nginx/conf/nginx.conf test is successful
- php安装
[root@localhost ~]# yum -y install zlib-devel pcre-devel openssl-devel xz-devel xm-devel libxml2-devel bzip2-devel
[root@localhost ~]# tar zxf libmcrypt-2.5.8.tar.gz -C /usr/src/
[root@localhost ~]# cd /usr/src/libmcrypt-2.5.8/
[root@localhost libmcrypt-2.5.8]# ln -s /usr/local/lib/libmcrypt.* /usr/lib
[root@localhost libmcrypt-2.5.8]# cd
[root@localhost ~]# tar zxf mhash-0.9.9.9.tar.gz -C /usr/src/
[root@localhost ~]# cd /usr/src/mhash-0.9.9.9/
[root@localhost ~]# ./configure && make && make install
[root@localhost mhash-0.9.9.9]# ln -s /usr/local/lib/libmhash* /usr/lib
[root@localhost ~]# cd
[root@localhost ~]# tar zxf mcrypt-2.6.8.tar.gz -C /usr/src/
[root@localhost ~]# cd /usr/src/mcrypt-2.6.8/
[root@localhost mcrypt-2.6.8]# export LD_LIBRARY_PATH=/usr/local/lib
[root@localhost mcrypt-2.6.8]# ./configure && make && make install
[root@localhost ~]# tar zxf php-7.3.0.tar.gz -C /usr/src
[root@localhost ~]# cd /usr/src/php-7.3.0/
[root@localhost php-7.3.0]# ./configure --prefix=/usr/local/php5 --enable-mysqlnd --with-mysqli=mysqlnd --enable-mbstring --with-mysql=mysqlnd --with-pdo-mysql=mysqlnd --with-freetype-dir --with-jpeg-dir --with-png-dir --with-zlib-dir --with-libxml-dir --enable-xml --enable-fpm --with-config-file-path=/usr/local/php5 --enable-maintainer-zts --disable-fileinfo && make && make install
注:编码详细介绍:
--enable-mysqlnd mysqln是专门为php优化编写的驱动。默认就是开启的。
--with-mysqli=mysqlnd 是由PHP源码提供的mysql驱动连接代码。
--with-mysql=mysqlnd
--with-pdo-mysql=mysqlnd pdo是一个应用层抽象类,底层和mysql server连接交互需要mysql驱动支持。Pdo的介绍请查看https://blog.csdn.net/weixin_34133829/article/details/86406061
--enable-mbstring 启用mbstring功能
--with-freetype-dir 打开对freetype字体库的支持
--with-jpeg-dir 打开对jpeg图片的支持
--with-png-dir 打开对png图片的支持
--with-zlib-dir 打开对zlib库的支持
--with-libxml-dir 打开libxml2库的支持
--enable-xml 开启xml库
--enable-fpm 打上PHP-fpm 补丁后才有这个参数,CGI方式安装的启动程序
--with-config-file-path=/usr/local/php5 指定自己的php.ini路径
--enable-maintainer-zts 按照开发需求安装PHP
--disable-fileinfo fileinfo在5.3以后就被默认安装的,小内存VPS上编译PHP会out of memory Disable fileinfo support
(如果需要对PHP的各参数选项有所了解:https://www.cnblogs.com/hubing/p/3735452.html)
[root@localhost php-7.3.0]# cp php.ini-development /usr/local/php5/php.ini
php有两个环境,一个是生产环境(php.ini-production)用于实际运营,一个是开发环境(php.ini-development)用于学习,这里我们选择生产环境。
[root@localhost php-7.3.0]# vim /usr/local/php5/php.ini
default_charset = "UTF-8" 默认使用的字符集
file_uploads = On 运行通过php上传网页文件
upload_max_filesize = 2M 允许上传文件的大小
max_file_uploads = 20 每个HTTP最多允许请求上传的文件数
post_max_size = 8M 每次通过表单post提交的数据限制
short_open_tag = On 允许识别PHP短语法标记,即<?.....?>
extension=php_mysql.dll 添加MySQL支持
copy php的执行文件到/etc/init.d下
[root@localhost php-7.3.0]# cp sapi/fpm/init.d.php-fpm /etc/init.d/php-fpm
给php执行文件权限
[root@localhost php-7.3.0]# chmod +x /etc/init.d/php-fpm
添加为系统服务
[root@localhost php-7.3.0]# chkconfig --add /etc/init.d/php-fpm
创建用户nginx
[root@localhost php-7.3.0]# useradd -M -s /sbin/nologin nginx
[root@localhost php-7.3.0]# cd /usr/local/php5/etc
为php的主配置文件做一个备份
[root@localhost etc]# cp php-fpm.conf.default php-fpm.conf
pid = /usr/local/php5/var/run/php-fpm.pid
[root@localhost etc]# cd php-fpm.d/
给php对外提供服务的fgi做备份
[root@localhost php-fpm.d]# cp www.conf.default www.conf
user = nginx
group = nginx
listen = 192.168.200.102:9000
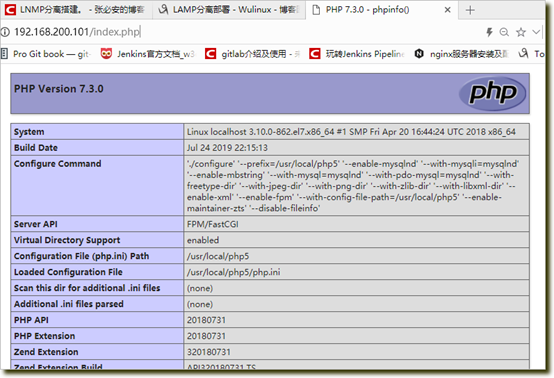
[root@localhost ~]# mkdir -p /var/www/html
[root@localhost ~]# vim /var/www/html/index.php
<?php
phpinfo();
?>
开启php-fpm
[root@localhost ~]# /etc/init.d/php-fpm start
- 搭建mysql
首先。要有软件包mysql-5.7.24-linux-glibc2.12-x86_64.tar.gz
wget http://mirrors.sohu.com/mysql/MySQL-5.7/mysql-5.7.24-linux-glibc2.12-x86_64.tar.gz
[root@bogon ~]#yum -y install libaio
[root@bogon ~]#tar zxf mysql-5.7.24-linux-glibc2.12-x86_64.tar.gz -C /usr/local
[root@bogon ~]# cd /usr/local/
[root@bogon local]# mv mysql-5.7.24-linux-glibc2.12-x86_64/ mysql
[root@bogon local]# useradd -M -s /sbin/nologin mysql
[root@bogon local]# cd mysql/
[root@bogon mysql]# chown -R mysql:mysql ./
[root@bogon mysql]# ./bin/mysqld --user=mysql --basedir=/usr/local/mysql --datadir=/usr/local/mysql/data --initialize
[Note] A temporary password is generated for root@localhost: ho19hx,%sZNq
记住上面这一行的密码。这个是初始密码。每一台机器的初始密码都不一样。
修改/etc/my.cnf文件
[mysqld]
datadir=/usr/local/mysql/data
socket=/tmp/mysql.sock
# Disabling symbolic-links is recommended to prevent assorted security risks
symbolic-links=0
# Settings user and group are ignored when systemd is used.
# If you need to run mysqld under a different user or group,
# customize your systemd unit file for mariadb according to the
# instructions in http://fedoraproject.org/wiki/Systemd
[mysqld_safe]
log-error=/usr/local/mysql/data/mysql.log
pid-file=/usr/local/mysql/data/mysql.pid
到这一步其实就已经做完了,后面的都是起服务跟优化
[root@bogon mysql]# ./support-files/mysql.server start
[root@bogon mysql]# netstat -anpt |grep 3306
[root@bogon mysql]# cp support-files/mysql.server /etc/init.d/mysqld
[root@bogon mysql]# service mysqld restart
[root@bogon mysql]# ./bin/mysqladmin -u root -p password '123123'
[root@bogon mysql]# ln -s /usr/local/mysql/bin/* /usr/local/bin
[root@bogon mysql]#service mysqld restart
因为是nginx调用php来解析动态内容,php再去找mysql ,所以 php需要有mysql客户端的包 不然即使授权了,网站也会报连接不上数据库
[root@localhost ~]# yum -y install mariadb-server
192.168.200.103上面的mysql在进行授权:
mysql> mysql> grant all on *.* to aaa@'192.168.200.%' identified by '123123';
Query OK, 0 rows affected, 1 warning (0.00 sec)
mysql> flush privileges;
Query OK, 0 rows affected (0.00 sec)
环境测试:
[root@localhost html]# vim index.php
<?php
phpinfo();
?>
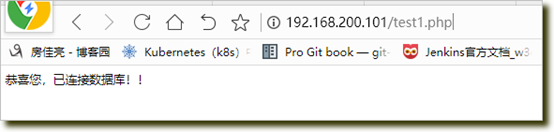
[root@localhost html]# vim test1.php (连接数据库的测试文件)
<?php
$link=mysqli_connect ('192.168.200.103','aaa','123123');
if ($link) echo "恭喜您,已连接数据库!!";
mysqli_close ($link);
?>