首先说一下我的环境, 我是在windows 10 上面建了一个ubuntu18的虚拟机,同时由于某些原因 不受网络限制, 所以安装比较顺利。
Install
1.安装并启用 Docker
sudo apt install docker.io
sudo systemctl enable docker
docker --version
2.添加 Kubernetes signing key 和Repository
sudo apt install curl
curl -s https://packages.cloud.google.com/apt/doc/apt-key.gpg | sudo apt-key add
sudo apt-add-repository "deb http://apt.kubernetes.io/ kubernetes-xenial main"
3.安装Kubeadm
sudo apt install kubeadm
kubeadm version


4.禁用 swapoff
sudo swapoff -a
以上的指令我只在一台Ubuntu上执行的(如果你有多台计算机,需要在所有的计算机上执行以上指令,我这里是通过拷贝虚拟机来实现的)
5.准备2台虚拟机k8s-master和k8s-node(我这里把上面的计算机命名为 k8s_master ,copy它并命名为k8s_node)
sudo hostnamectl set-hostname k8s-master #在k8s-master 上执行 IP:192.168.255.229
sudo hostnamectl set-hostname k8s-node #k8s-node 上执行 IP:192.168.255.230
Deploy
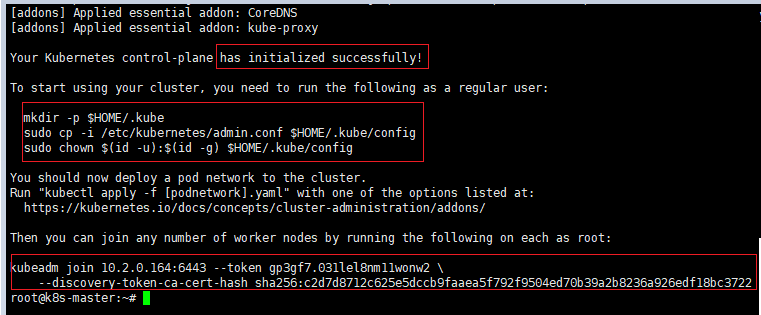
1.在master上初始化 Kubernetes
sudo kubeadm init --pod-network-cidr=192.168.255.229/2
#sudo kubeadm init --pod-network-cidr=192.168.100.0/2 这里不应该用现有计算机的ip 这里有解决方案 Kubernetes-dashboard pod is crashing again and again


2在master节点上执行如下:
mkdir -p $HOME/.kube
sudo cp -i /etc/kubernetes/admin.conf $HOME/.kube/config
sudo chown $(id -u):$(id -g) $HOME/.kube/config
#检查 master
kubectl get nodes

3.Deploy a Pod Network & view the status
sudo kubectl apply -f https://raw.githubusercontent.com/coreos/flannel/master/Documentation/kube-flannel.yml
kubectl get pods --all-namespaces
sudo kubectl get nodes

4.add slave node
在k8s-node上执行
kubeadm join 192.168.254.229:6443 --token ewlb93.v0ohocpvncaxgl16 --discovery-token-ca-cert-hash sha256:2522834081168fbe4b5b05854b964e76f1ea8bac6f8fc5e2be21c93c6a27c427

在k8s-master上检查节点信息:

5. 安装 Dashboard 插件 &检查状态
kubectl apply -f https://raw.githubusercontent.com/kubernetes/dashboard/v1.10.1/src/deploy/recommended/kubernetes-dashboard.yaml
kubectl get deployment kubernetes-dashboard -n kube-system
kubectl get svc kubernetes-dashboard -n kube-system
启动代理
kubectl proxy
#或者 如果需要暴露给其他机器,需要指定address:
kubectl proxy --address='0.0.0.0' --port=8001 --accept-hosts='^*$'
访问http://localhost:8001/api/v1/namespaces/kube-system/services/https:kubernetes-dashboard:/proxy/
不过我在访问这个地址 遇到错误如下:
root@k8s-master:~# kubectl get pods --all-namespaces
NAMESPACE NAME READY STATUS RESTARTS AGE
kube-system coredns-5c98db65d4-97xrf 1/1 Running 0 83m
kube-system coredns-5c98db65d4-vvtfc 1/1 Running 0 83m
kube-system etcd-k8s-master 1/1 Running 0 83m
kube-system kube-apiserver-k8s-master 1/1 Running 0 83m
kube-system kube-controller-manager-k8s-master 1/1 Running 0 83m
kube-system kube-flannel-ds-amd64-gbg49 1/1 Running 1 80m
kube-system kube-flannel-ds-amd64-hmrcp 1/1 Running 0 82m
kube-system kube-proxy-lbp5k 1/1 Running 0 80m
kube-system kube-proxy-szkb8 1/1 Running 0 83m
kube-system kube-scheduler-k8s-master 1/1 Running 0 83m
kube-system kubernetes-dashboard-7d75c474bb-p5nz5 0/1 CrashLoopBackOff 6 10m
root@k8s-master:~# kubectl logs kubernetes-dashboard-7d75c474bb-p5nz5 -n kube-system
2019/08/07 11:34:33 Using in-cluster config to connect to apiserver
2019/08/07 11:34:33 Using service account token for csrf signing
2019/08/07 11:34:33 Starting overwatch
2019/08/07 11:35:03 Error while initializing connection to Kubernetes apiserver. This most likely means that the cluster is misconfigured (e.g., it has invalid apiserver certificates or service account's configuration) or the --apiserver-host param points to a server that does not exist. Reason: Get https://10.96.0.1:443/version: dial tcp 10.96.0.1:443: i/o timeout
Refer to our FAQ and wiki pages for more information: https://github.com/kubernetes/dashboard/wiki/FAQ
root@k8s-master:~#
后来在https://stackoverflow.com/questions/52273029/kubernetes-dashboard-pod-is-crashing-again-and-again 找到解决方案,
Make sure you understand the difference between Host network, Pod network and Service network. These 3 networks can not overlap. For example --pod-network-cidr=192.168.0.0/16 must notinclude the IP address of your host, change it to 10.0.0.0/16 or something smaller if necessary.
所以 初始化该为 sudo kubeadm init --pod-network-cidr=192.168.100.0/2 就okay 了

创建账号
kubectl create serviceaccount dashboard -n default
kubectl create clusterrolebinding dashboard-admin -n default --clusterrole=cluster-admin --serviceaccount=default:dashboard
kubectl get secret $(kubectl get serviceaccount dashboard -o jsonpath="{.secrets[0].name}") -o jsonpath="{.data.token}" | base64 --decode
Copy the decoded password and login to dashboard.

在Kubernetes的安装过程中会默认安装很多Service账户,分别有不同的访问权限,要找到对应的token,你可以使用下面的方式:
kubectl -n kube-system get secret
kubectl -n kube-system describe secret certificate-controller-token-4xr9x

卸载集群
想要撤销kubeadm做的事,首先要排除节点,并确保在关闭节点之前要清空节点。
在主节点上运行:
kubectl drain <node name> --delete-local-data --force --ignore-daemonsets
kubectl delete node <node name>
然后在需要移除的节点上,重置kubeadm的安装状态:
kubeadm reset
参考:
K8s折腾日记(零) -- 基于 Ubuntu 18.04 安装部署K8s集群
Install and Deploy Kubernetes on Ubuntu 18.04 LTS
Install and Configure Kubernetes (k8s) 1.13 on Ubuntu 18.04 LTS / Ubuntu 18.10
Deploy Kubernetes cluster using kubeadmin on Ubuntu Server
Kubernetes on Ubuntu 18.04 - Master and Dashboard setup