Thymeleaf简介
Thymeleaf是一个流行的模板引擎,该模板引擎采用Java语言开发,模板引擎是一个技术名词,是跨领域跨平台的概念,在Java语言体系下有模板引擎,在C#、PHP语言体系下也有模板引擎。除了thymeleaf之外还有Velocity、FreeMarker等模板引擎,功能类似。
Thymeleaf的主要目标在于提供一种可被浏览器正确显示的、格式良好的模板创建方式,因此也可以用作静态建模。你可以使用它创建经过验证的XML与HTML模板。使用thymeleaf创建的html模板可以在浏览器里面直接打开(展示静态数据),这有利于前后端分离。需要注意的是thymeleaf不是spring旗下的。这里我们使用thymeleaf 3版本。
thymeleaf官方网址:https://www.thymeleaf.org/
thymeleaf官方在线文档网址:https://www.thymeleaf.org/doc/tutorials/3.0/usingthymeleaf.html
第一个thymeleaf程序
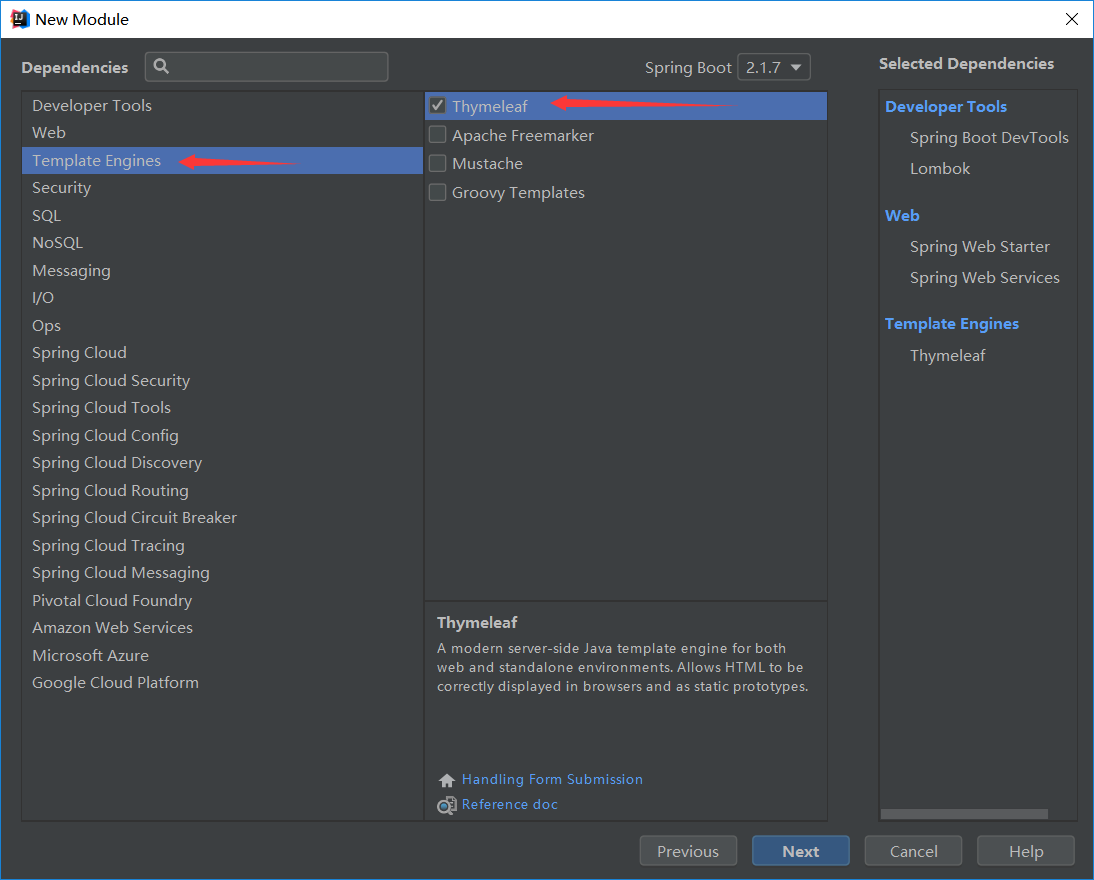
1、要想使用thymeleaf,首先需要添加thymeleaf依赖,这里与之前不一样的是我们需要勾选thymeleaf模板引擎依赖,其他的几个依赖我们之前已经说过,这里就不再进行讲解了。
<dependency>
    <groupId>org.springframework.boot</groupId>
    <artifactId>spring-boot-starter-thymeleaf</artifactId>
</dependency>
2、修改spring boot配置文件添加如下代码,在开发阶段建议关闭thymeleaf缓存,因为我们需要对开发项目进行实时修改,所以在这里我们先将缓存关闭。
#关闭thymeleaf缓存
spring.thymeleaf.cache=false
3、thymeleaf会对html中的标签进行严格的校验,如果标签缺少结束的话thymeleaf会报错,比如之前我们在html中写的<input>标签,如果缺少</input>则会报错。类似于这种错误不容易发现所以我们可以通过下面的方式去除thymeleaf的严格校验,首先添加依赖(需要手动添加,无法自动生成):
 <dependency>
      <groupId>net.sourceforge.nekohtml</groupId>
      <artifactId>nekohtml</artifactId>
      <version>1.9.22</version>
  </dependency>
pom.xml中添加完依赖之后,在spring boot配置文件中添加如下内容(完成以上两步之后就可以关闭thymeleaf的严格校验了):
spring.thymeleaf.mode=LEGANCYHTML5
4、创建controller,通过Model向html中传递数据,这里我们需要跳转html,不需要转换Json数据所以不需要使用RestController,Controller即可。thymeleaf默认的视图解析器为html,所以controller跳转时不需要再加html后缀,直接写"index"。
package com.scm.thymeleaf.controller;

import org.springframework.stereotype.Controller;
import org.springframework.ui.Model;
import org.springframework.web.bind.annotation.RequestMapping;

@Controller
public class ThymeleafController {
    @RequestMapping("/firstThymeleaf")
    public String thymeleafTest(Model model){
        model.addAttribute("info","This is my first thymeleaf!");
        return "index";
    }
}
5、在resources/templates里面创建一个index.html,填写下面内容。
注意:这里我们使用了thymeleaf,所以我们在<html>标签中添加 xmlns:th="http://www.thymeleaf.org"
<!DOCTYPE html>
<html xmlns:th="http://www.thymeleaf.org">
<head>
    <meta charset="UTF-8"/>
    <title>Spring boot集成 Thymeleaf</title>
</head>
<body>
<p th:text="${info}">Spring boot集成 Thymeleaf</p>
</body>
</html>
在html中我们通过th:text属性接收controller的"info"参数。并且将动态数据替换掉静态数据"Spring boot集成 Thymeleaf";
Springboot使用thymeleaf作为视图展示的时候,我们将模板文件放置在resource/templates目录下,静态资源放置在resource/static目录下。
Thymeleaf表达式
标准变量表达式
先创建一个controller用于向html传递数据,这里我们创建了一个User类。
package com.scm.thymeleaf.bean;

import lombok.Data;

@Data
public class User {
    private int id;
    private String Name;
    private String Phone;
    public User(){}
    public User(int id,String Name,String Phone){
        this.id = id;
        this.Name = Name;
        this.Phone = Phone;
    }
}
Controller
package com.scm.thymeleaf.controller;

import com.scm.thymeleaf.bean.User;
import org.springframework.stereotype.Controller;
import org.springframework.ui.Model;
import org.springframework.web.bind.annotation.RequestMapping;

@Controller
public class userInfo {
    @RequestMapping("/userInfo")
    public String userInfos(Model model){
        User user = new User(1000,"scm","188888888");
        model.addAttribute("u",user);
        model.addAttribute("hello","Hello World");
        return "user";
    }
}
user.html
html中我们接收了controller中传递的User对象,html中的${对象名.属性},对象名是addAttribute("键",“值”)方法中的键,而不是我们创建的User类。
在<td></td>标签中我们写入了静态数据,这些静态数据会被动态数据所取代,但是如果我们找到html本地路径,在本地直接打开user.html的话会显示静态资源,而不显示动态资源。
<!DOCTYPE html>
<html xmlns:th="http://www.thymeleaf.org">
<head>
    <meta charset="UTF-8">
    <title>Title</title>
</head>
<body>

<table>
    <tr>
        <td th:text="${u.id}">1</td>
        <td th:text="${u.name}">a</td>
        <td th:text="${u.phone}">137</td>
    </tr>
</table>
</body>
</html>
选择变量表达式
在标准变量表达式中我们通过${对象名.属性}的方式接收controller传递的参数。如果User类中有几十个属性甚至更多,那么岂不是要写几十次对象名,这样就显得麻烦。而使用选择变量表达式之后我们只需要声明一次对象名就可以了。代码如下:
<table>
    <tr th:object="${u}">
        <td th:text="*{id}">1</td>
        <td th:text="*{name}">a</td>
        <td th:text="*{phone}">137</td>
    </tr>
</table>
在<tr></tr>标签中我们声明了一个th:object获取了controller中的User对象,那么在这个<tr>标签中,我们就可以直接用*{属性名}的方式。这样如果User中的属性多的话我们只需要写属性名即可。
url表达式
将后台传入的数据拼接到url中,通过url表达式可以动态的拼接url。这里使用th:href属性,前两个为非Restful风格的get请求,后两个为Restful风格请求。
<a href="info.html" th:href="@{/user/info(id=${u.id})}">参数拼接</a>
<a href="info.html" th:href="@{/user/info(id=${u.id},phone=${u.phone})}">多参数拼接</a>
<a href="info.html" th:href="@{/user/info/{uid}(uid=${u.id})}">restful风格</a>
<a href="info.html" th:href="@{/user/info/{uid}/abc(uid=${u.id})}">restful风格</a>


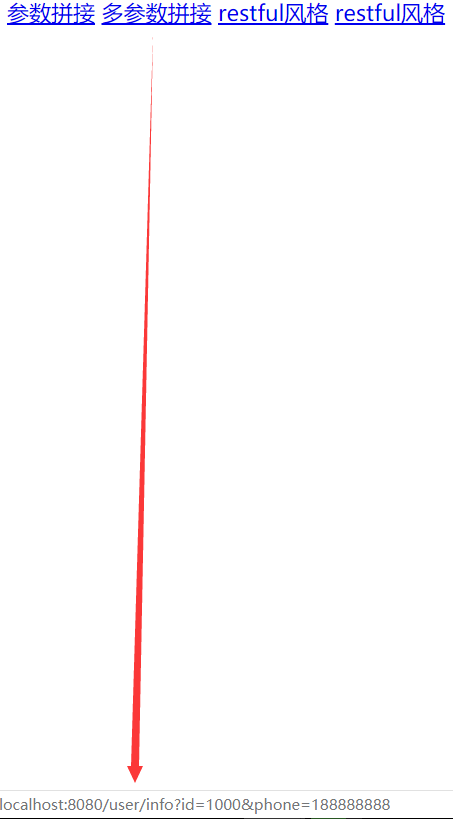
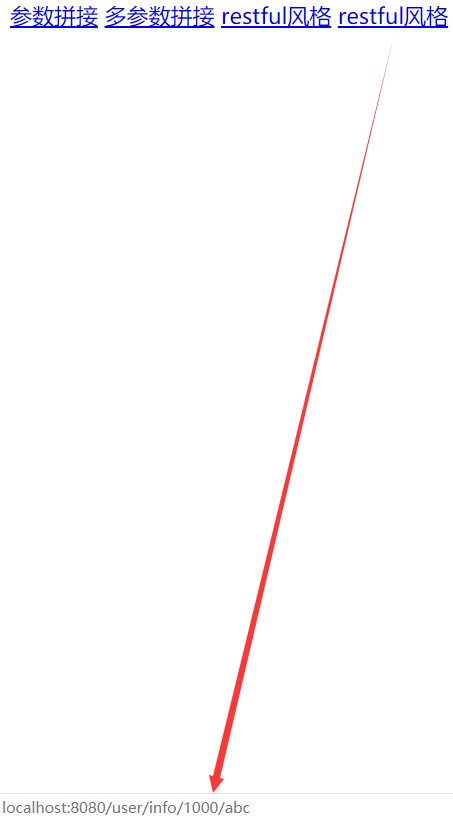
从图中看出我们将鼠标悬浮在超链接上,在下方我们可以看到动态拼接的url,这些url中的动态数据都是从controller中传递到url中的。
Thymeleaf运算符和表达式
重新创建一个controller,先在这里设置一些我们将要用到的参数。
package com.scm.thymeleaf.controller;

import com.scm.thymeleaf.bean.User;
import org.springframework.stereotype.Controller;
import org.springframework.ui.Model;
import org.springframework.web.bind.annotation.RequestMapping;

import javax.servlet.http.HttpSession;
import java.util.Date;

@Controller
public class userInfo {
    @RequestMapping("/userInfo1")
    public String userInfos1(Model model, HttpSession seesion){
        model.addAttribute("page",5);//字符串拼接
        model.addAttribute("sex",1);//三目运算符
        seesion.setAttribute("phone","16666666666");//session内置对象
        model.addAttribute("myDate",new Date());//#Date类
        return "user";
    }
}
字符串拼接(两种方式)
方式一:这种方式与java中字符串拼接类似。
<span th:text="'当前是第'+${page}+'页 ,共'+${page}+'页'"></span>
方式二:使用“|”减少了字符串的拼接,在| |之间thymeleaf可以自动识别 ${}表达式。
<span th:text="|当前是第${page}页,共${page}页|"></span>
三目运算符
<span th:text="${sex eq 0} ? '男' : '女'">未知</span>
基本运算和关系判断
算术运算:+ , - , * , / , %

关系比较: > , < , >= , <= ( gt , lt , ge , le )

相等判断:== , != ( eq , ne )
thymeleaf内置对象
模板引擎提供了一组内置的对象,这些内置的对象可以直接在模板中使用,这些对象由#号开始引用。
1、#request:相当于是HttpServletRequest对象
<span th:text="${#request.getContextPath()}"></span><br>
2、#session: 相当于是HttpSession对象
<span th:text="${#session.getAttribute('phone')}"></span><br>
除了上面的对象之外,工作中常使用的数据类型,如集合,时间,数值,thymeleaf的专门提供了功能性对象来处理它们,下面列举一部分。
1、#dates: java.util.Date对象的实用方法,可以调用里面的方法。#后边都多加一个s,例如#dates就是Date类。myDate参数是在controller创建的一个new Date();
<span th:text="${#dates.format(myDate, 'yyyy-MM-dd HH:mm:ss')}"></span>
2、#numbers: 格式化数字对象的实用方法;(Number类)
3、#strings: 字符串对象的实用方法;(String类)
4、#objects: 对objects操作的实用方法;(Object类)
5、#lists: list的实用方法,比如<span th:text="${#lists.size(datas)}">(List类)
6、#aggregates: 对数组或集合创建聚合的实用方法;(Aggregate类)