1.概述
使用iOS SDK中的HTTP网络请求API,相当的复杂,调用很繁琐,ASIHTTPRequest就是一个对CFNetwork API进行了封装,并且使用起来非常简单的一套API,用Objective-C编写,可以很好的应用在Mac OS X系统和iOS平台的应用程序中。ASIHTTPRequest适用于基本的HTTP请求,和基于REST的服务之间的交互。
2.ASIHTTPRequest功能很强大,主要特色如下:
- l 通过简单的接口,即可完成向服务端提交数据和从服务端获取数据的工作
- l 下载的数据,可存储到内存中或直接存储到磁盘中
- l 能上传本地文件到服务端
- l 可以方便的访问和操作请求和返回的Http头信息
- l 可以获取到上传或下载的进度信息,为应用程序提供更好的体验
- l 支持上传或下载队列,并且可获取队列的进度信息
- l 支持基本、摘要和NTLM身份认证,在同一会话中授权凭证会自动维持,并且可以存储在Keychain(Mac和iOS操作系统的密码管理系统)中
- l 支持Cookie
- l 当应用(iOS 4+)在后台运行时,请求可以继续运行
- l 支持GZIP压缩数据
- l 内置的ASIDownloadCache类,可以缓存请求返回的数据,这样即使没有网络也可以返回已经缓存的数据结果
- l ASIWebPageRequest –可以下载完整的网页,包括包含的网页、样式表、脚本等资源文件,并显示在UIWebView /WebView中。任意大小的页面都可以无限期缓存,这样即使没有网络也可以离线浏览
- l 支持客户端证书
- l 支持通过代理发起Http请求
- l 支持带宽限制。在iOS平台,可以根据当前网络情况来自动决定是否限制带宽,例如当使用WWAN(GPRS/Edge/3G)网络时限制,而当使用WIFI时不做任何限制
- l 支持断点续传
- l 支持同步和异步请求
3.如何在一个工程中使用ASIHTTPRequest
在源代码的class文件夹中,copy下面的这些文件到你的ios工程中,如果你不确定那个文件是你需要的,你最好全部拷贝到你的工程中
- 添加源代码文件
- ASIHTTPRequestConfig.h
- ASIHTTPRequestDelegate.h
- ASIProgressDelegate.h
- ASICacheDelegate.h
- ASIHTTPRequest.h
- ASIHTTPRequest.m
- ASIDataCompressor.h
- ASIDataCompressor.m
- ASIDataDecompressor.h
- ASIDataDecompressor.m
- ASIFormDataRequest.h
- ASIInputStream.h
- ASIInputStream.m
- ASIFormDataRequest.m
- ASINetworkQueue.h
- ASINetworkQueue.m
- ASIDownloadCache.h
- ASIDownloadCache.m
iPhone projects must also include:
- ASIAuthenticationDialog.h
- ASIAuthenticationDialog.m
- Reachability.h (in the External/Reachability folder)
- Reachability.m (in the External/Reachability folder)
2.添加依赖包CFNetwork, SystemConfiguration, MobileCoreServices, CoreGraphics and zlib

打开Build Phases tab,展开 Link Binary With Libraries然后点击 + 按钮
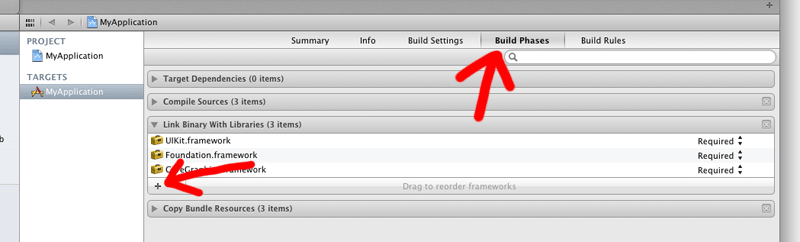
选中 CFNetwork.framework ,然后添加进来

重复上述步骤,依次添加:: SystemConfiguration.framework, MobileCoreServices.framework,CoreGraphics.framework and libz.dylib.
4.如何使用相应的API
由于篇幅有限,我只在这里简单介绍同步和异步的方法实现,具体文档详见官方地址如下:http://allseeing-i.com/ASIHTTPRequest/,
1)创建的同步请求:
- (IBAction)grabURL:(id)sender
{
  NSURL *url = [NSURL URLWithString:@"http://allseeing-i.com"];
  ASIHTTPRequest *request = [ASIHTTPRequest requestWithURL:url];
  [request startSynchronous];
  NSError *error = [request error];
  if (!error) {
    NSString *response = [request responseString];
  }
}
2)同步请求在实际应用中很少用到,因为同步的话,实际是执行的主线程,如果网络很慢或请求的数据很大,前台界面会一片空白,所以这时候我们往往会采用异步请求数据:
-(IBAction)grabURLInBackground:(id)sender
{NSURL*url =[NSURL URLWithString:@"http://allseeing-i.com"];
   ASIHTTPRequest*request =[ASIHTTPRequest requestWithURL:url];
   [request setDelegate:self];
   [request startAsynchronous];
}

-(void)requestFinished:(ASIHTTPRequest*)request
{// Use when fetching text dataNSString*responseString =[request responseString];

   // Use when fetching binary dataNSData*responseData =[request responseData];
}

-(void)requestFailed:(ASIHTTPRequest*)request
{NSError*error =[request error];
}
3)新版本支持的block
- (IBAction)grabURLInBackground:(id)sender
{
   NSURL *url = [NSURL URLWithString:@"http://allseeing-i.com"];
   __block ASIHTTPRequest *request = [ASIHTTPRequest requestWithURL:url];
   [request setCompletionBlock:^{
      // Use when fetching text data
      NSString *responseString = [request responseString];

      // Use when fetching binary data
      NSData *responseData = [request responseData];
   }];
   [request setFailedBlock:^{
      NSError *error = [request error];
   }];
   [request startAsynchronous];
}
Note the use of the __block qualifier when we declare the request, this is important! It tells the block not to retain the request, which is important in preventing a retain-cycle, since the request will always retain the block.