版权声明:本文为博主原创文章,遵循 CC 4.0 BY-SA 版权协议,转载请附上原文出处链接和本声明。
文章目录
前言
上篇文章, Spring Cloud Alibaba学习笔记:4、创建服务消费者(RestTemplate + LoadBalancerClient),
我们一起学习了 使用 RestTemplate + LoadBalancerClient 的方式 去创建服务消费者,但是依旧显得繁琐,本文,我们将结合使用 spring-cloud-openfeign 来创建服务消费者,简化消费调用…
一起开始吧
Feign 概述
Feign 是一个声明式的伪 Http 客户端,它使得写 Http 客户端变得更简单。使用 Feign,只需要创建一个接口并注解。它具有可插拔的注解特性,可使用 Feign 注解和 JAX-RS 注解。Feign 支持可插拔的编码器和解码器。Feign 默认集成了 Ribbon,Nacos 也很好的兼容了 Feign,默认实现了负载均衡的效果
- Feign 采用的是基于接口的注解
- Feign 整合了 ribbon
创建feign 服务消费者
1、 创建一个maven module 项目 sca-nacos-discovery-consumer-feign
2、 pom
<?xml version="1.0" encoding="UTF-8"?>
<project xmlns="http://maven.apache.org/POM/4.0.0"
         xmlns:xsi="http://www.w3.org/2001/XMLSchema-instance"
         xsi:schemaLocation="http://maven.apache.org/POM/4.0.0 http://maven.apache.org/xsd/maven-4.0.0.xsd">
    <modelVersion>4.0.0</modelVersion>
    <parent>
        <groupId>cn.fxbin.learn</groupId>
        <artifactId>sca</artifactId>
        <version>1.0</version>
    </parent>

    <artifactId>sca-nacos-discovery-consumer-feign</artifactId>
    <version>1.0</version>
    <name>sca-nacos-discovery-consumer-feign</name>
    <description>Spring Cloud Alibaba Nacos Discovery Consumer Feign Service Project</description>

    <dependencies>
        <!-- spring-boot web -->
        <dependency>
            <groupId>org.springframework.boot</groupId>
            <artifactId>spring-boot-starter-web</artifactId>
        </dependency>

        <!-- nacos-discovery -->
        <dependency>
            <groupId>org.springframework.cloud</groupId>
            <artifactId>spring-cloud-starter-alibaba-nacos-discovery</artifactId>
        </dependency>

        <!-- openfeign -->
        <dependency>
            <groupId>org.springframework.cloud</groupId>
            <artifactId>spring-cloud-starter-openfeign</artifactId>
        </dependency>
    </dependencies>

    <build>
        <plugins>
            <plugin>
                <groupId>org.springframework.boot</groupId>
                <artifactId>spring-boot-maven-plugin</artifactId>
            </plugin>
        </plugins>
    </build>

</project>
3、创建应用主类别 ScaNacosFeignApplication
package cn.fxbin.learn.sca.nacos.consumer;

import org.springframework.boot.SpringApplication;
import org.springframework.boot.autoconfigure.SpringBootApplication;
import org.springframework.cloud.client.discovery.EnableDiscoveryClient;
import org.springframework.cloud.openfeign.EnableFeignClients;

@EnableFeignClients
@EnableDiscoveryClient
@SpringBootApplication
public class ScaNacosFeignApplication {

    public static void main(String[] args) {
        SpringApplication.run(ScaNacosFeignApplication.class, args);
    }

}
4、创建 feign 客户端
package cn.fxbin.learn.sca.nacos.consumer.client;

import org.springframework.cloud.openfeign.FeignClient;
import org.springframework.web.bind.annotation.GetMapping;
import org.springframework.web.bind.annotation.PathVariable;

/**
 * DiscoveryClient
 *
 * @author fxbin
 * @version v1.0
 * @since 2019/7/7 22:47
 */
@FeignClient("sca-nacos-discovery-provider")
public interface DiscoveryClient {

    @GetMapping(value = "/echo/{message}")
    String echo(@PathVariable String message);

}
5、创建 ConsumerController
package cn.fxbin.learn.sca.nacos.consumer.controller;

import cn.fxbin.learn.sca.nacos.consumer.client.DiscoveryClient;
import lombok.extern.slf4j.Slf4j;
import org.springframework.web.bind.annotation.GetMapping;
import org.springframework.web.bind.annotation.RestController;

import javax.annotation.Resource;

/**
 * ConsumerController
 *
 * @author fxbin
 * @version v1.0
 * @since 2019/7/7 20:36
 */
@Slf4j
@RestController
public class ConsumerController {

    @Resource
    private DiscoveryClient discoveryClient;

    @GetMapping(value = "/test")
    public String test() {
        return discoveryClient.echo(" !^@^! ");
    }

}
6、配置服务端口、名称、服务端点检查和Nacos地址
server:
  port: 9033

management:
  endpoints:
    web:
      exposure:
        include: "*"

spring:
  application:
    name: sca-nacos-discovery-consumer-feign
  cloud:
    nacos:
      discovery:
        server-addr: 127.0.0.1:8848
7、启动Feign服务消费者

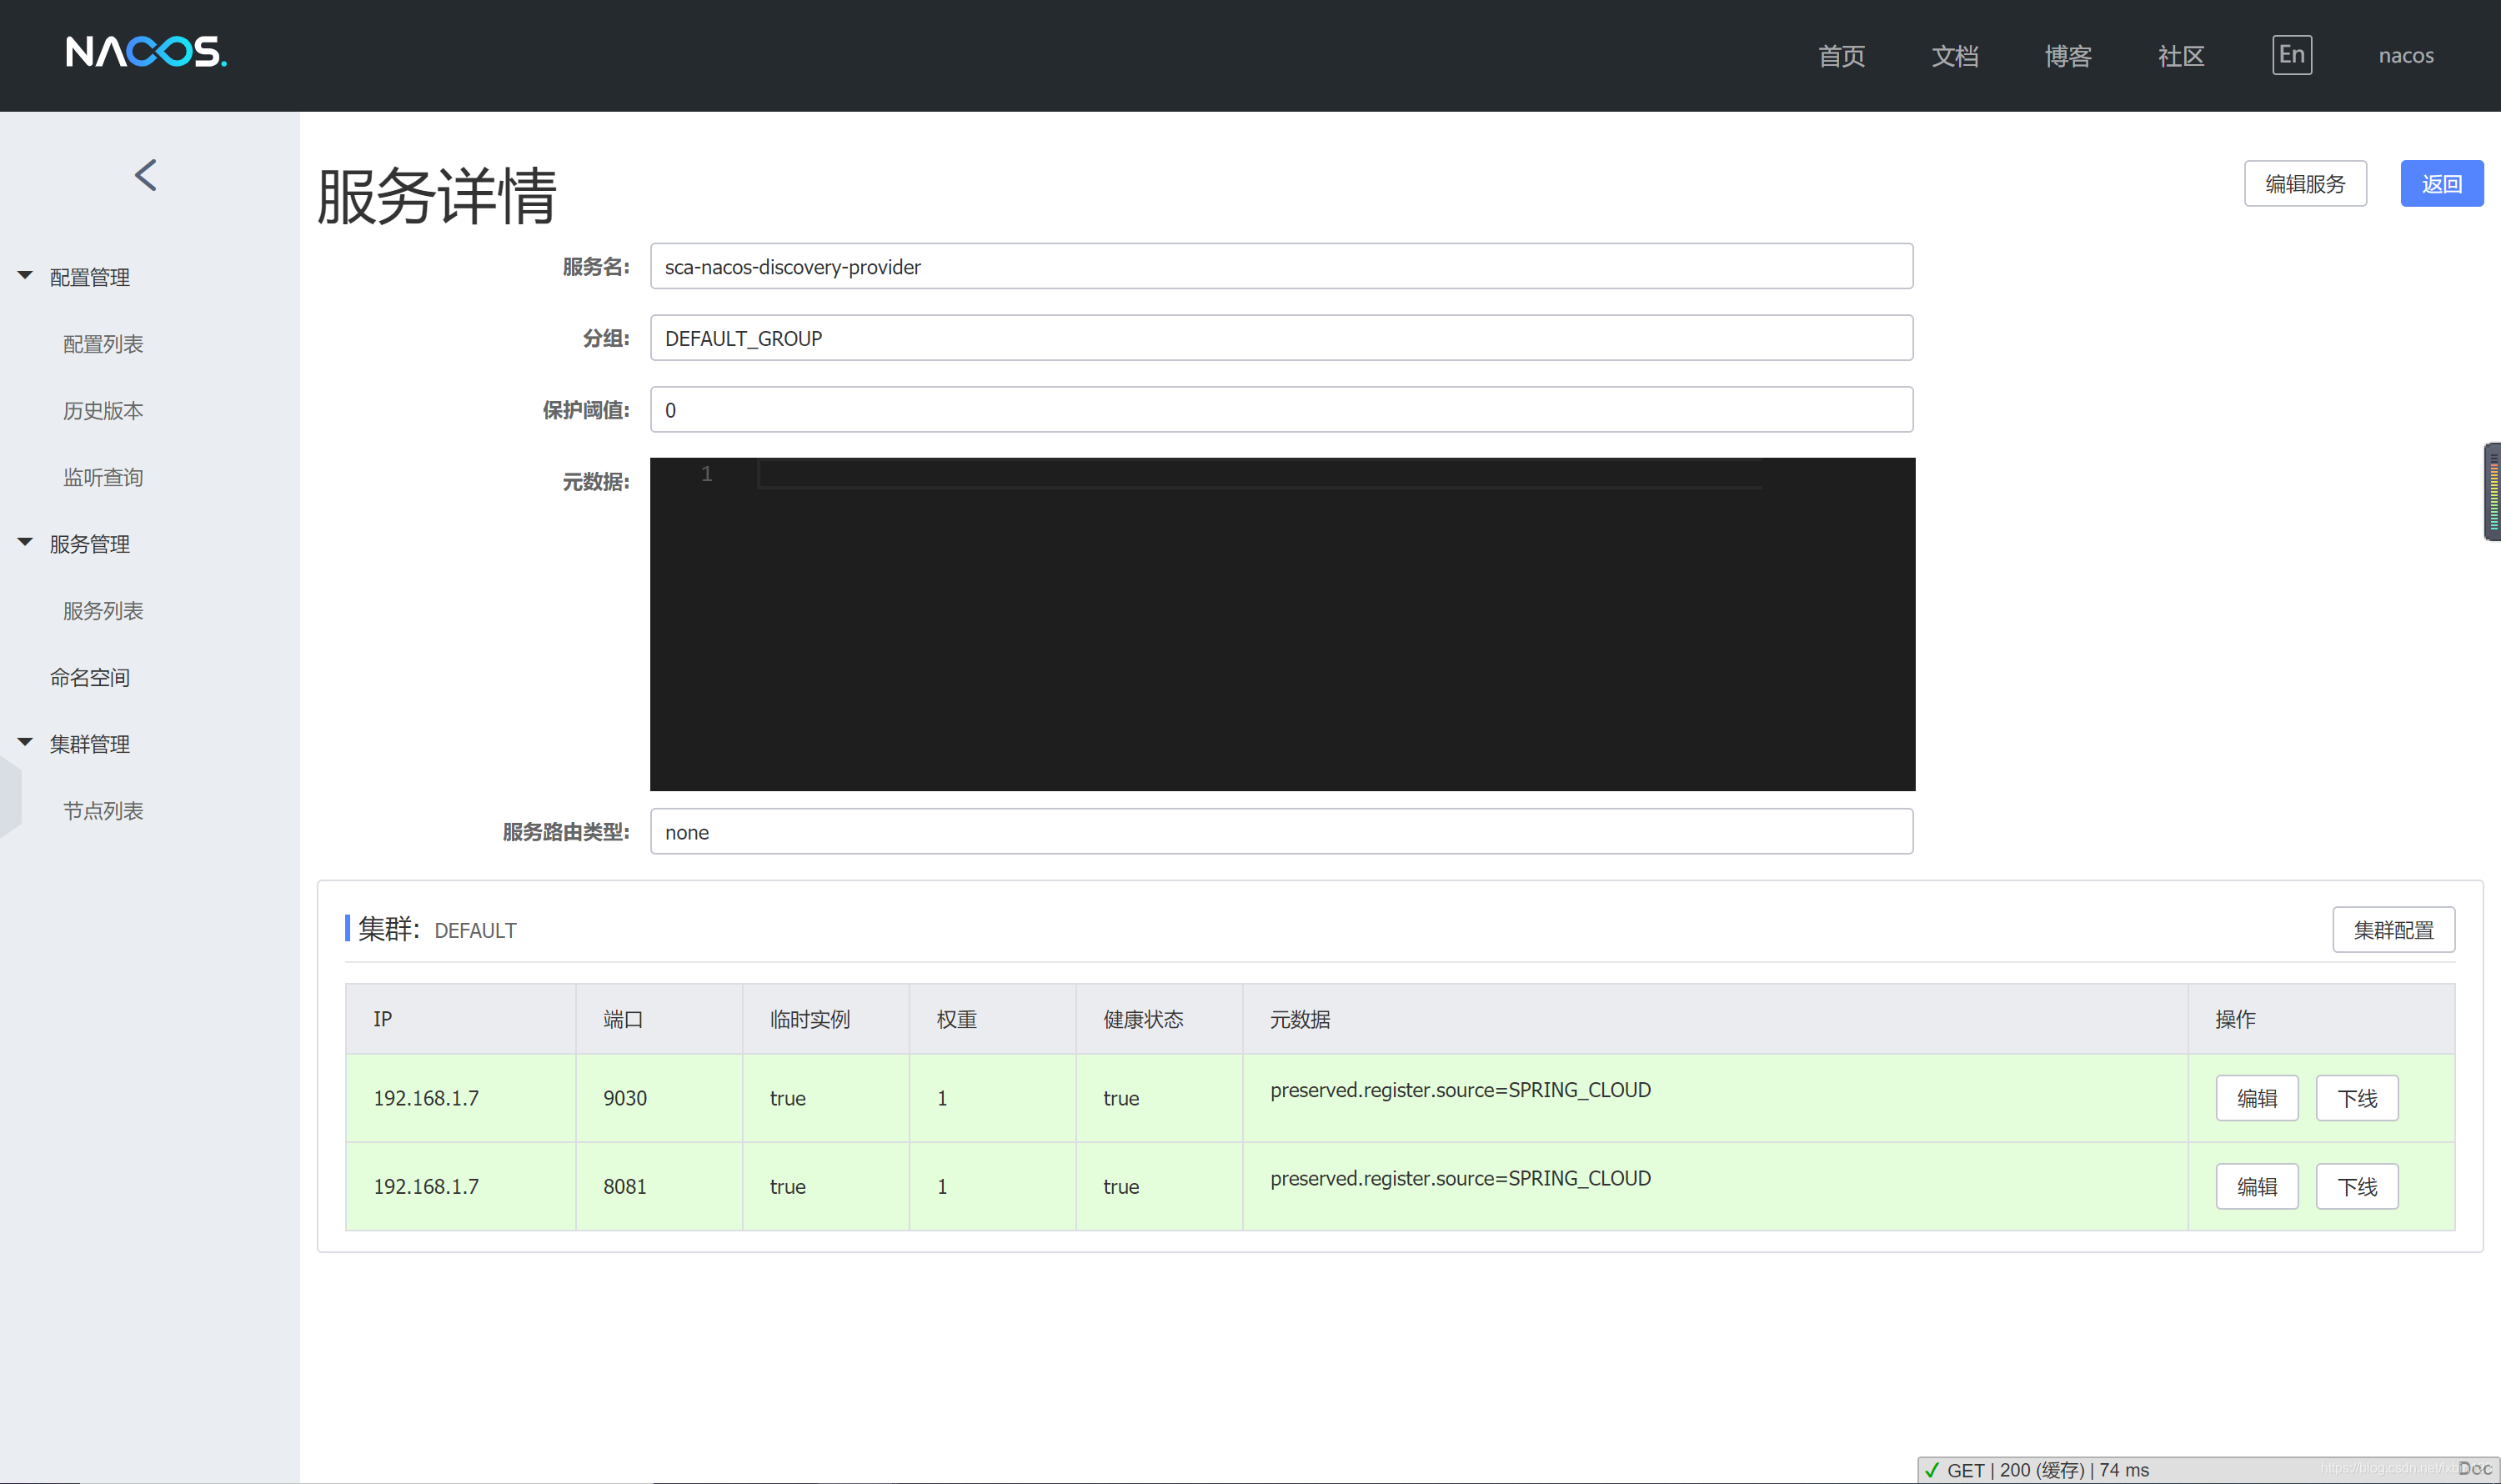
8、检查nacos 控制台

9、测试消费者
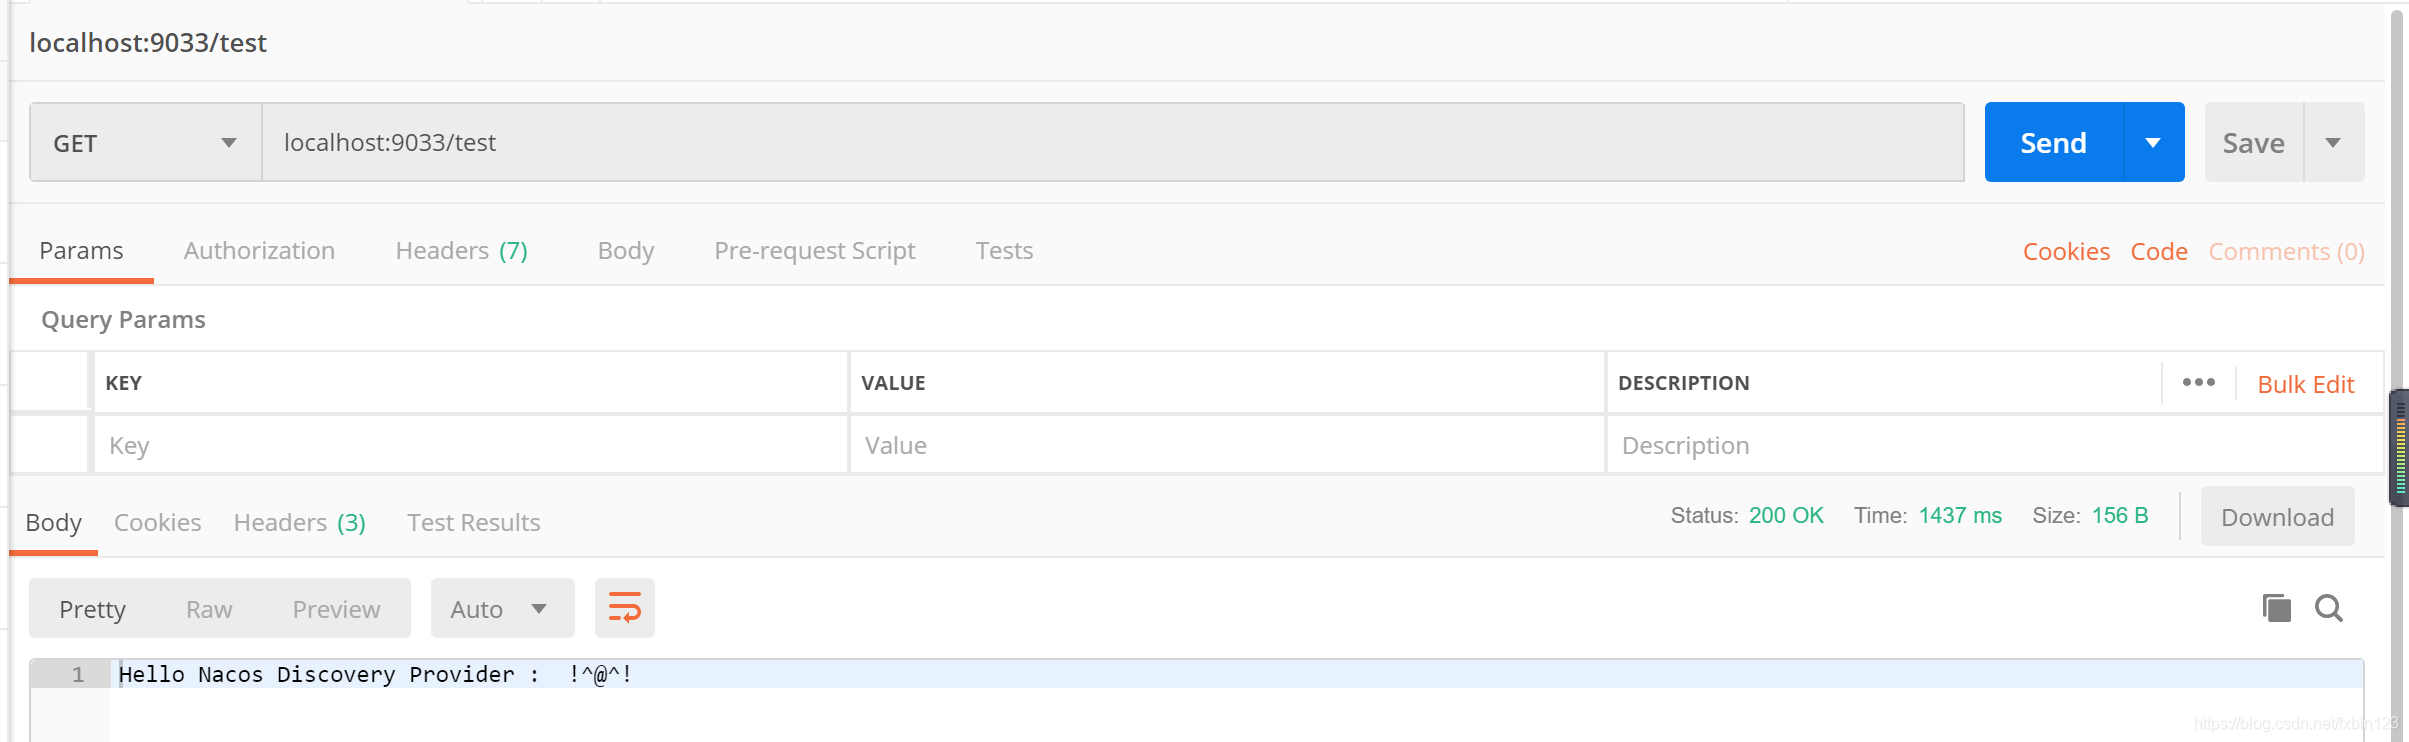
> 测试服务消费API
postman 调用 api: http://localhost:9033/test

> 测试服务负载
- 修改
sca-nacos-discovery-provider服务 api, 打印当前服务端口
  @RestController
  public class EchoController {

       @Value("${server.port}")
       private String port;

      @GetMapping(value = "/echo/{message}")
      public String echo(@PathVariable String message) {
          return "Hello Nacos Discovery Provider : " + message + ", port :" + port;
      }
  }
-
接下来重新启动原有实例,并再启动一个
sca-nacos-discovery-provide的实例, 如下所示:
-
再次请求 http://localhost:9033/test , 会交替显示如下信息:
Hello Nacos Discovery Provider :  !^@^! , port :8081
Hello Nacos Discovery Provider :  !^@^! , port :9030


扫描二维码关注公众号,回复:
7193978 查看本文章

源码地址:
github地址: https://github.com/fxbin/sca
码云地址 : https://gitee.com/fxbin/sca
– end –
如有疑问,请留言或者发送邮件,感谢您的阅读