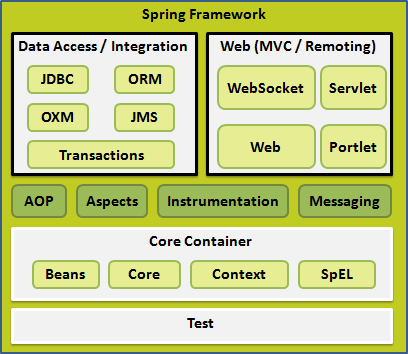
Spring的核心容器为beans,Core,Context SpEL,因此建立一个spring项目必须要引入这四个相关的jar包。
1 选择新建一个Dynamic Web Project,复制以下四个jar包(beans对应上面Core Container中的beans,context对应Context,core对应Core,expression对应SpEL),到项目的WebContent->WEB-INF->lib目录下
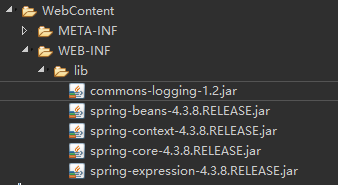
另外还需要复制一个commons-logging的jar包,最后选择选中这5个包,右键选择build path.(官网打开很慢,5个基本jar包的下载地址:[点击下载](https://github.com/benkzone/MySpringTask/tree/master/BasicJars))
2 编写一个类,包含getter、setter与构造方法
public class Person {
    private int id;
    private String name;
    private int age;

    public Person() {
        super();
        // TODO Auto-generated constructor stub
    }

    public Person(int id, String name, int age) {
        super();
        this.id = id;
        this.name = name;
        this.age = age;
    }

    public int getId() {
        return id;
    }
    public void setId(int id) {
        this.id = id;
    }
    public String getName() {
        return name;
    }
    public void setName(String name) {
        this.name = name;
    }
    public int getAge() {
        return age;
    }
    public void setAge(int age) {
        this.age = age;
    }
    @Override
    public String toString() {
        return "Person [id=" + id + ", name=" + name + ", age=" + age + ", getId()=" + getId() + ", getName()="
                + getName() + ", getAge()=" + getAge() + "]";
    }

}
3 配置bean文件,建立一个applicationContext.xml文件放在src文件夹下,其中xsi:schemaLocation中打开http://www.springframework.org/schema/beans/spring-beans.xsd太慢会出错,因此把xsd文件放在了本地E盘的xml文件夹里,并将该网址用
file:///E:/xml/spring-beans-4.0.xsd代替。([xsd文件下载](https://github.com/benkzone/MySpringTask/tree/master/BasicJars))
<?xml version="1.0" encoding="UTF-8"?>

<beans xmlns="http://www.springframework.org/schema/beans"
        xmlns:xsi="http://www.w3.org/2001/XMLSchema-instance"
        xmlns:aop="http://www.springframework.org/schema/aop"
        xsi:schemaLocation="http://www.springframework.org/schema/beans
                            file:///E:/xml/spring-beans-4.0.xsd
                            http://www.springframework.org/schema/aop
                            http://www.springframework.org/schema/aop/spring-aop.xsd">
<bean> id="per" class="包名.Person"</bean>
<bean index="0" value="123"></bean>
<bean index="1" value="lisi"></bean>
<bean index="2" value="23"></bean>
</beans>
4 创建一个TestDemo类来测试代码,在主程序里写入:
        ApplicationContext ac=new ClassPathXmlApplicationContext("applicationContext.xml");
        Person person=ac.getBean("per",Person.class);
        System.out.println(person);
5 运行,成功
