1.基础环境
node1: 192.168.100.200
node2: 192.168.100.201
lcmc: 192.168.100.222注:node1和node2为两个数据库节点,lcmc为安装LCMC工具的节点,node1、node2均存在highgo用户
2.前提配置
(1)三台机器均设置防火墙关闭、SELINUX关闭、SSH互信,配置步骤见数据库集群corosync+pacemaker+pcs
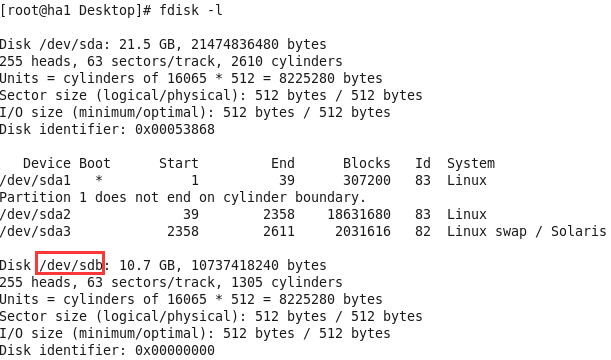
(2) node1、node2均有一空白磁盘
(3)该文档中三台机器的主机名为ha1、ha2、disk
3.drbd安装配置
配置过程参考于http://www.360doc.com/content/14/0316/13/9430500_361013725.shtml
wget -c http://elrepo.org/linux/elrepo/el6/x86_64/RPMS/drbd84-utils-8.4.2-1.el6.elrepo.x86_64.rpm

wget -c http://elrepo.org/linux/elrepo/el6/x86_64/RPMS/kmod-drbd84-8.4.2-1.el6_3.elrepo.x86_64.rpm

rpm -ivh *.rpm
安装完成后配置
(1)在node1、node2执行
[root@ha1 ~]# sha1sum /etc/drbd.conf
[root@ha2 ~]# sha1sum /etc/drbd.conf
(2)在node1创建配置文件并拷贝到node2
[root@ha1 drbd.d]# pwd
/etc/drbd.d
[root@ha1 drbd.d]# cat dbcluster.res
resource dbcluster {
    protocol C;
    net {
        cram-hmac-alg sha1;
        shared-secret "8a6c5f3c21b84c66049456d34b4c4980468bcfb3";
        after-sb-0pri discard-zero-changes;
        after-sb-1pri discard-secondary;
        after-sb-2pri disconnect;
        rr-conflict disconnect;
    }
    device    /dev/drbd0;
    disk      /dev/sdb;
    meta-disk internal;
    on ha1 {
        address   192.168.100.200:7789;
    }
    on ha2 {
        address   192.168.100.201:7789;
    }
}
[root@ha1 drbd.d]# scp dbcluster.res ha2:/etc/drbd.d/
dbcluster.res                                 100%  492     0.5KB/s   00:00
(3)为资源dbcluster创建meta data
[root@ha1 ~]# drbdadm create-md dbcluster
[root@ha2 ~]# drbdadm create-md dbcluster
(4)激活资源
加载并确认,然后启动后台进程,node1、node2均执行
[root@ha1 ~]# lsmod | grep drbd
[root@ha1 ~]#
[root@ha1 ~]# modprobe drbd
[root@ha1 ~]# lsmod | grep drbd
drbd                  317306  0
libcrc32c               1246  1 drbd
[root@ha1 ~]#
[root@ha1 ~]# drbdadm up dbcluster
(5)查看drbd状态
[root@ha1 ~]# drbd-overview
  0:dbcluster/0  Connected Secondary/Secondary Inconsistent/Inconsistent C r-----

[root@ha2 ~]# drbd-overview
  0:dbcluster/0  Connected Secondary/Secondary Inconsistent/Inconsistent C r-----
注:状态信息显示drbd服务已经在node1、node2运行,但均不是主机器,无法访问资源
(6)主节点node1执行,开始同步
[root@ha1 ~]# drbdadm -- --overwrite-data-of-peer primary dbcluster
(7)查看状态
正在同步...
[root@ha1 ~]# drbd-overview
  0:dbcluster/0  SyncSource Primary/Secondary UpToDate/Inconsistent C r---n-
    [======>.............] sync'ed: 37.7% (6380/10236)M
同步完成后node1、node2状态
[root@ha1 ~]# drbd-overview
0:dbcluster/0 Connected Primary/Secondary UpToDate/UpToDate C r-----
[root@ha1 ~]#
[root@ha1 ~]# ssh ha2
Last login: Sun Nov 13 23:12:08 2016 from disk
[root@ha2 ~]#
[root@ha2 ~]# drbd-overview
0:dbcluster/0 Connected Secondary/Primary UpToDate/UpToDate C r-----
(8)在主节点node1创建文件系统
[root@ha1 ~]# mkfs -t ext4 /dev/drbd0注:不需要再node2做该操作,drbd会进行同步
4.安装数据库
(1)首先在node2安装数据库
- root创建/install/hgdb,并更改目录所有者为highgo
[root@ha2 ~]# mkdir -p /install/hgdb
[root@ha2 ~]# chown -R highgo:highgo /install
- 修改highgo用户的环境变量
[root@ha2 ~]# vi /home/highgo/.bash_profile
[root@ha2 ~]# cat /home/highgo/.bash_profile
# .bash_profile

# Get the aliases and functions
if [ -f ~/.bashrc ]; then
    . ~/.bashrc
fi

# User specific environment and startup programs
export HG_HOME=/home/highgo/hgdb
export PGDATA=/install/hgdb/data
export LD_LIBRARY_PATH=$HG_HOME/lib
PATH=$PATH:$HOME/bin:$HG_HOME/bin

export PATH
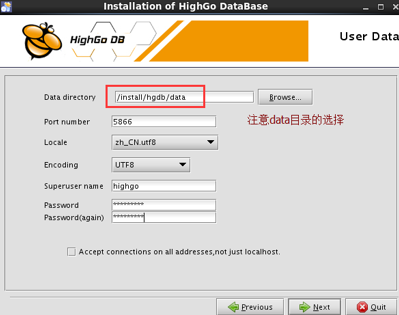
- 切换为highgo用户登录并安装数据库,注意data目录选择在/install/hgdb下
- 安装完成后停掉数据库服务并设置开机非自启
[root@ha2 ~]# service hgdb-se2.0.4 stop
Stopping HighGo Database
waiting for server to shut down.... done
server stopped
[root@ha2 ~]#
[root@ha2 ~]# chkconfig hgdb-se2.0.4 off
- 删除data目录
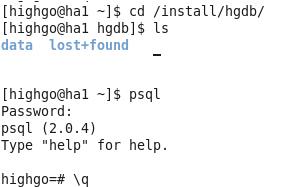
[highgo@ha2 ~]$ cd /install/hgdb/
[highgo@ha2 hgdb]$ rm -rf data/
[highgo@ha2 hgdb]$ ls
[highgo@ha2 hgdb]$
(2)在node1节点安装数据库
- 同样创建/install/hgdb并更改所有者
[root@ha1 ~]# mkdir -p /install/hgdb
[root@ha1 ~]# chown -R highgo:highgo /install- 挂载drbd文件系统到node1
[root@ha1 ~]# mount /dev/drbd0 /install/hgdb/- 修改highgo用户环境变量,同node2的highgo环境变量
- 切换为highgo用户登录并安装数据库,同注意data目录选在/install/hgdb
- 设置数据库非开机自启
[root@ha1 ~]# chkconfig hgdb-se2.0.4 off5.安装corosync、pacemaker并配置
(1)安装
yum -y install corosync pacemaker(2)配置
- 生成key并拷贝到node2
[root@ha1 ~]# corosync-keygen
[root@ha1 ~]# scp /etc/corosync/authkey ha2:/etc/corosync/- 创建配置文件corosync,并拷贝到node2
[root@ha1 corosync]# ls
authkey corosync.conf.example corosync.conf.example.udpu service.d uidgid.d
[root@ha1 corosync]# cp corosync.conf.example.udpu corosync.conf
[root@ha1 corosync]#
[root@ha1 corosync]# vi corosync.conf
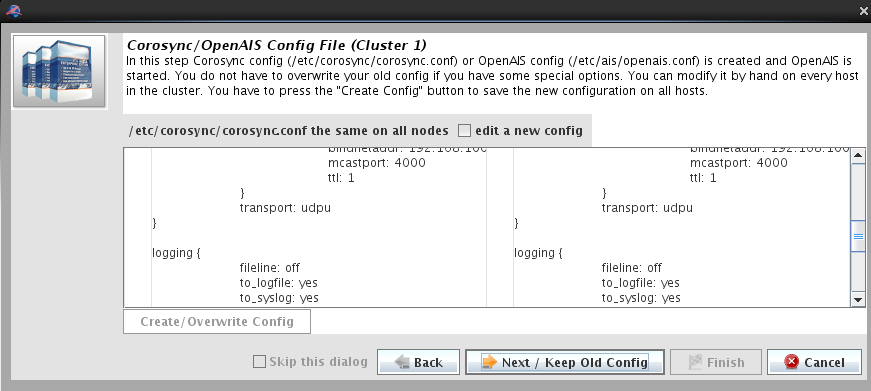
[root@ha1 corosync]# cat corosync.conf
# Please read the corosync.conf.5 manual page
compatibility: whitetank
aisexec {
user: root
group: root
}
totem {
version: 2
secauth: off
interface {
member {
memberaddr: 192.168.100.200
}
member {
memberaddr: 192.168.100.201
}
ringnumber: 0
bindnetaddr: 192.168.100.0
mcastport: 4000
ttl: 1
}
transport: udpu
}
logging {
fileline: off
to_logfile: yes
to_syslog: yes
logfile: /var/log/cluster/corosync.log
debug: off
timestamp: on
logger_subsys {
subsys: AMF
debug: off
}
}
amf {
mode: disabled
}
[root@ha1 corosync]# scp corosync.conf ha2:/etc/corosync/- 创建pcmk,并拷贝到node2
[root@ha1 corosync]# cd service.d/
[root@ha1 service.d]# pwd
/etc/corosync/service.d
[root@ha1 service.d]# vi pcmk
[root@ha1 service.d]# cat pcmk
service {
# Load the Pacemaker Cluster Resource Manager
    name: pacemaker
    ver: 0
}

[root@ha1 service.d]# scp pcmk ha2:/etc/corosync/service.d/
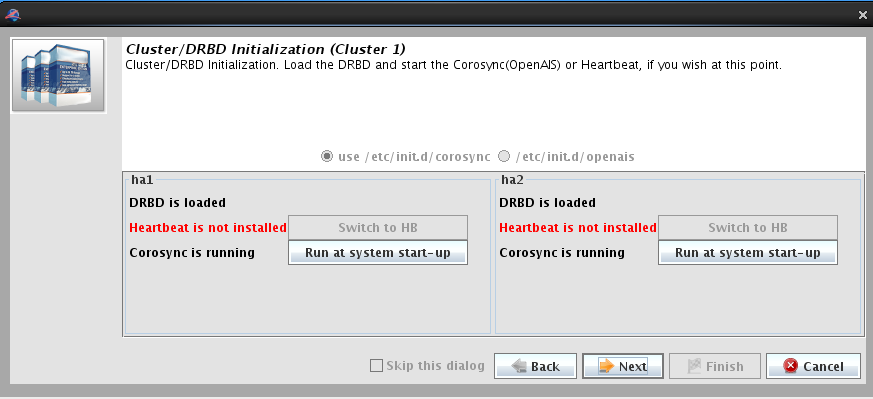
- 启动corosync
[root@ha1 service.d]# service corosync start
Starting Corosync Cluster Engine (corosync):               [  OK  ]

[root@ha2 service.d]# service corosync start
Starting Corosync Cluster Engine (corosync):               [  OK  ]
6.在lcmc机器安装jdk、lcmc,并配置
(1) 安装
[root@disk Desktop]# ls
jdk-8u111-linux-x64.rpm  lcmc-1.7.12-1.noarch.rpm
[root@disk Desktop]#
[root@disk Desktop]# rpm -ivh *.rpm
Preparing...                ########################################### [100%]
   1:lcmc                   ########################################### [ 50%]
   2:jdk1.8.0_111           ########################################### [100%]
Unpacking JAR files...
    tools.jar...
    plugin.jar...
    javaws.jar...
    deploy.jar...
    rt.jar...
    jsse.jar...
    charsets.jar...
    localedata.jar...
(2)配置
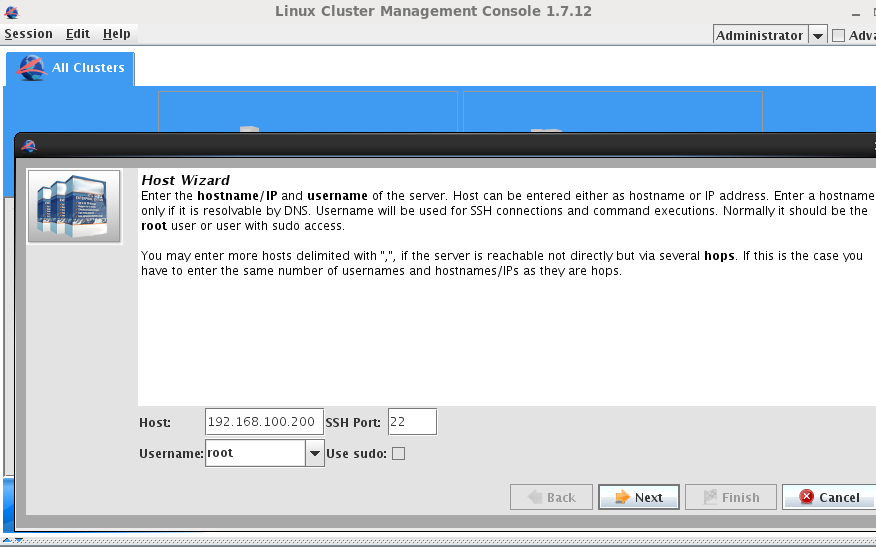
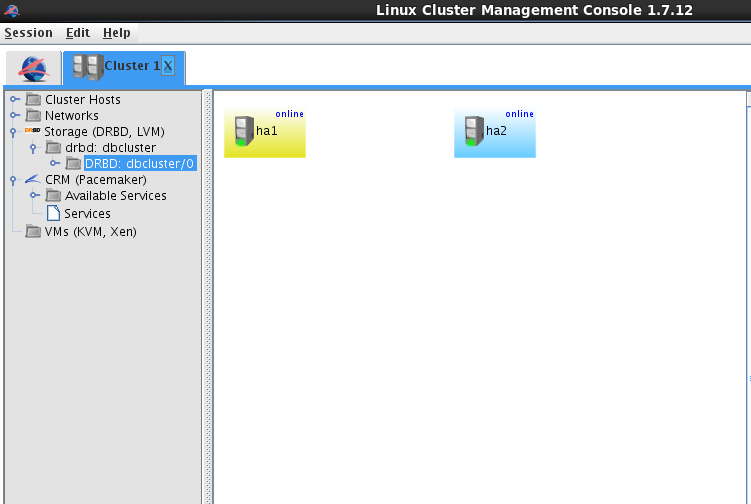
- 添加两个节点

- 添加完节点后,添加集群
- 资源配置
任何情况集群资源继续运行
禁用stonith
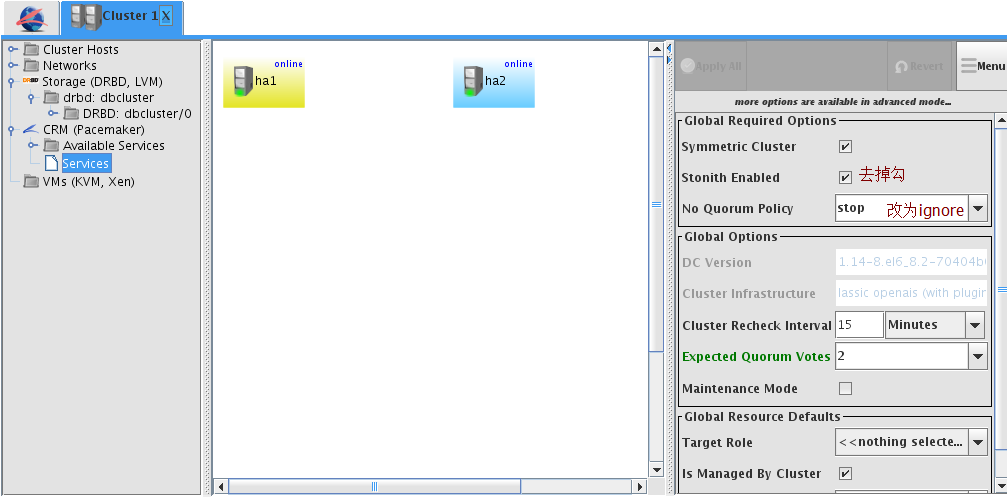
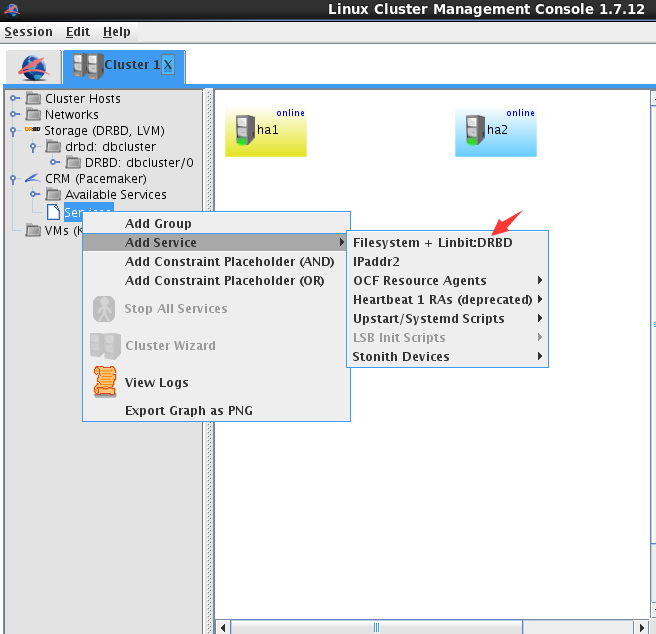
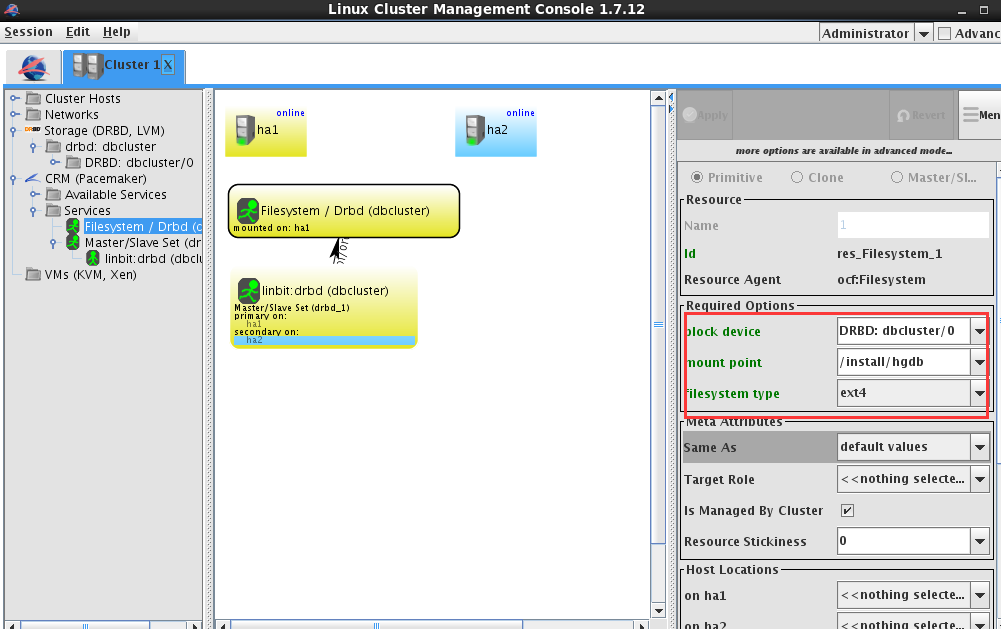
配置文件系统
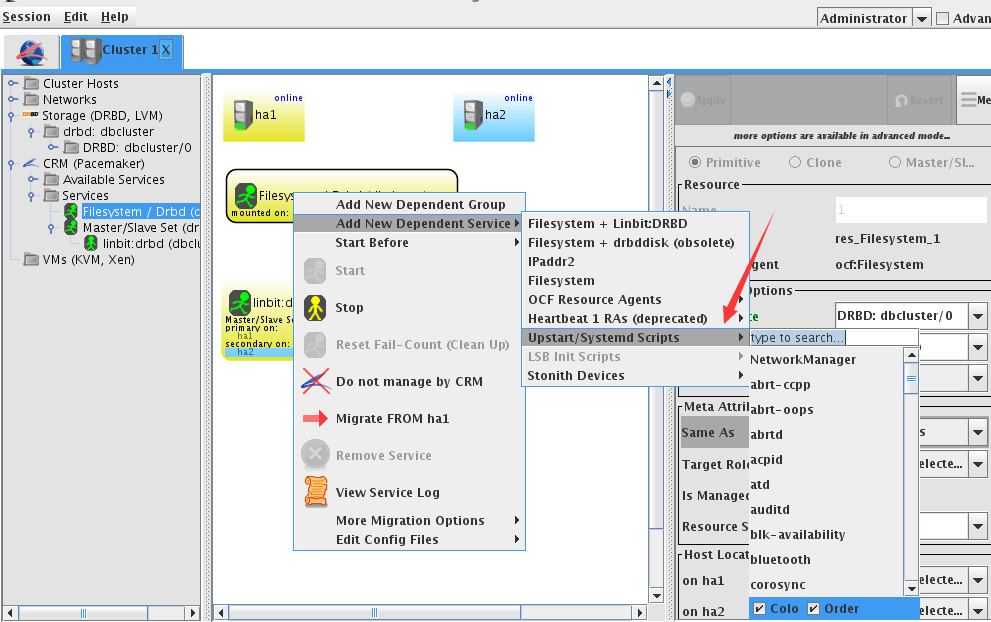
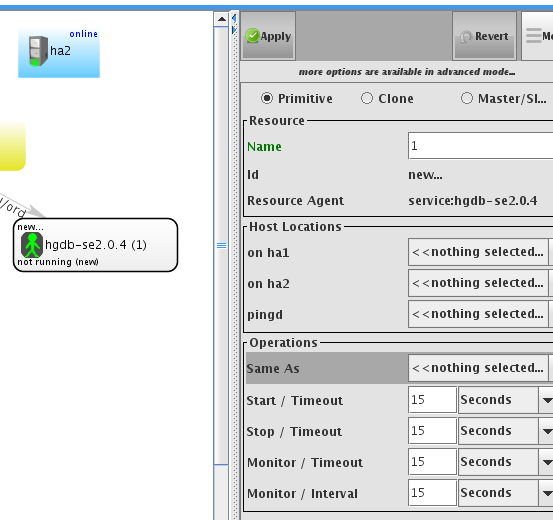
配置数据库服务,选择服务hgdb-se2.0.4
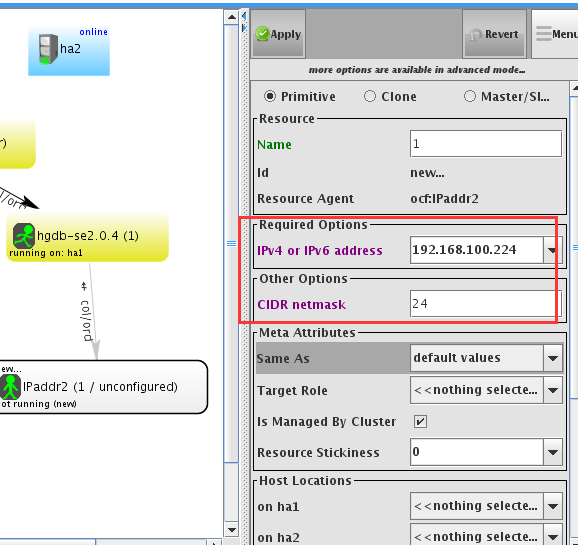
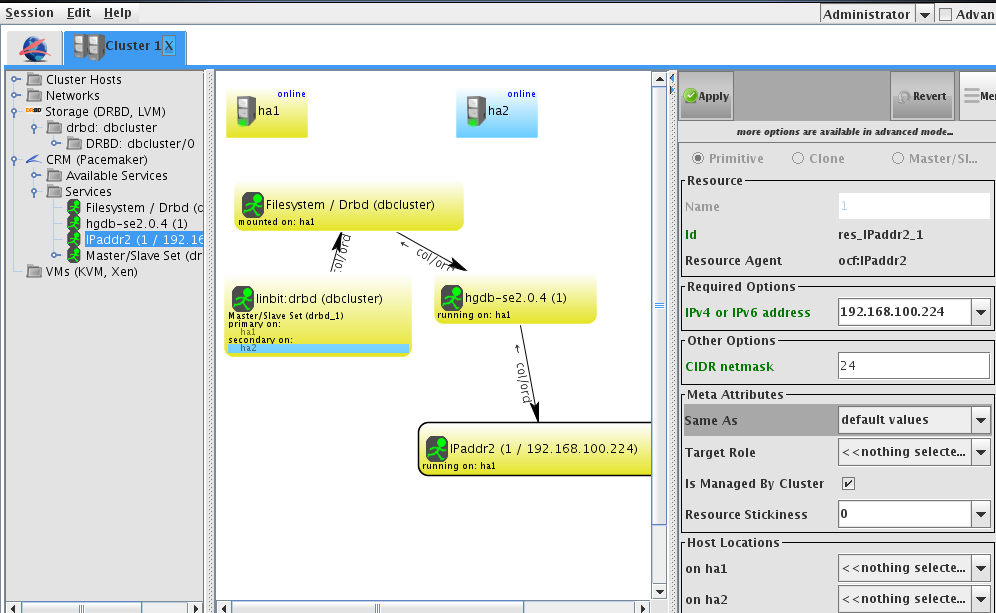
配置vip
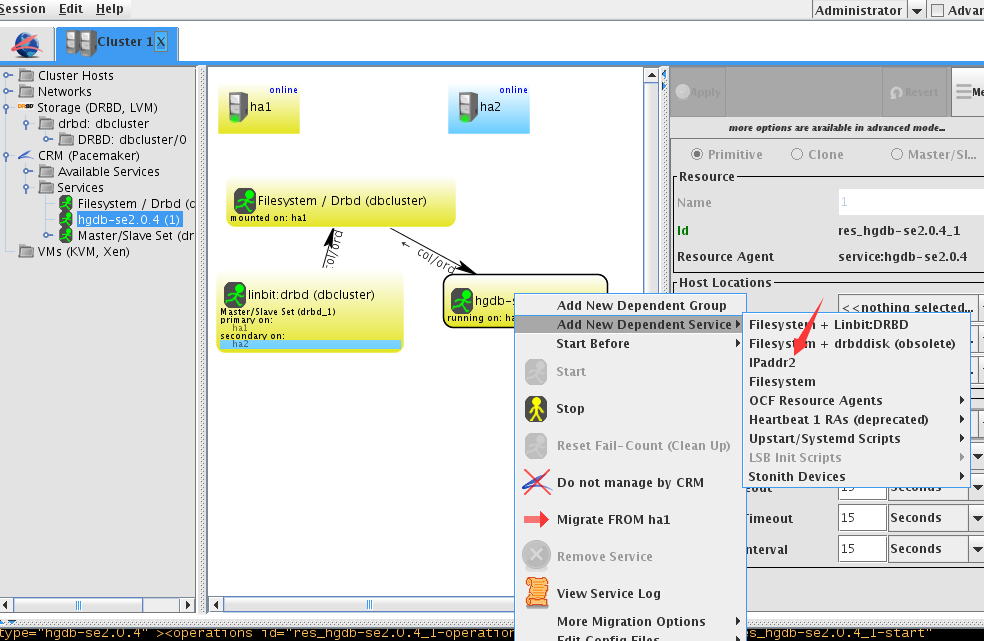
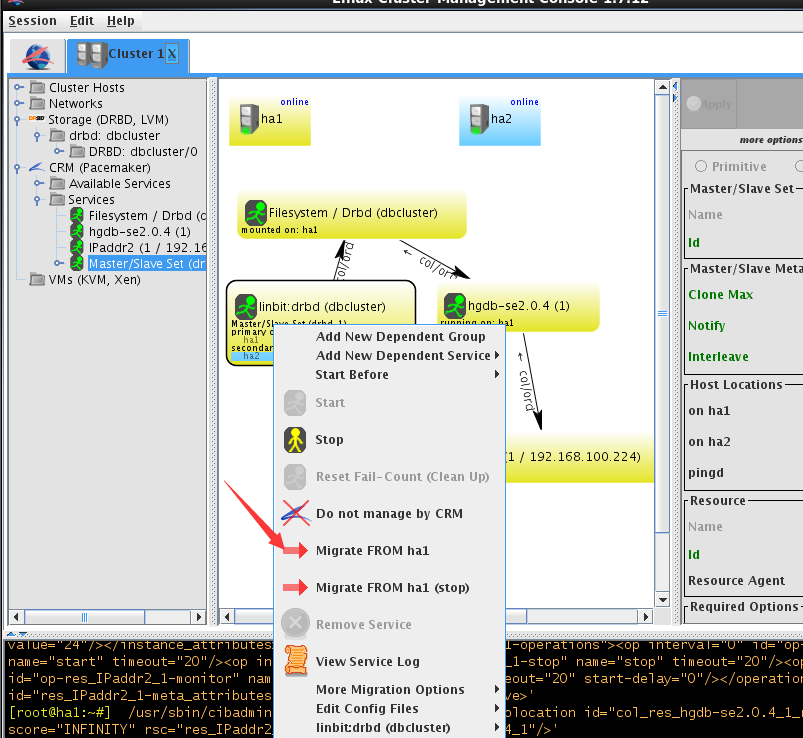
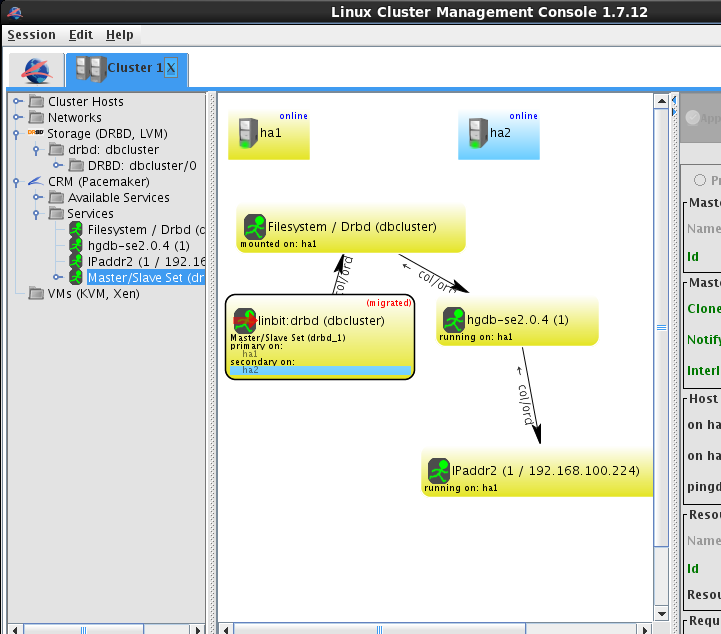
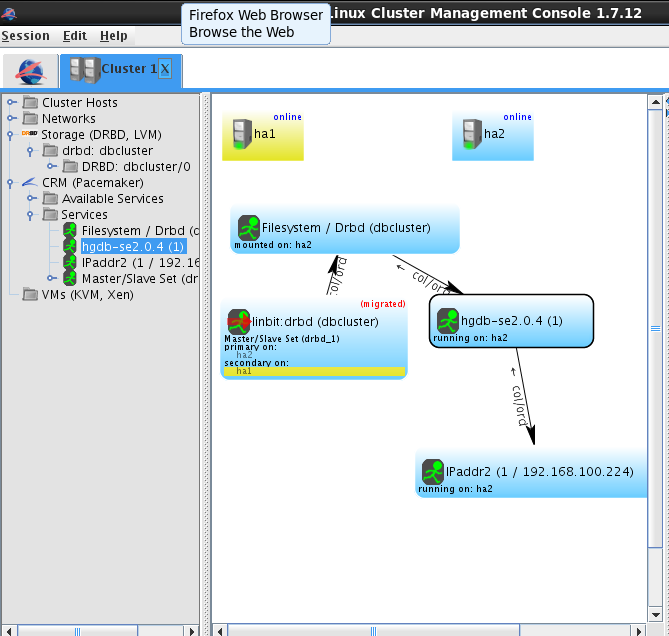
全部配置完成后即显示为下图,均running on ha1
7.测试
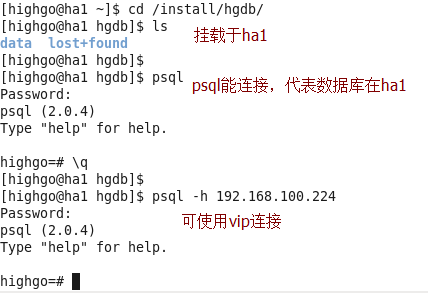
(1)配置完成后,数据库在ha1
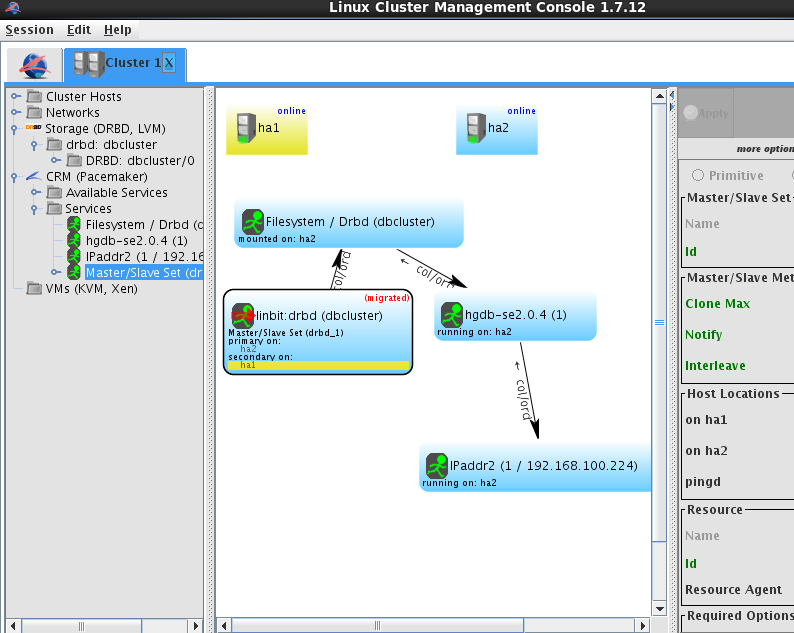
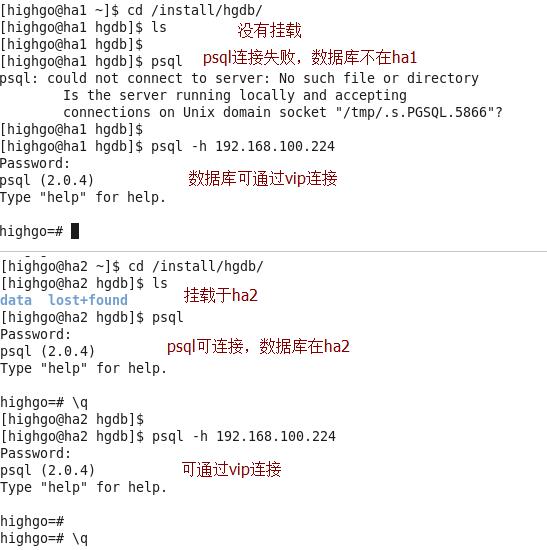
(2)切换到ha2
切换成功
(3)切换回ha1
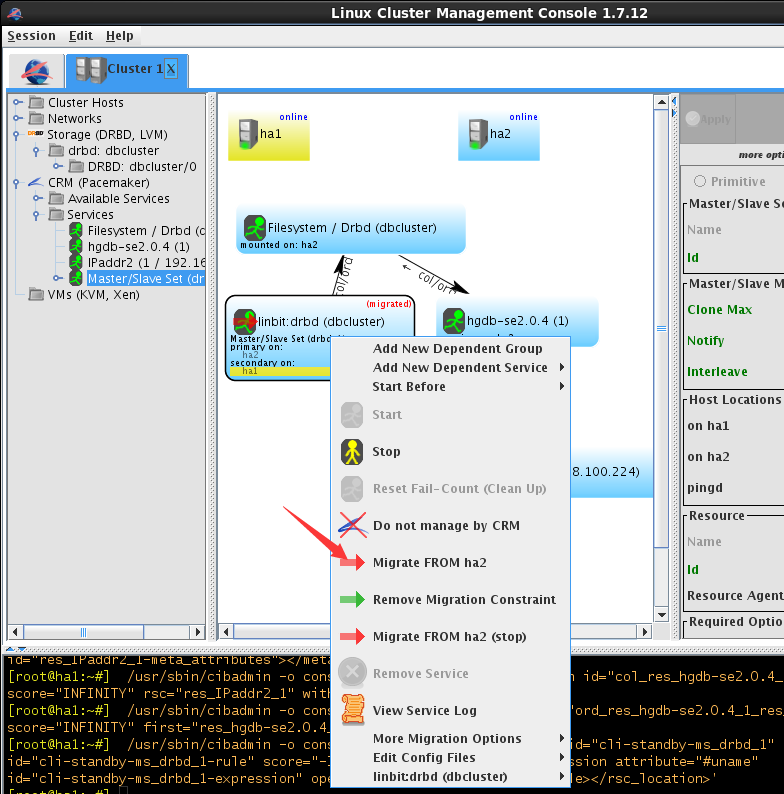
切换成功
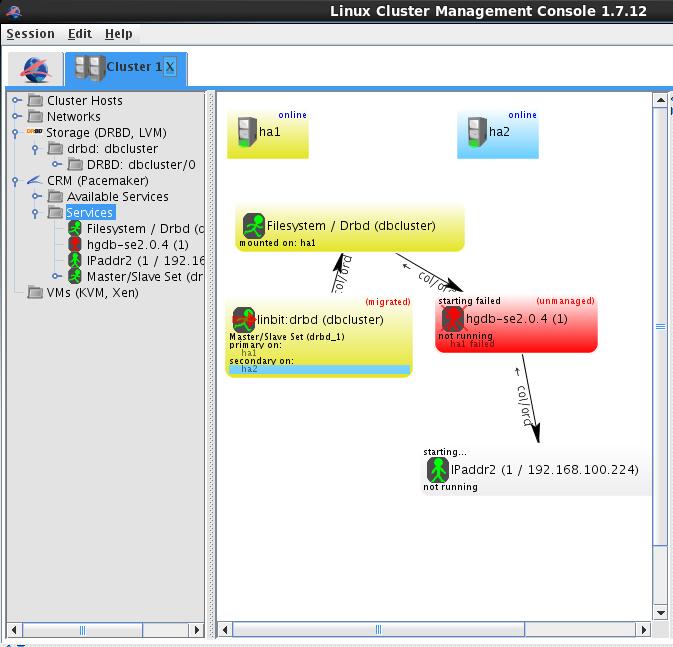
(4)模拟ha1数据库崩溃
[highgo@ha1 ~]$ pg_ctl stop
waiting for server to shut down.... done
server stopped
lcmc显示此时集群状态
进行切换
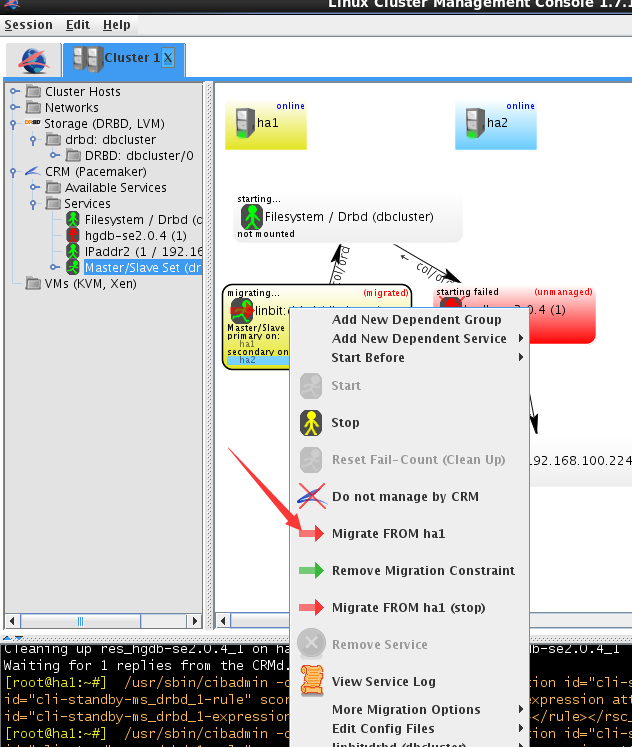
并执行
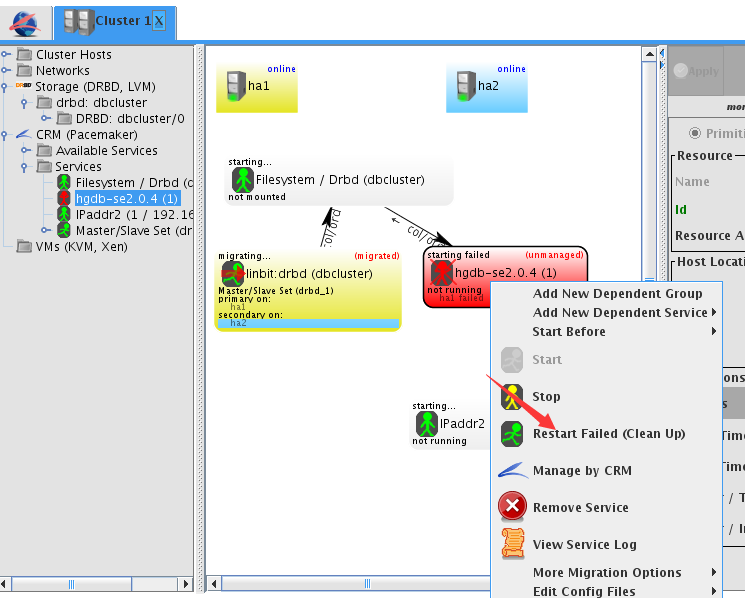
切换成功
另: drbd的相关知识可参考
(1)系统管理:drbd的使用
(2)HA集群之四:Corosync+Pacemaker+DRBD实现HA Mysql