什么是链表:
我们之前已经学过了 动态数组,栈和 队列 三种我们自己定义的数据结构。它们三者的底层都是依托静态数组(使用resize解决容量问题)。
而下面我们学习的链表,它才是真正的动态数据结构。
为什么链表很重要:
1,它是最简单的动态数据结构,有助于学习后面更加复杂的数据结构。
2,有助于更深入的理解引用 (Java) 指针(c/c++)。
3, 有助于更深入的理解递归。
4, 辅助组成其他数据结构。
链表基础:
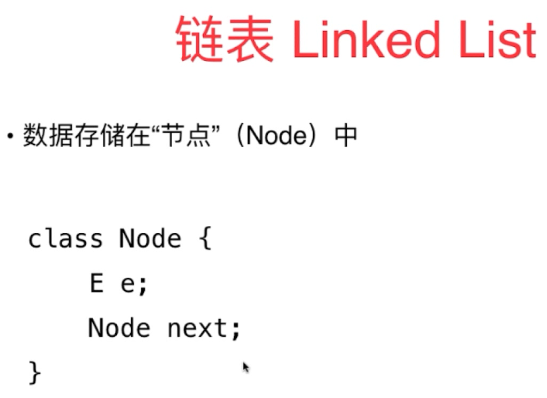
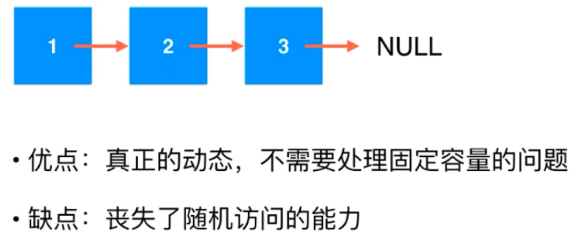
数组 和 链表 的对比:

代码:


 1 package cn.zcb.demo04;
 2
 3 public class LinkedList <T> {
 4     private class Node{
 5         public T data;//具体数据
 6         public Node next; //引用(指针)
 7
 8         //Node 节点的构造器
 9         public Node(T data,Node next){
10             this.data  = data;
11             this.next = next;
12         }
13         public Node(T data){
14             this(data,null);
15         }
16         public  Node(){
17             this(null,null);
18         }
19
20         @Override
21         public String toString(){
22             return this.data.toString();
23         }
24
25     }
26
27
28 }
在链表中添加元素:
 1 package cn.zcb.demo04;
 2
 3 public class LinkedList <T> {
 4     private class Node{
 5         public T data;//具体数据
 6         public Node next; //引用(指针)
 7
 8         //Node 节点的构造器
 9         public Node(T data,Node next){
10             this.data  = data;
11             this.next = next;
12         }
13         public Node(T data){
14             this(data,null);
15         }
16         public  Node(){
17             this(null,null);
18         }
19
20         @Override
21         public String toString(){
22             return this.data.toString();
23         }
24
25     }
26
27     private Node head; //头节点
28     private int size;
29     //LinkedList 的构造器
30
31     public LinkedList (){  //只需要空参构造器  , Node() 实例化需在LinkedList 内部实现!!!外部无法实现。
32         this.head = null;
33         this.size = 0;
34     }
35     //获取链表中的元素个数
36     public int getSize(){
37         return this.size;
38     }
39     //返回链表是否为空
40     public boolean isEmpty(){
41         return this.size ==0;
42     }
43
44     //在链表头添加 新的元素 newData
45     public void addFirst(T newData){
46 //        Node newNode = new Node(newData,null);
47 //
48 //        newNode.next = this.head;
49 //        this.head = newNode;
50         //下面是更简洁的写法
51         this.head = new Node(newData,this.head);   //一句话 顶上面三句话。
52         this.size ++;
53     }
54     //在链表 中间 索引(idx)  添加新元素
55     public void insertByIdx(int idx,T newData){
56         if(idx <= 0 || idx > this.size){
57             //在链表头插入
58             this.addFirst(newData);
59             return;
60         }
61         Node tempPtr = new Node();
62         tempPtr = this.head;
63         for (int i =0;i< idx -1 ;i++){
64             tempPtr = tempPtr.next;
65         }
66         Node node = new Node(newData,tempPtr.next);
67         tempPtr.next = node;
68
69         this.size ++;
70     }
71
72     //在链表尾部 添加新元素
73     public void addLast(T newData){
74         this.insertByIdx(this.size,newData);
75     }
76
77     @Override
78     public String toString(){
79         StringBuilder builder = new StringBuilder();
80         builder.append(String.format("LinkList's Data is below: [size:%d] \n", this.size));
81         Node tempPtr = this.head;
82
83         while (tempPtr !=null){
84             builder.append(tempPtr.data +", ");
85            tempPtr =tempPtr.next;
86         }
87         return builder.toString();
88     }
89
90 }
为链表设立虚拟头节点(重要):
在前面 在链表中添加元素的时候,我们会发现, 操作链表头节点和 操作其他的节点的时候的逻辑会不同。
这时因为,链表头节点的前面已经没有节点了。所以它和其他的节点会有区别。
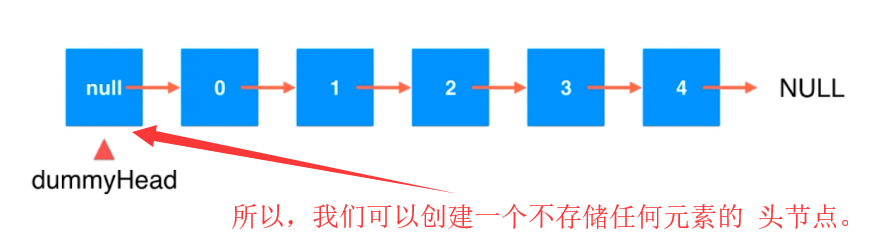
这样头节点的处理逻辑 就和其他的节点一致了。
 1 package cn.zcb.demo04;
 2
 3 public class LinkedList <T> {
 4     private class Node{
 5         public T data;//具体数据
 6         public Node next; //引用(指针)
 7
 8         //Node 节点的构造器
 9         public Node(T data,Node next){
10             this.data  = data;
11             this.next = next;
12         }
13         public Node(T data){
14             this(data,null);
15         }
16         public  Node(){
17             this(null,null);
18         }
19
20         @Override
21         public String toString(){
22             return this.data.toString();
23         }
24
25     }
26
27     private Node dummyHead; //虚拟头节点
28     private int size;
29     //LinkedList 的构造器
30
31     public LinkedList (){    //此时,当链表初始化的时候就已经存在一个 虚拟的头节点了。
32         dummyHead = new Node(null,null);
33         this.size = 0;
34     }
35     //获取链表中的元素个数
36     public int getSize(){
37         return this.size;
38     }
39     //返回链表是否为空
40     public boolean isEmpty(){
41         return this.size ==0;
42     }
43     //在链表 中间 索引(idx)  添加新元素
44     public void insertByIdx(int idx,T newData){
45         if(idx < 0 || idx > this.size){
46             throw new IllegalArgumentException("idx 错误!");
47         }
48         Node tempPtr = new Node();
49         tempPtr = this.dummyHead;
50         for (int i =0;i< idx;i++){
51             tempPtr = tempPtr.next;
52         }
53         Node node = new Node(newData,tempPtr.next);
54         tempPtr.next = node;
55
56         this.size ++;
57     }
58
59     //在链表头添加 新的元素 newData
60     public void addFirst(T newData){
61         insertByIdx(0,newData);
62     }
63     //在链表尾部 添加新元素
64     public void addLast(T newData){
65         this.insertByIdx(this.size,newData);
66     }
67
68     @Override
69     public String toString(){
70         StringBuilder builder = new StringBuilder();
71         builder.append(String.format("LinkList's Data is below: [size:%d] \n", this.size));
72         Node tempPtr = this.dummyHead.next;
73
74         while (tempPtr !=null){
75             builder.append(tempPtr.data +", ");
76            tempPtr =tempPtr.next;
77         }
78         return builder.toString();
79     }
80
81 }
注意:有了虚拟头节点,插入时的遍历就不是从真正的head 开始了,而是从虚拟头节点开始遍历。 注:查看时候的遍历是从真正的head 开始的。
 1 package cn.zcb.demo04;
 2
 3 public class Test {
 4
 5     public static void main(String[] args) {
 6         LinkedList<Integer> linkedList = new LinkedList<>();
 7 //        for (int i =0;i<10;i++){
 8 //            linkedList.addFirst(i);
 9 //        }
10
11
12         linkedList.addLast(12);
13         linkedList.addLast(11);
14         for (int i=0;i<6;i++){
15             linkedList.addLast(i);
16         }
17         System.out.println(linkedList);
18
19
20         linkedList.addFirst(15);
21         linkedList.addFirst(15);
22         linkedList.addFirst(15);
23         linkedList.addFirst(15);
24         System.out.println(linkedList);
25         linkedList.addLast(12);
26         linkedList.addLast(12);
27         linkedList.addLast(12);
28         linkedList.addLast(12);
29         linkedList.addLast(12);
30         System.out.println(linkedList);
31
32
33
34     }
35
36
37
38
39 }
总结:
虚拟头节点为 添加元素 统一了处理逻辑。这是很重要的一点!!!