gVisor是用Go实现的用户空间内核。包括OCI运行时runsc,隔离应用和主机内核。
介绍
gVisor是用Go实现的用户空间内核。包括OCI运行时runsc,隔离应用和主机内核。
容器并不是沙箱。尽管容器改变了我们开发、打包和部署应用的方式,但共享一个内核带来性能和效率的同时,也让容器逃离成为可能。
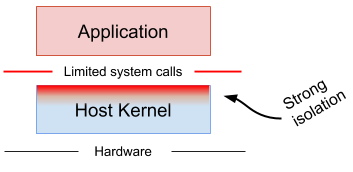
gVisor是容器的用户态内核,限制应用访问内核接口的同时允许应用获得需要的特性。
适用场景:
- 小容器,快速启动,高密度(如:FaaS?)
不适用场景:
- 可信镜像
- 系统调用频繁
- 直接访问硬件
隔离机制
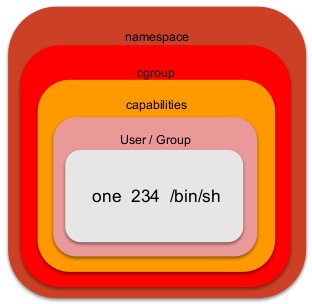
容器现有的安全隔离手段包括:用户/组、Capabilities、Cgroup和名字空间。
除此之外,还有其它增强容器隔离性的手段,包括虚拟化、基于规则的安全策略和沙箱。
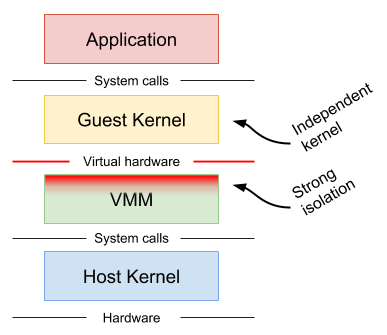
虚拟化
通过VMM将虚拟硬件暴露给虚拟机内核,容器运行在虚拟机中可以获得更好的隔离性和兼容性,但通常需要额外的代理和更多的资源。如KVM、Xen。
基于规则
为应用或容器制定专门的安全策略,让暴露面尽量小,但不能在新的应用上通用。如seccomp、SELinux和AppArmor。
gVisor

原理
架构
gVisor解析应用的系统调用,并进行相应的处理,而不是简单的转发给主机内核。gVisor实现了内核中大部分的基础组件(primitives),包括信号、文件系统、管道、内存管理、futexes等,并在此基础上实现列完整的系统调用处理方法。
gVisor容器运行时分为2个独立进程,Sentry进程负责执行用户代码,处理系统调用,而文件系统相关的操作则由Gofer进程处理,它们之间通过9P连接。
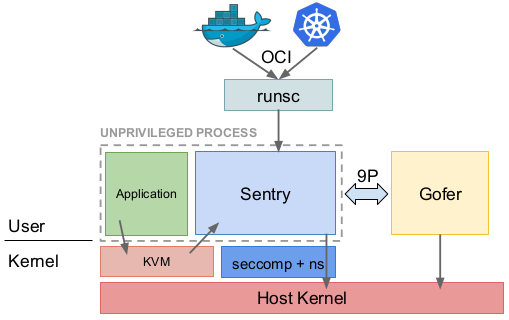
文件系统
Gofer作为文件系统代理,按应用的需求打开主机文件。Sentry在空用户名字空间运行,gVisor的系统调用会经过seccomp filters限制,实现深度防御(defense-in-depth)。
网络
Sentry实现了自己的网络栈(netstack),负责TCP连接状态、控制消息和包组装等工作,实现了与主机网络栈的隔离。数据链路层的包会直接写入优Docker或Kubernetes创建的网络名字空间虚拟设备上。
同时也支持网络透传模式,但这样会降低隔离性。
平台
Sentry需要平台(platform)实现基本的上下文切换和内存映射功能。目前支持两种平台:
- Ptrace,使用SYSEMU功能执行用户代码,无需执行主机系统调用。 大专栏 gVisor · Hello DLWorld>
- KVM,Sentry同时充当虚拟机OS和VMM,之间无缝切换。沙箱还是进程模型,没有虚拟硬件层,只是利用了现代处理器的虚拟化扩展提高隔离性和地址空间切换性能。
UML
User-Mode Linux
附录
快速试用
- 环境要求
- linux 3.17+
- docker 17.09+
- git/Bazel/Python
- 安装bazel工具
$ wget https://github.com/bazelbuild/bazel/releases/download/0.13.0/bazel-0.13.0-installer-linux-x86_64.sh
$ chmod +x ./bazel-0.13.0-installer-linux-x86_64.sh
$ mkdir ~/bin
$ ./bazel-0.13.0-installer-linux-x86_64.sh --user
- 下载编译安装gvisor
$ git clone https://gvisor.googlesource.com/gvisor gvisor
$ cd gvisor
$ bazel build runsc
INFO: Analysed target //runsc:runsc (170 packages loaded).
INFO: Found 1 target...
Target //runsc:runsc up-to-date:
  bazel-bin/runsc/linux_amd64_pure_stripped/runsc
INFO: Elapsed time: 24.098s, Critical Path: 16.44s
INFO: 156 processes, linux-sandbox.
INFO: Build completed successfully, 157 total actions
$ sudo cp ./bazel-bin/runsc/linux_amd64_pure_stripped/runsc /usr/bin/
- 配置docker
$ cat /etc/docker/daemon.json { "runtimes": { "runsc": { "path": "/usr/bin/runsc" "runtimeArgs": [ "--debug-log-dir=/tmp/runsc", "--debug", "--strace", "--platform=ptrace" ] } } } $ sudo systemctl restart docker - 验证 ``` $ sudo docker run –runtime=runsc hello-world Hello from Docker! This message shows that your installation appears to be working correctly. To generate this message, Docker took the following steps:
- The Docker client contacted the Docker daemon.
- The Docker daemon pulled the “hello-world” image from the Docker Hub. (amd64)
- The Docker daemon created a new container from that image which runs the executable that produces the output you are currently reading.
- The Docker daemon streamed that output to the Docker client, which sent it to your terminal. ```
注:由于网络问题,无法访问golang.org导致编译失败,需要修改依赖的路径
diff --git a/WORKSPACE b/WORKSPACE
index 5ce2245..655cec6 100644
--- a/WORKSPACE
+++ b/WORKSPACE
@@ -56,12 +56,16 @@ go_repository(
 go_repository(
     name = "org_golang_x_net",
     importpath = "golang.org/x/net",
+    remote = "https://github.com/golang/net.git",
+    vcs = "git",
     commit = "b3c676e531a6dc479fa1b35ac961c13f5e2b4d2e",
 )
 go_repository(
     name = "org_golang_x_sys",
     importpath = "golang.org/x/sys",
+    remote = "https://github.com/golang/sys.git",
+    vcs = "git",
     commit = "0dd5e194bbf5eb84a39666eb4c98a4d007e4203a",
 )