pytest
1,最简单的示例
import pytest


def test_case_01():
    print("执行test01")
    assert 1  # 断言成功


def test_case_02():
    print("执行test02")
    assert 0  # 断言失败


if __name__ == '__main__':
    pytest.main(['test_01.py'])
运行结果如下:
pytest
1,最简单的示例
import pytest


def test_case_01():
    print("执行test01")
    assert 1  # 断言成功


def test_case_02():
    print("执行test02")
    assert 0  # 断言失败


if __name__ == '__main__':
    pytest.main(['test_01.py'])
运行结果如下:
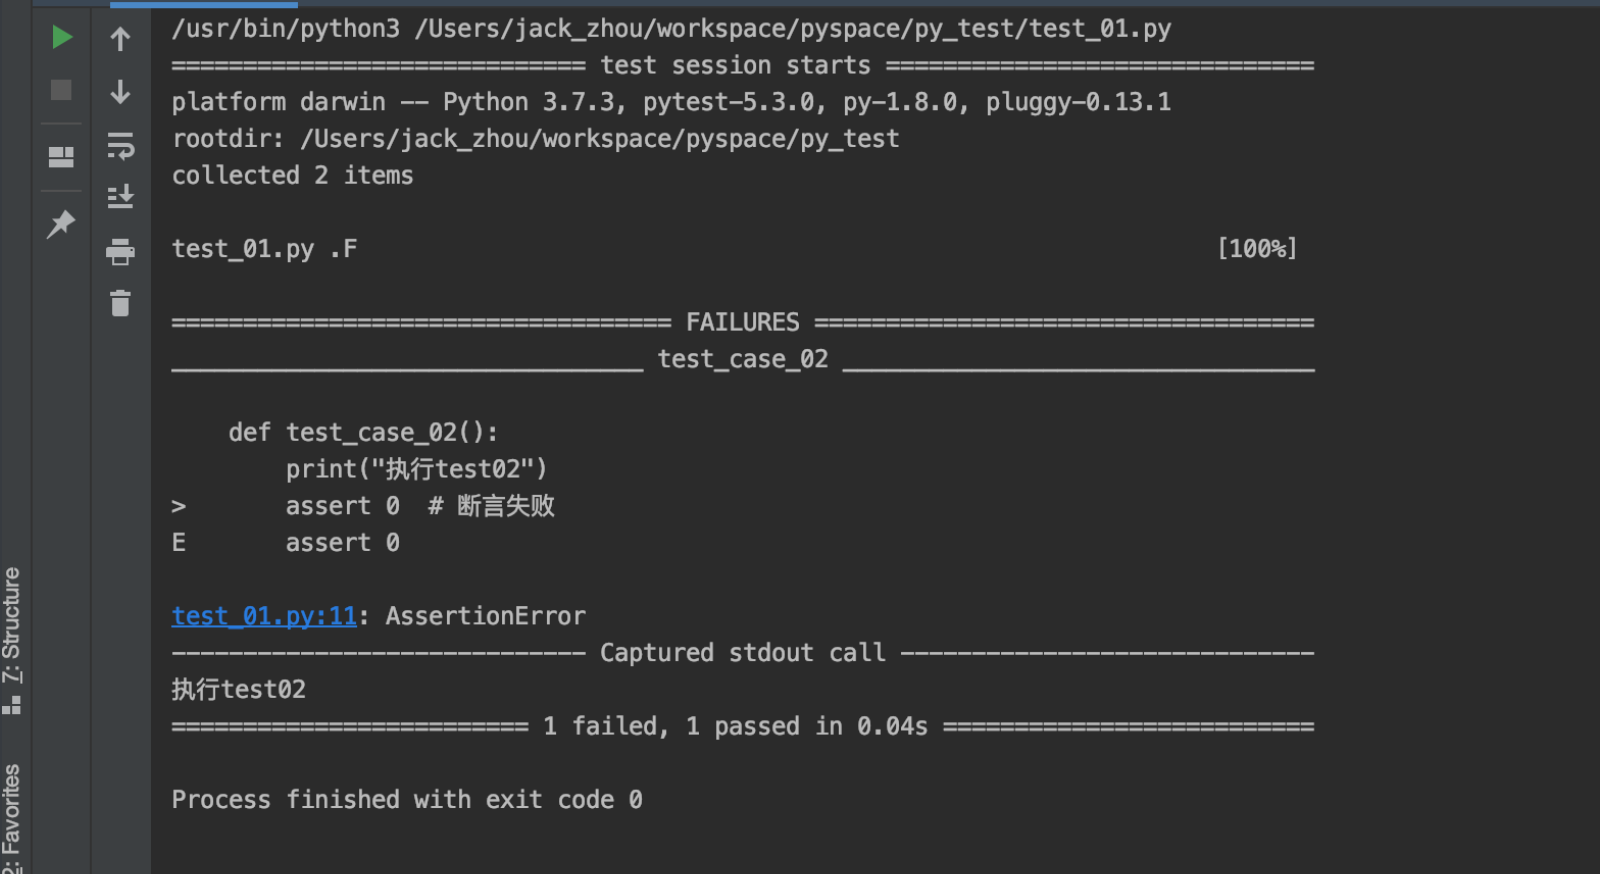
如图所示:
在执行完成之后先会显示test01.py,后面跟着.F
其中.代表执行成功,F代表执行失败,并且在下方会展示错误的提示
2,pytest使用步骤:
1,导入pytest
2,编写测试用例
一,无需在测试类下编写测试用例,可以直接编写测试函数
二,测试函数名必须包含test_ 开头,或者_test结尾;
3,在pytest框架下执行测试用例
在py文件内执行测试用例: pytest.main(['test_01.py'])
3,查看执行结果
一,.代表执行成功
二,F代表执行失败
4,pytest中的setup和teardown函数
首先看原有的unitest的博文中:点击进入
一,模块级别,对整个py文件作用
setup_module/teardown_module
二,函数级别,对测试用例作用(不在测试类中)
setup_function/teardown/function
三,类级别,对测试类作用
setup_class/teardown_class
四,方法级别,对测试类中的测试用例起作用
setup_method/teardown_method
下面看一下实现过程:
# -*- coding=utf-8 -*-
# @Time    : 2019/11/25 10:49 下午
# @Site    :
# @File    : test_case_02.py
# @Software: PyCharm
# @Author 周力


import pytest

"""
函数级别的setup/teardown
"""


def setup_function():
    print("在测试用例执行前去执行")


def teardown_function():
    print("在测试用例执行后去执行")


def test_case_01():
    print("执行test01")
    assert 1  # 断言成功


def test_case_02():
    print("执行test02")
    assert 0  # 断言失败


if __name__ == '__main__':
    pytest.main(['test_case_02.py'])
打印结果如下:

# -*- coding=utf-8 -*-
# @Time    : 2019/11/25 10:49 下午
# @Site    :
# @File    : test_case_02.py
# @Software: PyCharm
# @Author 周力


import pytest

"""
函数级别的setup/teardown
"""


def setup_function():
    print("在测试用例执行前去执行")


def teardown_function():
    print("在测试用例执行后去执行")


"""
模块级别的setup/teardown
"""


def setup_module():
    print("在模块运行前执行")


def teardown_module():
    print("在模块运行后执行")


def test_case_01():
    print("执行test01")
    assert 1  # 断言成功


def test_case_02():
    print("执行test02")
    assert 0  # 断言失败


if __name__ == '__main__':
    pytest.main(['test_case_02.py'])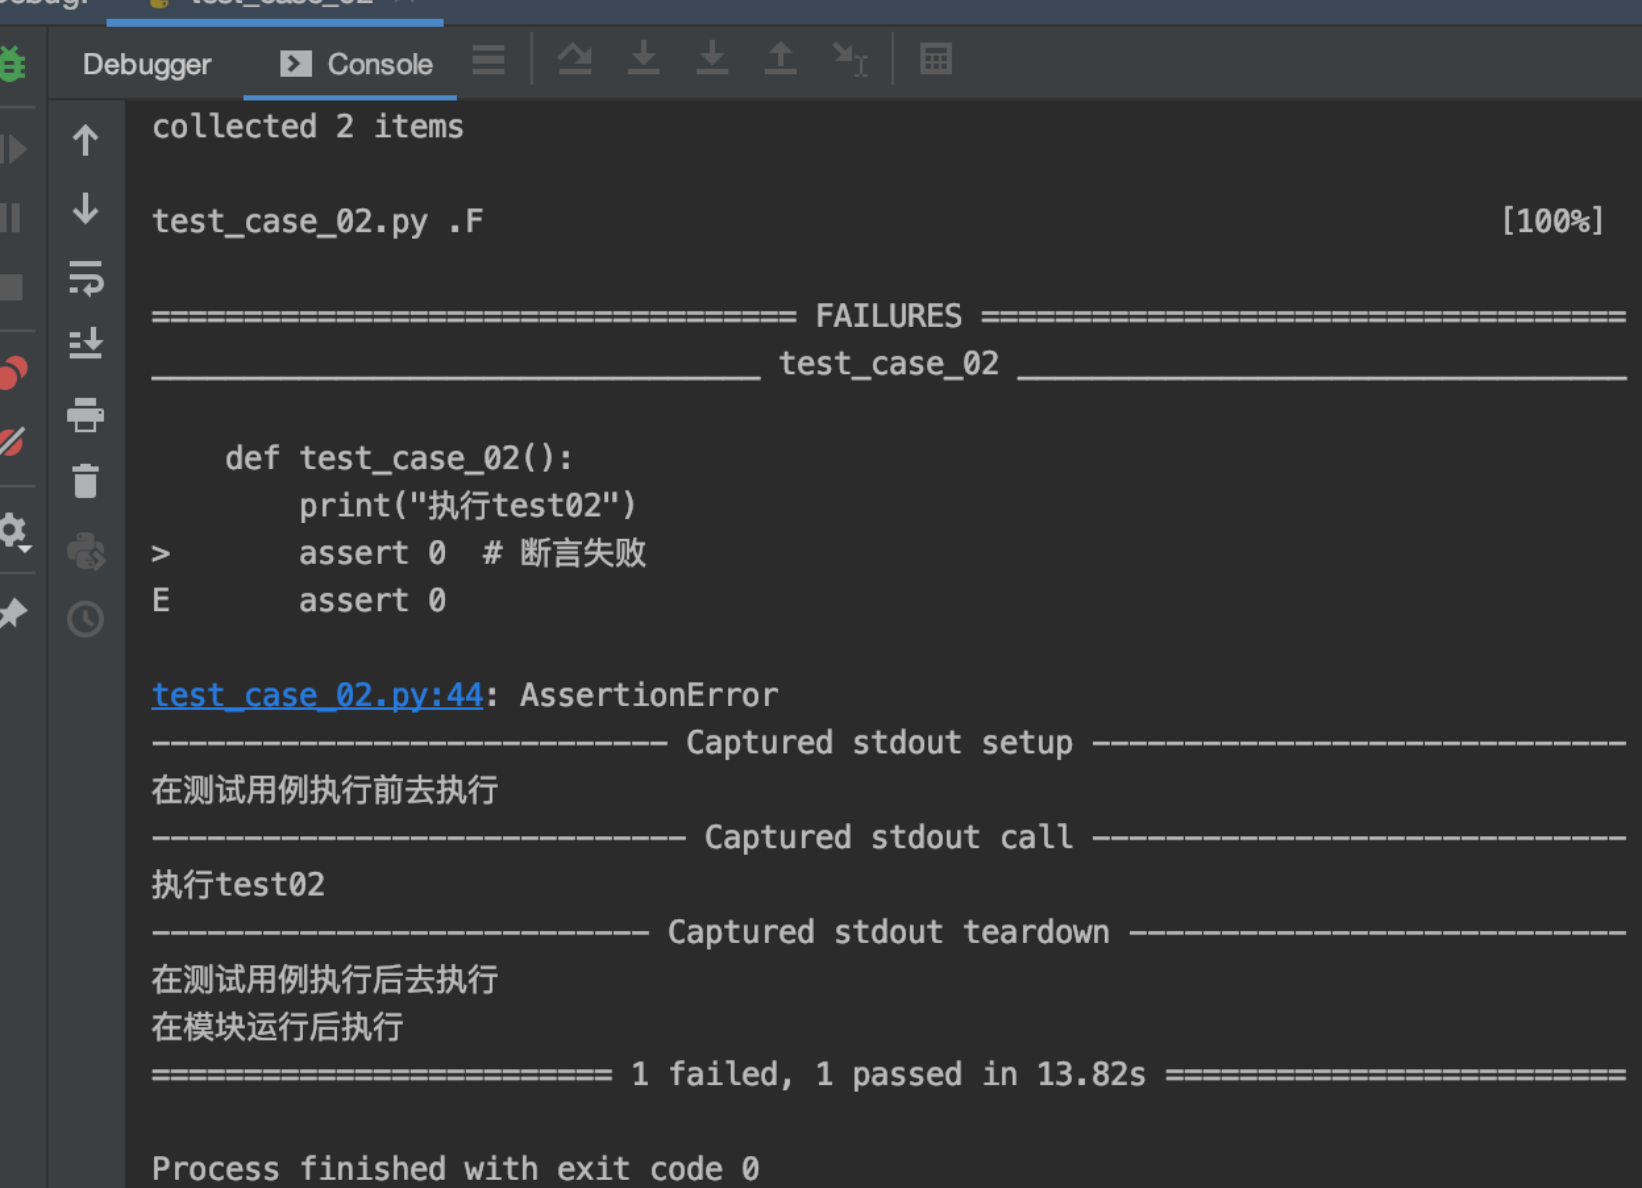
# -*- coding=utf-8 -*-
# @Time    : 2019/11/25 11:14 下午
# @Site    :
# @File    : test_case_03.py
# @Software: PyCharm
# @Author 周力

import pytest

"""
类级别和方法级别,前提是在测试类中进行使用
"""


class TestCase:  # 不需要继承
    """
    类级别的setup/teardown
    """

    def setup_class(self):
        print("在类执行前执行一次")

    def teardown_class(self):
        print("在类执行后执行一次")

    def setup_method(self):
        print("在测试方法执行前执行")

    def teardown_method(self):
        print("在测试方法执行后执行一次")

    def test_a(self):
        print("执行测试用例a")
        assert 1

    def test_b(self):
        print("执行测试用例b")
        assert 0


if __name__ == '__main__':
    pytest.main(['test_case_03.py'])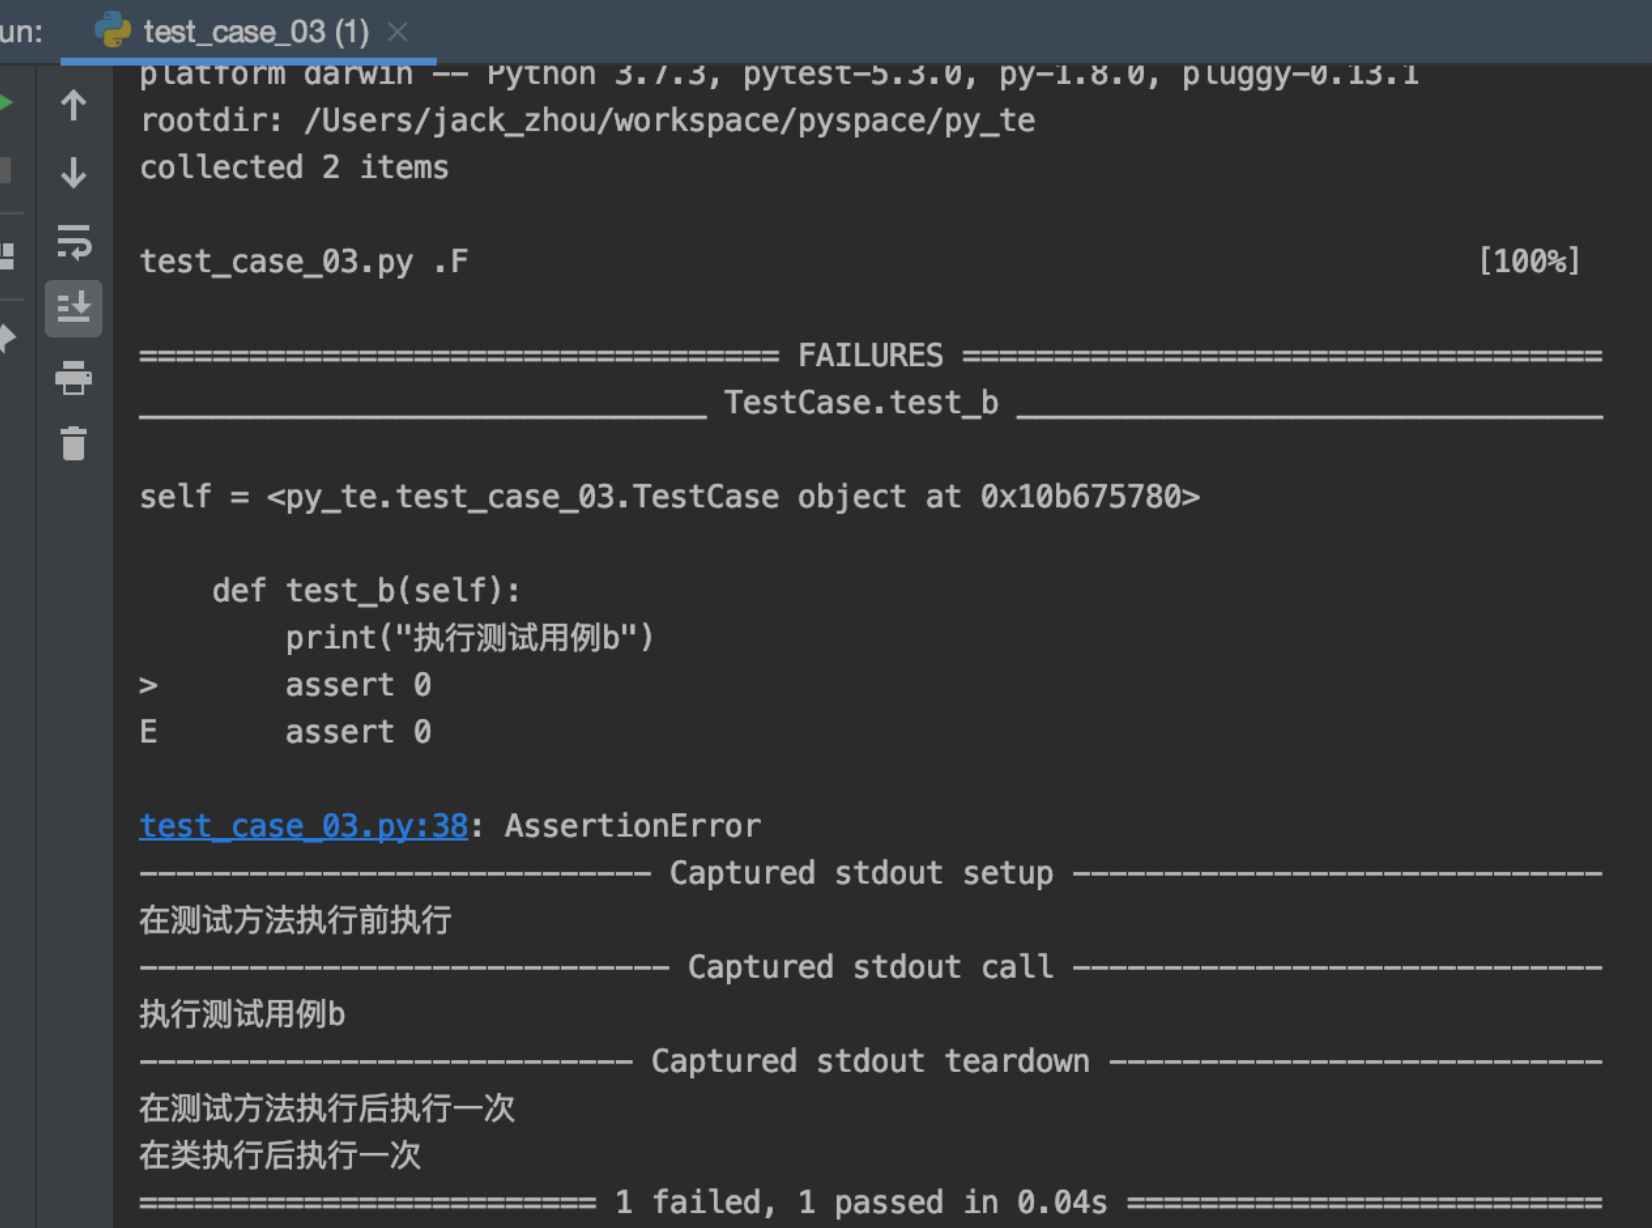
4,总结:
一,pytest测试类写法:
1,测试类开头Test,必须大写
######     2,测试类中不需要 __init__ 方法

######     3,测试类中的测试方法的编写规则和测试函数的编写规则一致
5,pytest配置文件
一,pytest的配置文件通常放在测试目录下:名称pytest.ini,命令行运行时会使用配置文件进行配置
1,配置命令行的运行参数
addopts = -s # 空格分割,可添加多个命令行参数,所有参数均为插件包参数
2,配置测试搜索的文件名
testpaths = ./scripts # 当前目录下的scripts文件夹 可以自定义
3,配置测试搜索的类名
python_files = test_*.py # 当前目录下所有scripts文件夹下,以test开头, 以.py为结尾的所有文件
4,配置测试搜索的函数名
python_classes = Test_* # 当前目录下所有scripts文件夹下,以 test_ 开头,以.py结尾的所有文件中,以Test_开头的所有类
5,配置测试搜索的测试函数名
python_functions = test_* # 当前目录下所有scripts文件夹下,以 test_ 开头,以.py结尾的所有文件中,以Test_开头的所有类,中的以test_开头的方法
示例如下(pytest.ini):
[pytest]
addopts = -s
testpaths = ./scripts
python_files = test_*.py
python_classes = Test*
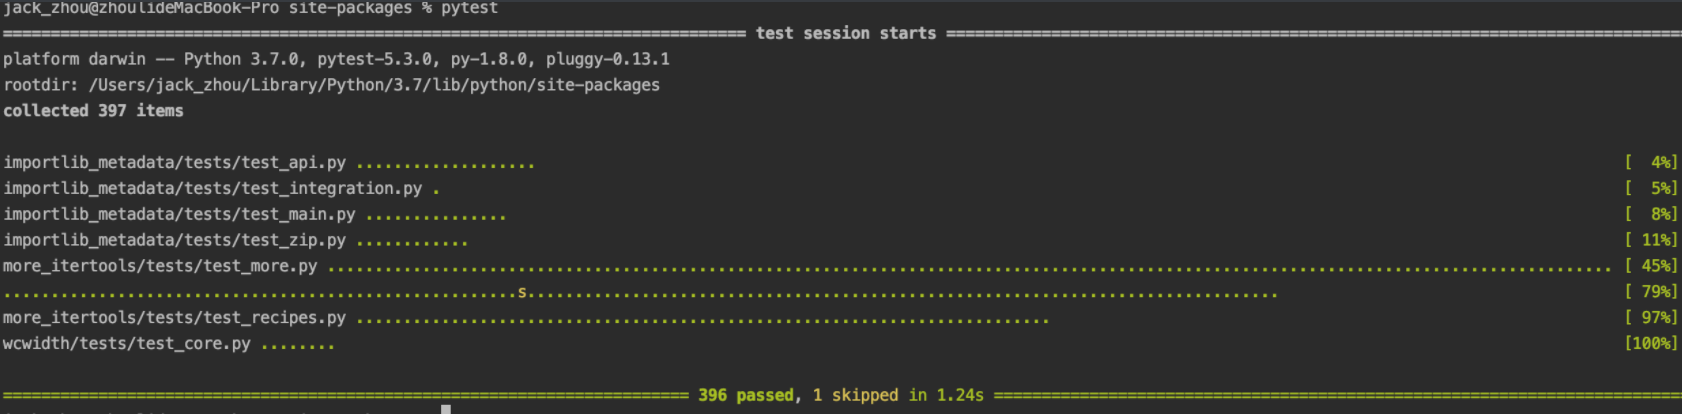
python_functions = test*在终端中直接输入pytest即可执行
6,pytest常用插件
如图所示:
在执行完成之后先会显示test01.py,后面跟着.F
其中.代表执行成功,F代表执行失败,并且在下方会展示错误的提示
2,pytest使用步骤:
1,导入pytest
2,编写测试用例
一,无需在测试类下编写测试用例,可以直接编写测试函数
二,测试函数名必须包含test_ 开头,或者_test结尾;
3,在pytest框架下执行测试用例
在py文件内执行测试用例: pytest.main(['test_01.py'])
3,查看执行结果
一,.代表执行成功
二,F代表执行失败
4,pytest中的setup和teardown函数
首先看原有的unitest的博文中:点击进入
一,模块级别,对整个py文件作用
setup_module/teardown_module
二,函数级别,对测试用例作用(不在测试类中)
setup_function/teardown/function
三,类级别,对测试类作用
setup_class/teardown_class
四,方法级别,对测试类中的测试用例起作用
setup_method/teardown_method
下面看一下实现过程:
# -*- coding=utf-8 -*-
# @Time    : 2019/11/25 10:49 下午
# @Site    :
# @File    : test_case_02.py
# @Software: PyCharm
# @Author 周力


import pytest

"""
函数级别的setup/teardown
"""


def setup_function():
    print("在测试用例执行前去执行")


def teardown_function():
    print("在测试用例执行后去执行")


def test_case_01():
    print("执行test01")
    assert 1  # 断言成功


def test_case_02():
    print("执行test02")
    assert 0  # 断言失败


if __name__ == '__main__':
    pytest.main(['test_case_02.py'])
打印结果如下:

# -*- coding=utf-8 -*-
# @Time    : 2019/11/25 10:49 下午
# @Site    :
# @File    : test_case_02.py
# @Software: PyCharm
# @Author 周力


import pytest

"""
函数级别的setup/teardown
"""


def setup_function():
    print("在测试用例执行前去执行")


def teardown_function():
    print("在测试用例执行后去执行")


"""
模块级别的setup/teardown
"""


def setup_module():
    print("在模块运行前执行")


def teardown_module():
    print("在模块运行后执行")


def test_case_01():
    print("执行test01")
    assert 1  # 断言成功


def test_case_02():
    print("执行test02")
    assert 0  # 断言失败


if __name__ == '__main__':
    pytest.main(['test_case_02.py'])
# -*- coding=utf-8 -*-
# @Time    : 2019/11/25 11:14 下午
# @Site    :
# @File    : test_case_03.py
# @Software: PyCharm
# @Author 周力

import pytest

"""
类级别和方法级别,前提是在测试类中进行使用
"""


class TestCase:  # 不需要继承
    """
    类级别的setup/teardown
    """

    def setup_class(self):
        print("在类执行前执行一次")

    def teardown_class(self):
        print("在类执行后执行一次")

    def setup_method(self):
        print("在测试方法执行前执行")

    def teardown_method(self):
        print("在测试方法执行后执行一次")

    def test_a(self):
        print("执行测试用例a")
        assert 1

    def test_b(self):
        print("执行测试用例b")
        assert 0


if __name__ == '__main__':
    pytest.main(['test_case_03.py'])
4,总结:
一,pytest测试类写法:
1,测试类开头Test,必须大写
######     2,测试类中不需要 __init__ 方法

######     3,测试类中的测试方法的编写规则和测试函数的编写规则一致
5,pytest配置文件
一,pytest的配置文件通常放在测试目录下:名称pytest.ini,命令行运行时会使用配置文件进行配置
1,配置命令行的运行参数
addopts = -s # 空格分割,可添加多个命令行参数,所有参数均为插件包参数
2,配置测试搜索的文件名
testpaths = ./scripts # 当前目录下的scripts文件夹 可以自定义
3,配置测试搜索的类名
python_files = test_*.py # 当前目录下所有scripts文件夹下,以test开头, 以.py为结尾的所有文件
4,配置测试搜索的函数名
python_classes = Test_* # 当前目录下所有scripts文件夹下,以 test_ 开头,以.py结尾的所有文件中,以Test_开头的所有类
5,配置测试搜索的测试函数名
python_functions = test_* # 当前目录下所有scripts文件夹下,以 test_ 开头,以.py结尾的所有文件中,以Test_开头的所有类,中的以test_开头的方法
示例如下(pytest.ini):
[pytest]

addopts = -s

testpaths = ./scripts

python_files = test_*.py

python_classes = Test*

python_functions = test*
在终端中直接输入pytest即可执行
