zabbix编译安装
zabbix下载网站:https://sourceforge.net/projects/zabbix/files/ZABBIX%20Latest%20Stable/
zabbix官网文档:https://www.zabbix.com/cn/download?zabbix=4.4&os_distribution=centos&os_version=8&db=mysql
1.下载zabbix安装包
wget https://sourceforge.net/projects/zabbix/files/ZABBIX%20Latest%20Stable/4.4.0/zabbix-4.4.0.tar.gz注:直接在服务器上下载速度可能很慢,可以下载后上传到服务器上
2.创建用户及用户组
groupadd zabbix
useradd -g zabbix zabbix
usermod -s /sbin/nologin zabbix

#官方文档
groupadd --system zabbix
useradd --system -g zabbix -d / usr / lib / zabbix -s / sbin / nologin -c“ Zabbix监控系统” zabbix
3.创建zabbix数据库并执行授权命令
create database zabbix charset=utf8;
grant all on zabbix.* to zabbix@"%" identified by 'zabbix';
flush privileges;
4.解压
tar -zxvf zabbix-4.4.0.tar.gz
cd zabbix-4.4.0
一、Zabbix Server
1.编译安装
./configure --prefix=/usr/local/zabbix/ --enable-server --with-mysql --enable-ipv6 --with-net-snmp --with-libcurl
make && make install
ln -s /usr/local/zabbix/sbin/zabbix_* /usr/local/sbin/
2.创建并配置数据库
create database zabbix charset=utf8;
grant all on zabbix.* to zabbix@"%" identified by 'zabbix';
flush privileges;
3.将基础sql文件导入数据库
#sql文件在解压的文件夹里
cd zabbix-4.4.0
mysql -uzabbix -pzabbix zabbix < database/mysql/schema.sql
mysql -uzabbix -pzabbix zabbix < database/mysql/images.sql
mysql -uzabbix -pzabbix zabbix < database/mysql/data.sql
4.配置zabbix-server
#切换到配置文件所在目录
cd /usr/local/zabbix/etc/
#备份配置文件
cp zabbix_server.conf zabbix_server.conf.bak
#配置文件更改
vim zabbix_server.conf
配置文件:
LogFile=/tmp/zabbix_server.log
DBHost=localhost
DBName=zabbix
DBUser=zabbix
DBPassword=zabbix
从安装包目录中拷贝zabbix_server启动脚本至开机启动目录,默认监听端口为10051
cd zabbix-4.4.0
cp misc/init.d/tru64/zabbix_server /etc/init.d/zabbix_server
chmod o+x /etc/init.d/zabbix_server
5.配置zabbix-web页面
5.1Apache
yum install -y httpd httpd-devel httpd-tools5.2Nginx
更改nginx配置文件
server {
        listen  80;
        server_name zabbix.wx93.top;

        root /usr/local/zabbix/html;
        index  index.php;


        location ~ "\.php$" {
            fastcgi_pass   127.0.0.1:9000;
            fastcgi_index  index.php;
            fastcgi_param  SCRIPT_FILENAME  /usr/local/zabbix/html$fastcgi_script_name;
            include        fastcgi_params;
        }
    }
安装PHP
#CentOs 5.x
rpm -Uvh http://repo.webtatic.com/yum/el5/latest.rpm
#CentOs 6.x
rpm -Uvh http://repo.webtatic.com/yum/el6/latest.rpm
#CentOs 7.X
rpm -Uvh https://repo.webtatic.com/yum/el7/epel-release.rpm
rpm -Uvh https://repo.webtatic.com/yum/el7/webtatic-release.rpm

yum remove php*
yum install -y php72w php72w-cli php72w-common php72w-gd php72w-ldap php72w-mbstring php72w-mcrypt php72w-mysql php72w-pdo.x86_64
修改PHP配置文件
1.#修改时区
#第一种:
sed -i '/date.timezone/i date.timezone = PRC' /etc/php.ini
#第二种
vim /etc/php.ini
date.timezone = Asia/Shanghai
#拷贝页面文件
cp -a /root/zabbix-4.4.0/frontends/php/* /var/www/html/
#重新启动zabbix-server,HTTP/Nginx,MySQL服务
/etc/init.d/zabbix_server restart
/etc/init.d/httpd restart
/etc/init.d/mysqld restart
#或
systemctl restart zabbix-server
systemctl restart httpd
systemctl restart mariadb6.访问zabbix-web
通过浏览器访问http://服务器IP
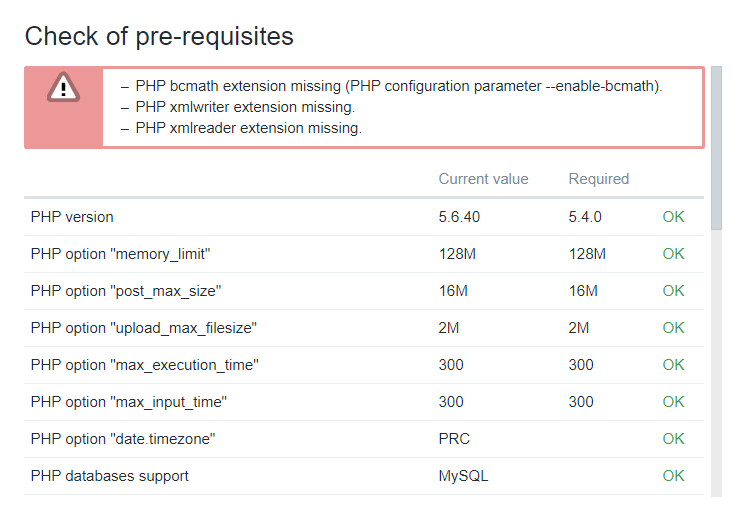
#解决:安装缺少的软包并修改php.ini
yum install -y php72w-mbstring php72w-bcmath php72w-gd php72w-xml
yum install -y gd gd-devel
systemctl restart httpd
sed -i '/post_max_size/s/8/16/g;/max_execution_time/s/30/300/g;/max_input_time/s/60/300/g;s/\;date.timezone.* /date.timezone \=PRC/g;s/\;always_populate_raw_post_data/always_populate_raw_post_data/g' /etc/php.ini
systemctl restart httpd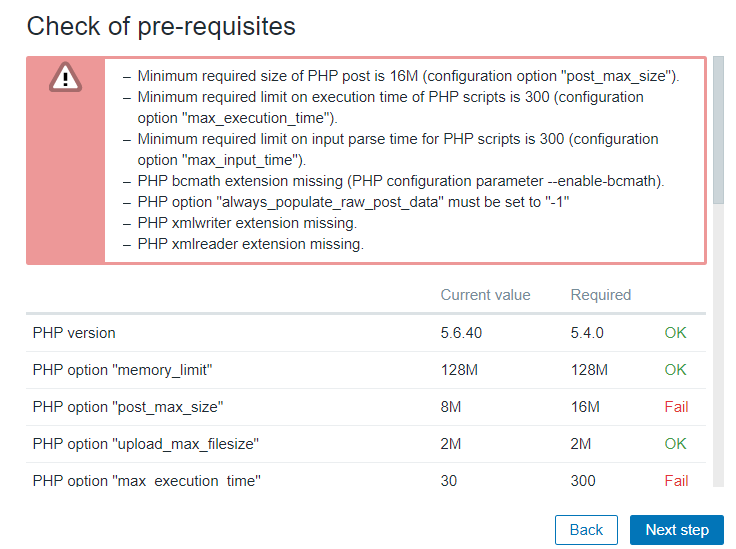
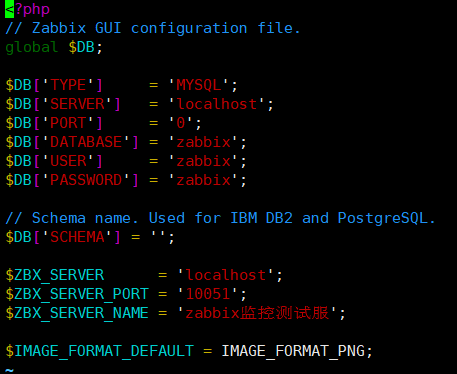
#点击下载the configuration file或者创建zabbix.conf.php文件,代码如上图所示
#上传到/var/www/html/conf/下并且设置可写权限
chmod o+x zabbix.conf.php
二、Zabbix-agent
1.编译安装
./configure --prefix=/usr/local/zabbix/ --enable-agent
make && make install
ln -s /usr/local/zabbix/sbin/zabbix_* /usr/local/sbin/
2.修改zabbix_agent,指定serverIP,设置本地Hostname为本地IP地址或者DNS名称
cd /usr/local/zabbix/etc
#备份客户端配置文件
cp zabbix_agentd.conf zabbix_agentd.conf.bak
vim zabbix_agentd.conf
配置文件配置:
LogFile=/tmp/zabbix_agentd.log
Server=ServerIP
ServerActive=ServerIP
Hostname=IP
3.从安装包目录中拷贝zabbix_server启动脚本至开机启动目录,默认监听端口为10051
cd zabbix-4.4.0
cp misc/init.d/tru64/zabbix_agentd /etc/init.d/zabbix_agentd
chmod o+x /etc/init.d/zabbix_agentd
/etc/init.d/zabbix_agentd start
三、zabbix-proxy代理配置
1.编译安装
./configure --prefix=/usr/local/zabbix --enable-proxy --with-mysql --with-net-snmp --with-libcurl --with-libxml2
make && make install
ln -s /usr/local/zabbix/sbin/zabbix_* /usr/local/sbin/
2.配置数据库
!!!不能跟server公用一个数据库
create database zabbix_proxy charset=utf8;
grant all on zabbix_proxy.* to zabbix@"%" identified by 'zabbix';
flush privileges;
3.导入基础sql文件
#只导这一个文件就够了,切记!!!(否则会报cannot use database "zabbix_proxy": Zabbix proxy cannot work with a Zabbix server database这个错)
cd zabbix-4.4.0
mysql -uzabbix -pzabbix zabbix_proxy < database/mysql/schema.sql
4.修改zabbix_proxy配置文件
cp zabbix_proxy.conf zabbix_proxy.conf.bak
vim zabbix_proxy.conf
#配置文件
DBHost=localhost
DBName=zabbix_proxy
DBUser=zabbix
DBPassword=zabbix
CacheSize=100M
HeartbeatFrequency=60
DataSenderFrequency=1
StartPingers=50
StartDiscoverers=30
StartPollers=300
DataSenderFrequency=1
5.启动
/usr/local/zabbix/sbin/zabbix_proxy -c /usr/local/zabbix/etc/zabbix_proxy.conf6.在zabbix-web添加代理,添加主机
添加代理


创建主机时,选择代理IP

Centos7创建启动脚本:
centos7 采用systemd启动方式,使用源码编译不自带启动脚本文件需要自己编写
1.创建文件
#zabbix-server
vim /usr/lib/systemd/system/zabbix-server.service
#zabbix-proxy
vim /usr/lib/systemd/system/zabbix-proxy.service
#zabbix-agent
vim /usr/lib/systemd/system/zabbix-agent.service
2.启动文件配置
zabbix-server.service
[Unit]
Description=Zabbix Server
After=syslog.target
After=network.target

[Service]
Environment="CONFFILE=/usr/local/zabbix/etc/zabbix_server.conf"
EnvironmentFile=-/etc/sysconfig/zabbix-server
Type=forking
Restart=on-failure
PIDFile=/tmp/zabbix_server.pid
KillMode=control-group
ExecStart=/usr/local/zabbix/sbin/zabbix_server -c $CONFFILE
ExecStop=/bin/kill -SIGTERM $MAINPID
RestartSec=10s
TimeoutSec=0

[Install]
WantedBy=multi-user.target
zabbix-proxy.service
[Unit]
Description=Zabbix Proxy
After=syslog.target
After=network.target
[Service]
Environment="CONFFILE=/usr/local/zabbix/etc/zabbix_proxy.conf"
EnvironmentFile=-/etc/sysconfig/zabbix-proxy
Type=forking
Restart=on-failure
PIDFile=/tmp/zabbix_proxy.pid
KillMode=control-group
ExecStart=/usr/local/zabbix/sbin/zabbix_proxy -c $CONFFILE
ExecStop=/bin/kill -SIGTERM $MAINPID
RestartSec=10s
[Install]
WantedBy=multi-user.target
zabbix-agent.service
[Unit]
Description=Zabbix Agent
After=syslog.target
After=network.target

[Service]
Environment="CONFFILE=/usr/local/zabbix/etc/zabbix_agentd.conf"
EnvironmentFile=-/etc/sysconfig/zabbix-agent
Type=forking
Restart=on-failure
PIDFile=/tmp/zabbix_agentd.pid
KillMode=control-group
ExecStart=/usr/local/sbin/zabbix_agentd -c $CONFFILE
ExecStop=/bin/kill -SIGTERM $MAINPID
RestartSec=10s

[Install]
WantedBy=multi-user.target
基本命令
#添加开机自启
systemctl enable zabbix-server
systemctl enable zabbix-proxy
systemctl enable zabbix-agent
#取消开机自启
systemctl disable zabbix-server
systemctl disable zabbix-proxy
systemctl disable zabbix-agent
#重启服务
systemctl restart zabbix-server
systemctl restart zabbix-proxy
systemctl restart zabbix-agent
#启动服务
systemctl start zabbix-server
systemctl start zabbix-proxy
systemctl start zabbix-agent
#停止服务
systemctl stop zabbix-server
systemctl stop zabbix-proxy
systemctl stop zabbix-agent
错误ERROR
ERROR:Get value from agent failed: cannot connect to [[1.1.1.1]:10050]: [4] Interrupted system call
问题分析及解决:
服务端先ping zabbix-agent没问题
服务端然后telnet zabbix-agent的10050端口
如果都可以查看zabbix_web上的host配置是否正确
#报错:configure: error: no acceptable C compiler found in $PATH
#问题分析及解决:
#安装gcc套件
yum install -y gcc
yum install -y gcc-c++#报错:configure: error: MySQL library not found
#问题分析及解决:
yum install -y mysql-devel#报错:configure: error: Unable to use libevent (libevent check failed)
#问题分析及解决:
yum install -y libevent-devel#错误:切换成中文后中文乱码:
#通过xftp(或其他上传工具)将字体上传至zabbix的fonts目录(zabbix的web安装路径下的fonts)
#Windows下的字体文件在C:\windows\fonts下
#zabbix 3.x
上传至zabbix服务器的/usr/share/zabbix/fonts #zabbix文件所在目录下的fonts
#zabbix4.x
上传至zabbix服务器的/usr/local/zabbix/html/assets/fonts/ #zabbix-web的html目录下的fonts#Unable to use libpcre (libpcre check failed)
apt-get install libpcre3-dev
yum install libpcre3-devel