第六步:网络验证服务器端项目上线部署
前提
项目名:netauth
系统:百度云服务器下的Ubuntu16.4
软件:xshell(无论如何想办法用这个跟服务器实例连上,不要用远程连接干敲,不然你会有砸电脑的冲动)
FileZille(通过这个软件,将项目的zip包传到服务器系统下)
apt install unzip
unzip netauth.zip
rm netauth.zip
步骤目录:
1.安装nginx
2.安装python3.6
3.安装mysql
4.配置虚拟环境
5.安装配置uwsgi
6.配置nginx
1.安装nginx
apt install nginx -y
#安装完,访问公网ip,见到欢迎界面,代表安装成功
#nginx -s stop
2.安装python3.6
add-apt-repository ppa:fkrull/deadsnakes
#回车
apt-get install python-software-properties -y
apt-get update
apt-get install python3.6-dev python3.6-venv -y

apt install python-pip -y
3.安装MySQL
apt-get install mysql-server -y
#设置密码:(不显示)
apt-get install mysql-client
apt-get install libmysqlclient-dev -y
mysql -u root -p
#输入密码(不显示),登录mysql
CREATE DATABASE `netauth` DEFAULT CHARACTER SET utf8 COLLATE utf8_general_ci;
#新建一个名为netauth的数据库,数据库名跟项目中数据库名要一致
quit
#退出登录MySQL
4.配置虚拟环境
python3.6 -m venv env36
#在当前目录下,创建一个python3.6的虚拟环境,取名为env36
. env36/bin/activate
#进入虚拟环境
#退出虚拟环境 deactivate
cd netauth
pip3 install -r requirments.txt
#安装相关依赖包,其中requirments.txt,是在客户端时,通过pip freeze > requirments.txt获得
#这个过程也许需要多等一会,比较low一点的云服务就慢一些,亲身体验,bat里,百度的最慢
扫描二维码关注公众号,回复:
855315 查看本文章

python manage.py makemigrations
python manage.py migrate
python manage.py createsuperuser
#创建超级用户 ,用户名:(自定义) 邮箱:(自定义) 密码:(自定义不显示)
修改settings.py
cd netauth
vim settings.py
#进入settings.py文件中,点击i键,变为编辑模式
#通过上下左右键移动光标
ALLOWED_HOSTS = ['公网ip']
#在最底追加
STATIC_ROOT=os.path.join(BASE_DIR,"static/")
#然后敲Esc键,输入:wq 保存退出
5.虚拟环境中安装uwsgi
安装
pip3 install uwsgi
#下载安装uwsgi,这里真的要吐槽一下百度云了,1M宽带,几k十几k的网速,同样配置同样带宽,在腾讯云完成这一步操作的时候,嗖得一下就下载安装完了。
检测是否安装成功
uwsgi --http :8000 --module netauth.wsgi
#通过uwsgi启动项目,这一步必须在项目目录下操作执行
#不知为何,客户端浏览器访问过来,并没有静态文件丢失,但media文件依然没有
#ctrl+C键关闭项目服务状态
#fuser -k 8000/tcp
#关闭8000端口占用
配置uwsgi
#在项目目录下执行,注意后面这个点儿别落下
cp /etc/nginx/uwsgi_params .
#回到~目录下
cd ..
配置uwsgi.ini
vim uwsgi.ini
#进入uwsgi.ini,然后在英文输入下敲i键,进入插入模式,将以下内容填充进去(通过敲i键进入插入模式这一步不能省略,不然粘贴进去的内容会部分丢失)
[uwsgi]
chdir=/root/netauth
module=netauth.wsgi:application
home=/root/env36
master=true processes=10 socket=:8001 chmod-socket = 666 vacuum=true #然后在英文输入下,Esc键,然后输入冒号wq+回车,保存退出。
6.配置nginx
#cd 到项目目录下
vim netauth_nginx.conf
#新建进入了nginx.conf文件
#在英文输入法下,敲i键,进入可插入模式
#粘贴以下内容
# mysite_nginx.conf

# the upstream component nginx needs to connect to
upstream django {
    # server unix:/root/netauth/netauth.sock; # for a file socket
    server 127.0.0.1:8001; # for a web port socket (we'll use this first)
}

# configuration of the server
server {
    # the port your site will be served on
    listen      8000;
    # the domain name it will serve for
    server_name .example.com; # substitute your machine's IP address or FQDN
    charset     utf-8; # max upload size client_max_body_size 75M; # adjust to taste # Django media location /media { alias /root/netauth/media; # your Django project's media files - amend as required  } location /static { alias /root/netauth/static; # your Django project's static files - amend as required  } # Finally, send all non-media requests to the Django server. location / { uwsgi_pass django; include /root/netauth/uwsgi_params; # the uwsgi_params file you installed  } }
建立软链接
sudo ln -s /root/netauth/netauth_nginx.conf /etc/nginx/sites-enabled/
收集静态文件
#cd 到项目目录下执行
python manage.py collectstatic
#yes
最后测试
#修改settings.py中
DEBUG = False
cd ~
service nginx restart
#重启nginx
#启动uwsgi
uwsgi --ini uwsgi.ini
#浏览器访问http://180.76.143.11:8000
#media依然是获取不成功,403错误
浏览器网页报错:
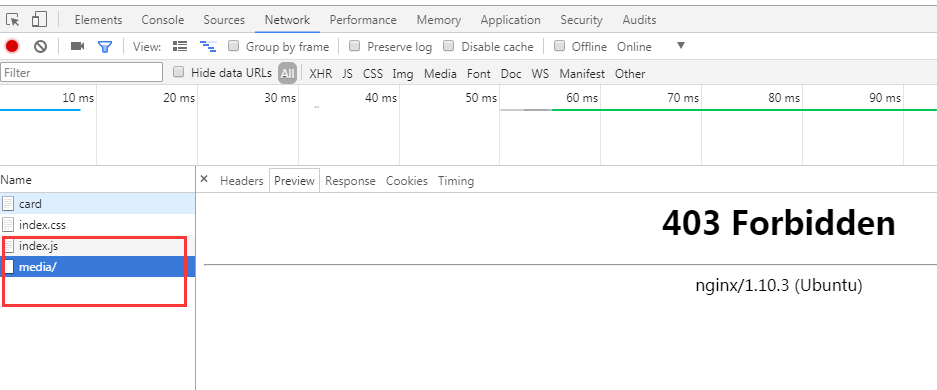
而netauth项目,我在电脑端运行,media下的图片却都可以正常访问


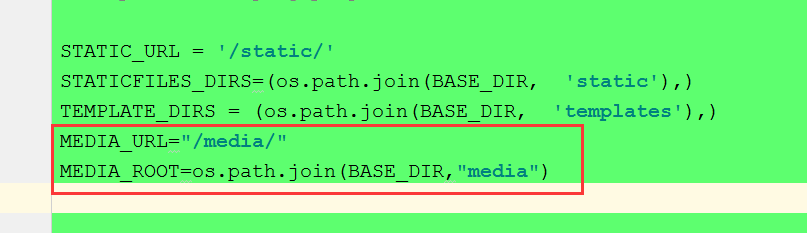
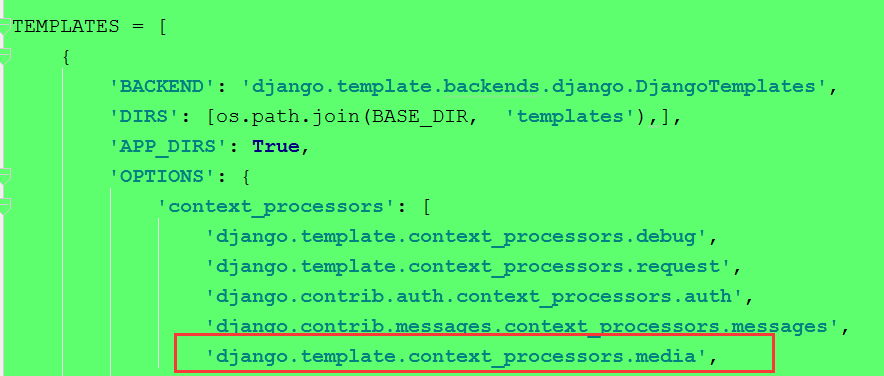
项目的settings.py
项目的urls.py(两种url的配置方法,都试过了,都是在电脑端运行正常访问,一放到服务器上就403)
from django.contrib import admin
from django.urls import path,re_path
import xadmin

# from django.views.static import serve
# from netauth.settings import MEDIA_ROOT

from django.conf import settings
from django.conf.urls.static import static


from yanzheng.views import RegisterView,LoginView,PingView,CardView,RechargeView,ResetPwdView

urlpatterns = [
    path('admin/', admin.site.urls),
    path('xadmin/', xadmin.site.urls),
#配置上传文件的访问处理函数
    # path('media/<path:path>',serve,{'document_root':MEDIA_ROOT}),
    # re_path('media/(?P<path>.*)', serve, {"document_root": MEDIA_ROOT }),
    # path('register',RegisterView.as_view()),
    path('login',LoginView.as_view()),
    path('ping',PingView.as_view()),
    path('card',CardView.as_view(),name='card'),
    path('recharge',RechargeView.as_view()),
    path('resetpwd',ResetPwdView.as_view()),
]
urlpatterns+=static(settings.MEDIA_URL,document_root=settings.MEDIA_ROOT)