新建项目:


Spring Boot是为了简化Spring应用,通过官网学习: 
根据官网的文档:
pom.xml配置如下:
在java中写com.bit.springboot.controller.HelloController类:
package com.bit.springboot.controller;

@Controller
public class HelloController {


    @ResponseBody
    @RequestMapping("/hello")
    public String sayHello()
    {return "hello,This is my first spring boot application";}

}
再新建po包,其中写MyBootRun类:
package com.bit.springboot.po;

import org.springframework.boot.SpringApplication;
import org.springframework.boot.autoconfigure.SpringBootApplication;

@SpringBootApplication
public class MyBootRun {

    public static void main(String[] args) {
        SpringApplication.run(MyBootRun.class,args);
    }

}
运行后是这样的:
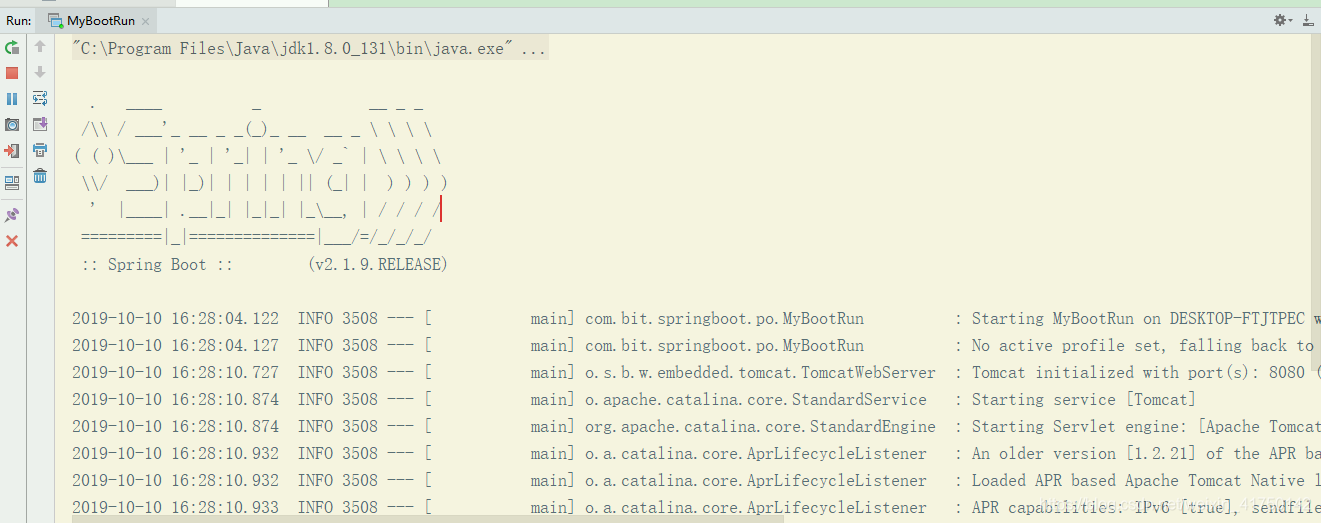
(遇到了Whitelabel Error Page,解决过程见我的“解决错误”专栏中的博客)
我们使用的是maven目录结构,在pom.xml中写:
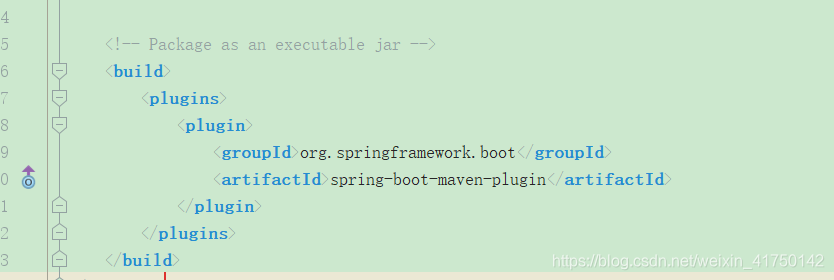
的时候,是把项目打包成jar包的,maven是怎么把我们的项目打包成jar包的呢?maven黄金法则:1.compile编译
2.test测试
3.package打包
4.install建造
我们在MyBootRun类中用的@SpringBootApplication是个复合注解,点进去可以看到: 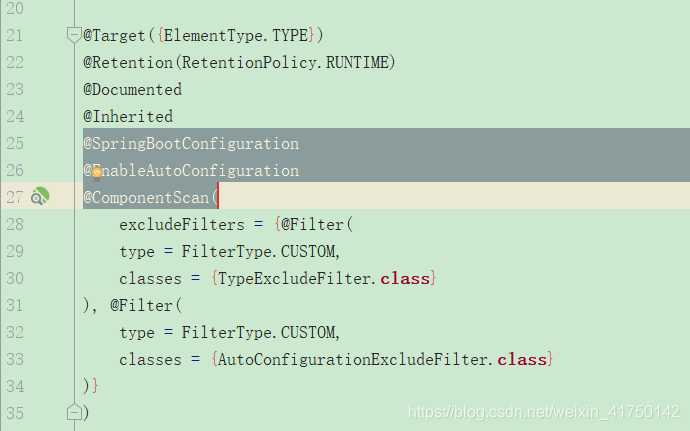
(1)先看@SpringBootConfiguration:
  @Target({ElementType.TYPE})
@Retention(RetentionPolicy.RUNTIME)
@Documented
@Configuration
public @interface SpringBootConfiguration {
}
使用@Configuration说明该类是一个Spring配置类,相当于applicationContext.xml。
(2)再看@EnableAutoConfiguration:
@Target({ElementType.TYPE})
@Retention(RetentionPolicy.RUNTIME)
@Documented
@Inherited
@AutoConfigurationPackage
@Import({AutoConfigurationImportSelector.class})
public @interface EnableAutoConfiguration {
    String ENABLED_OVERRIDE_PROPERTY = "spring.boot.enableautoconfiguration";

    Class<?>[] exclude() default {};

    String[] excludeName() default {};
}
@AutoConfigurationPackag自动扫描SpringbootApplication所在的包以及其下的子包。这里的@Import表示自动导入我们选择的那些东西,通过AutoConfigurationImportSelector类的
protected List<AutoConfigurationImportFilter> getAutoConfigurationImportFilters() {
        return SpringFactoriesLoader.loadFactories(AutoConfigurationImportFilter.class, this.beanClassLoader);}
方法进到SpringFactoriesLoader类中
其中有个loadFactoryNames方法:
  public static List<String> loadFactoryNames(Class<?> factoryClass, @Nullable ClassLoader classLoader) {
        String factoryClassName = factoryClass.getName();
        return (List)loadSpringFactories(classLoader).getOrDefault(factoryClassName, Collections.emptyList());
    }
再进到loadSpringFactories方法中,可以看到:
private static Map<String, List<String>> loadSpringFactories(@Nullable ClassLoader classLoader) {
        MultiValueMap<String, String> result = (MultiValueMap)cache.get(classLoader);
        if (result != null) {
            return result;
        } else {
            try {
                Enumeration<URL> urls = classLoader != null ? classLoader.getResources("META-INF/spring.factories") : ClassLoader.getSystemResources("META-INF/spring.factories");
                LinkedMultiValueMap result = new LinkedMultiValueMap();

                while(urls.hasMoreElements()) {
                    URL url = (URL)urls.nextElement();
                    UrlResource resource = new UrlResource(url);
                    Properties properties = PropertiesLoaderUtils.loadProperties(resource);
                    Iterator var6 = properties.entrySet().iterator();

                    while(var6.hasNext()) {
                        Entry<?, ?> entry = (Entry)var6.next();
                        String factoryClassName = ((String)entry.getKey()).trim();
                        String[] var9 = StringUtils.commaDelimitedListToStringArray((String)entry.getValue());
                        int var10 = var9.length;

                        for(int var11 = 0; var11 < var10; ++var11) {
                            String factoryName = var9[var11];
                            result.add(factoryClassName, factoryName.trim());
                        }
                    }
                }
加载的正是那些资源。
在控制层,使用@Controller注解,在模型层,使用@Service注解,在持久层,使用@Repository注解,其他代码不归于以上三层的,使用@Component,@Component注解代表将该组件的类纳入Spring框架的管理之中。
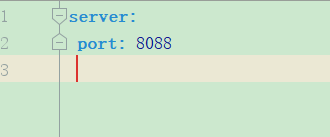
在resources包下写application.yml:(yml是You not a Markup Langguage,不是标记语言):
server:
 port: 8088
要很注意yml的格式,"port"之前有空格,"8088"之前也有空格,在IDEA中需要变成蓝色才是可以的。
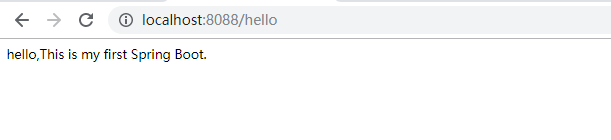
这时再执行MyBootRun的主方法。在浏览器中输入http://localhost/hello:
接下来学习yml的语法,在po包中新建Employee类:(省略setter、getter和toString方法)
package com.bit.springboot.po;

import java.util.List;
import java.util.Map;

public class Employee {
    private String empName;
    private int empAge;
    private boolean boss;
    private List list;
    private Map map;
    private User use;
}
再在po包中写User类:(省略setter、getter和toString方法)
package com.bit.springboot.po;

public class User {
    private String uName;
    private int uAge;

    public User(){}
}
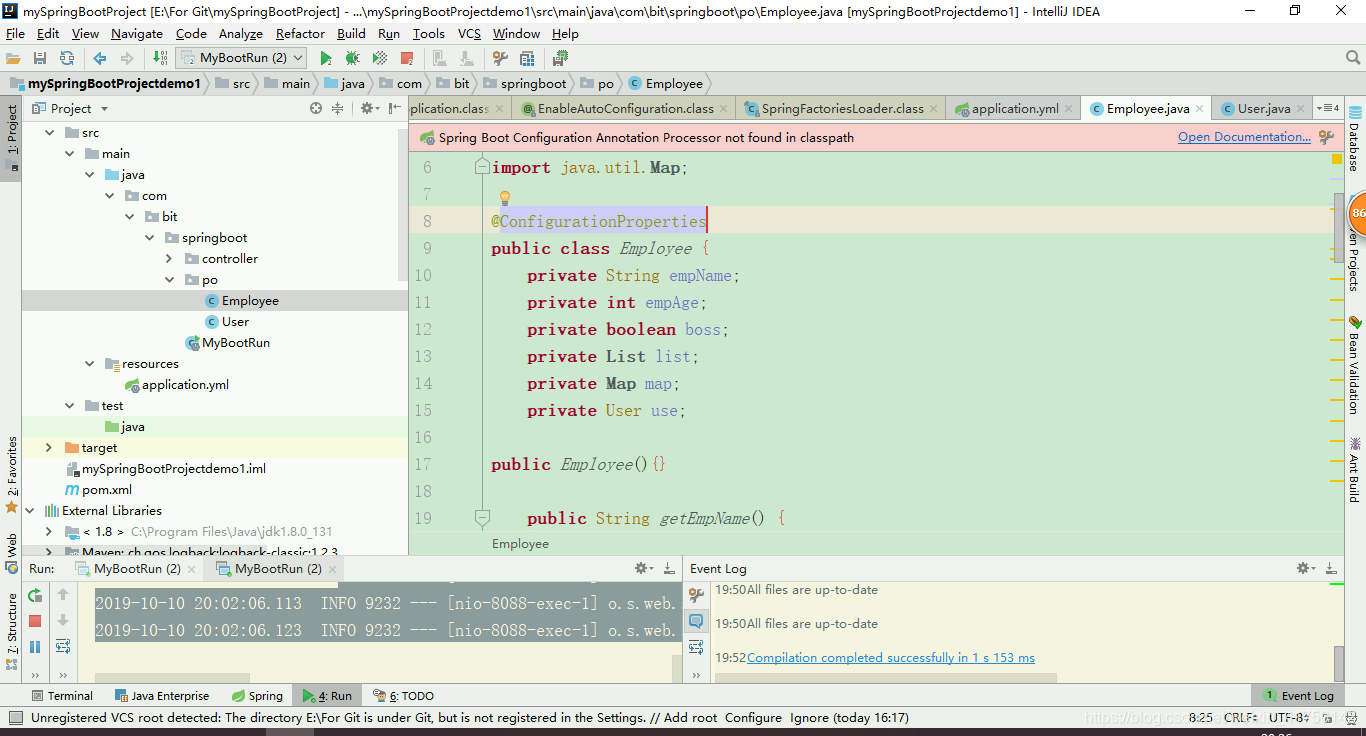
以前在Spring中,我们是使用applicationContext.xml赋值的,现在我们使用application.yml进行赋值,得先让po包中的这两个类纳入Spring管理,在两个类上加@ConfigurationProperties注解。添加注解后,IDEA中会弹出:
点击右上角Open Documentation。又进入官网啦:

按照步骤添加相应依赖/
@Component
@ConfigurationProperties(prefix = "myEmp")
public class Employee {
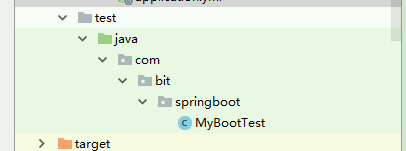
在测试包下新建MyBootTest,注意结构要与src.main中的”springboot“一致:
并在pom.xml中添加依赖:
 <dependency>
<groupId>org.springframework.boot</groupId>
<artifactId>spring-boot-starter-test</artifactId>
    </dependency>
写测试类:(注意:在测试类之前,必须有MyBootRun类,且这两个类的根目录结构是一致的!!!否则测试类会报错。 )
package com.bit.springboot;

import com.bit.springboot.po.Employee;
import org.junit.Test;
import org.junit.runner.RunWith;
import org.springframework.beans.factory.annotation.Autowired;
import org.springframework.boot.test.context.SpringBootTest;
import org.springframework.test.context.junit4.SpringRunner;

@RunWith(SpringRunner.class)
@SpringBootTest
public class MyBootTest {
    @Autowired
    private Employee employee;

    @Test
    public void testMyBootMethod()
    {
System.out.println(employee);

    }

}
在applicationContext.yml中写:
```c
myemp:
 empName: jia
 empAge: 10
 boss: true
 list:
  - listvalue1
  - listvalue2
  - listvalue3
 map:
  key1: value1
  key2: value2
  key3: value3
 use:
  uName: ohh
  uAge: 100
控制台输出为:Employee{empName=‘jia’, empAge=10, boss=true, list=[listvalue1, listvalue2, listvalue3], map={key1=value1, key2=value2, key3=value3}, use=User{uName=‘ohh’, uAge=100}}。说明通过yml赋值成功。
还可以通过在resources中新建application.properties赋值:
myemp.emp-name=ming
myemp.boss=false
在public class Employee下对应的属性上面写@Value("${myemp.emp-name}")
(由于我的git出现了问题,在IDEA中的项目它自动被删除掉了。)
第二节课
首先,在po包下新建User类、Orders类:(省略无参构造、toString、getter、setter方法)
package com.bit.springboot.po;

public class Orders {
    private int ordId;
    private String orderName;
}
package com.bit.springboot.po;

import java.util.List;

public class User {
    private String userName;
    private int userAge;
    private boolean female;
    private List list;
    private Orders orders;}
在resources包下写application.yml:
user:
 userName: arvin
 userAge: 20
 female: false
 list:
  - listvalue1
  - listvalue2
  - listvalue3
 map:
  key1: mapValue1
  key2: mapValue2
 orders:
  orderId: 00101
  orderName: OrderName
在测试类中写:
package com.bit.springboot;


import com.bit.springboot.po.User;
import org.junit.Test;
import org.junit.runner.RunWith;
import org.springframework.beans.factory.annotation.Autowired;
import org.springframework.boot.test.context.SpringBootTest;
import org.springframework.test.context.junit4.SpringRunner;

@RunWith(SpringRunner.class)
@SpringBootTest


public class Demo1Test {
    @Autowired
    private User user;
    @Test
    public void contextLoad()
    {
        System.out.println(user);

    }
}
控制台输出为:
User{userName=‘arvin’, userAge=20, female=false, list=[listvalue1, listvalue2, listvalue3]}
再使用application.properties(标准语法)来给POJO类的属性赋值:
user.female=false
user.list={value1,value2,value3}
user.user-name=xiaoJia
user.user-age=8

user.orders={00100,ordername}
运行单元测试,控制台输出为:
User{userName=‘xiaoJia’, userAge=8, female=false, list=[{value1, value2, value3}]}
现在给User类加上private Orders orders和 private Map map属性,(注意:一定要提供getter、setter方法!!!)来学习如歌通过properties给Map和引用类型赋值。
user.female=false
user.list={value1,value2,value3}
user.user-name=xiaoJia
user.user-age=8
user.map.key1=value1
user.map.key2=value2
user.orders.ordId=000110
user.orders.orderName=ohh
可以做分文件管理,
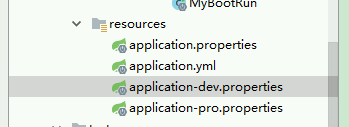
通过在properties中active

新增service包,其下放UserService接口和UserServiceImpl类。
package com.bit.springboot.service;

public interface UserService {
    public void addUser();
}
package com.bit.springboot.service;

public class UserServiceImpl implements UserService {

    @Override
       public void addUser()
    {System.out.println("---UserServiceImpl.addUser()----");}

}
再新建serviceConfig包,其下放ServiceConfig配置类。
package com.bit.springboot.serviceConfig;


import com.bit.springboot.service.UserServiceImpl;
import org.springframework.context.annotation.Bean;
import org.springframework.context.annotation.Configuration;

@Configuration
public class ServiceConfig {
    @Bean("userService1")
    public UserServiceImpl userService()
    {UserServiceImpl userService1=new UserServiceImpl();
    return  userService1;
}
进行单元测试,通过:
package com.bit.springboot;

import com.bit.springboot.service.UserService;
import com.bit.springboot.service.UserServiceImpl;
import org.junit.Test;
import org.junit.runner.RunWith;
import org.springframework.beans.factory.annotation.Autowired;
import org.springframework.boot.test.context.SpringBootTest;
import org.springframework.context.ApplicationContext;
import org.springframework.test.context.junit4.SpringRunner;

@RunWith(SpringRunner.class)
@SpringBootTest
public class ServiceTest {
@Autowired
    private ApplicationContext applicationContext;

@Test
public void serviceTest(){
UserService userService= (UserService)applicationContext.getBean("userService2");
userService.addUser();}
}
在SpringBoot中,配置文件放置的位置不一样,其优先级也不同。从低到高:
resources/*.file
resources/**/*.file
项目根目录/*.file
项目根目录/**/*.file
再进行分目录管理。在resources下新建user.properties:
user.female=false
user.list={value1,value2,value3}
user.user-name=xiaoMing
user.user-age=18
user.map.key1=value1
user.map.key2=value2
user.orders.ordId=000110
user.orders.orderName=hoo
在User类上加:
@PropertySource(value={"classpath:user.properties"})
@Component
@ConfigurationProperties(prefix = "user")
public class User {
在单元测试中写:(注意!!!之前的那个application.properties需要注释掉,否则它的优先级会比我们现在这个user.properties优先级高,赋的是它的值)
@RunWith(SpringRunner.class)
@SpringBootTest
public class ServiceTest {
@Autowired
    private User user;
//分文件管理
@Test
    public void test()
{System.out.println("user:  "+user);}}
控制台输出为:
user: User{userName=‘xiaoMing’, userAge=18, female=false, list=[{value1, value2, value3}], map={key2=value2, key1=value1}, orders=Orders{ordId=110, orderName=‘hoo’}}
在SpringBoot中,@SpringBootApplication注解是用来引入.xml的,@PropertySource注解是用来引入properties的。这两个都属于Spring框架,但不属于SpringBoot。
再来分文件管理Orders类,在resources下新建orders.properties:
or.ord-Id=0000
or.order-Name=jia
注意这个格式,如果是写成”or.ordId=000“,“or.orderName=jia"也是可以的,不过写成”-"更好。
同理,需要在Order类上加:
@Component
@ConfigurationProperties(prefix = "or")
@PropertySource(value = {"classpath:orders.properties"})
public class Orders {
控制台输出为:Orders{ordId=0, orderName=‘jia’}
