上文讲了授权码模式,了解授权码模式可以很好的了解授权模式,但实际开发中也需要 "用户名+密码"方式来获取授权,本文将"用户名密码"这种方式接入到标准的OAuth2流程中,登录成功后返回token,根据token访问其它接口。
1. pom.xml
<?xml version="1.0" encoding="UTF-8"?>
<project xmlns="http://maven.apache.org/POM/4.0.0" xmlns:xsi="http://www.w3.org/2001/XMLSchema-instance"
         xsi:schemaLocation="http://maven.apache.org/POM/4.0.0 http://maven.apache.org/xsd/maven-4.0.0.xsd">
    <modelVersion>4.0.0</modelVersion>
    <parent>
        <groupId>org.springframework.boot</groupId>
        <artifactId>spring-boot-starter-parent</artifactId>
        <version>2.1.5.RELEASE</version>
        <relativePath/> <!-- lookup parent from repository -->
    </parent>
    <groupId>com.example</groupId>
    <artifactId>springboot-security-example</artifactId>
    <version>0.0.1-SNAPSHOT</version>
    <name>springboot-security-example</name>
    <description>Demo project for Spring Boot</description>

    <properties>
        <java.version>1.8</java.version>
    </properties>

    <dependencies>
        <dependency>
            <groupId>org.springframework.boot</groupId>
            <artifactId>spring-boot-starter-web</artifactId>
        </dependency>
        <dependency>
            <groupId>org.springframework.boot</groupId>
            <artifactId>spring-boot-starter-security</artifactId>
        </dependency>
        <dependency>
            <groupId>org.springframework.security.oauth.boot</groupId>
            <artifactId>spring-security-oauth2-autoconfigure</artifactId>
            <version>2.1.2.RELEASE</version>
        </dependency>
        <dependency>
            <groupId>org.springframework.security.oauth</groupId>
            <artifactId>spring-security-oauth2</artifactId>
            <version>2.3.4.RELEASE</version>
            <scope>compile</scope>
        </dependency>

        <dependency>
            <groupId>org.projectlombok</groupId>
            <artifactId>lombok</artifactId>
        </dependency>
        <dependency>
            <groupId>org.springframework.boot</groupId>
            <artifactId>spring-boot-starter-test</artifactId>
        </dependency>
    </dependencies>

    <build>
        <plugins>
            <plugin>
                <groupId>org.springframework.boot</groupId>
                <artifactId>spring-boot-maven-plugin</artifactId>
            </plugin>
        </plugins>
    </build>

</project>
2. application.yml
server:
  port: 8080

logging:
  level:
    org.springframework: debug
3. SecurityConfiguration
@Configuration
@EnableWebSecurity
public class SecurityConfiguration extends WebSecurityConfigurerAdapter {

    @Autowired
    private MyAuthenticationSuccessHandler myAuthenticationSuccessHandler;

    @Autowired
    private MyAuthenticationFailureHandler myAuthenticationFailureHandler;

    @Autowired
    private MyUserDetailsService myUserDetailsService;


    @Override
    protected void configure(HttpSecurity http) throws Exception {
        http.formLogin()
                .loginPage("/authentication/form")
                .successHandler(myAuthenticationSuccessHandler)
                .failureHandler(myAuthenticationFailureHandler);

        http.authorizeRequests()
                .antMatchers("/login", "/authentication/form").permitAll()
                .anyRequest().authenticated()
                .and().csrf().disable();
    }

    @Override
    public void configure(AuthenticationManagerBuilder auth) throws Exception {
        auth.userDetailsService(myUserDetailsService).passwordEncoder(passwordEncoder());
    }

    @Bean
    public PasswordEncoder passwordEncoder(){
        return new BCryptPasswordEncoder();
    }

    /**
     * 对原始字符不进行加密,比较时都会返回true
     */
//    @Bean
//    public PasswordEncoder passwordEncoder() {
//        return new PasswordEncoder() {
//            @Override
//            public String encode (CharSequence charSequence) {
//                return charSequence.toString();
//            }
//            @Override
//            public boolean matches(CharSequence charSequence, String s) {
//                return true;
//            }
//        };
//    }

}
4. UserDetailsService
@Component
public class MyUserDetailsService implements UserDetailsService {
    @Autowired
    private PasswordEncoder passwordEncoder;

    @Override
    public UserDetails loadUserByUsername(String username) throws UsernameNotFoundException {
        return new User(username, passwordEncoder.encode("123456"), AuthorityUtils.commaSeparatedStringToAuthorityList("admin"));
    }

    public static void main(String[] args) {
        System.out.println(new BCryptPasswordEncoder().encode("123456"));
    }
}
5. AuthenticationSuccessHandler
@Slf4j
@Component
public class MyAuthenticationSuccessHandler extends SavedRequestAwareAuthenticationSuccessHandler {

    @Autowired
    private ObjectMapper objectMapper;

    @Autowired
    private ClientDetailsService clientDetailsService;

    @Autowired
    private AuthorizationServerTokenServices authorizationServerTokenServices;

    @Override
    public void onAuthenticationSuccess(HttpServletRequest request, HttpServletResponse response, Authentication authentication) throws IOException, ServletException {
        log.info("login sucesssful {}", objectMapper.writeValueAsString(authentication));

        String header = request.getHeader("Authorization");
        if (header == null || !header.toLowerCase().startsWith("basic ")) {
            throw new UnapprovedClientAuthenticationException("请求头中没有clientId");
        }

        String[] tokens = extractAndDecodeHeader(header, request);
        assert tokens.length == 2;

        String clientId = tokens[0];
        String clientSecret = tokens[1];
        ClientDetails clientDetails = clientDetailsService.loadClientByClientId(clientId);
        if (clientDetails == null) {
            throw new UnapprovedClientAuthenticationException("clientId配置信息不存在,clientId=" + clientId);
        } else if (!new BCryptPasswordEncoder().matches(clientSecret, clientDetails.getClientSecret())) {
            throw new UnapprovedClientAuthenticationException("clientSecret不匹配,clientId=" + clientId);
        }

        // grantType 为自定义的"custom"
        TokenRequest tokenRequest = new TokenRequest(new HashMap<>(), clientId, clientDetails.getScope(), "custom");
        OAuth2Request oAuth2Request = tokenRequest.createOAuth2Request(clientDetails);
        OAuth2Authentication oAuth2Authentication = new OAuth2Authentication(oAuth2Request, authentication);
        OAuth2AccessToken accessToken = authorizationServerTokenServices.createAccessToken(oAuth2Authentication);

        response.setContentType("application/json;charset=UTF-8");
        response.getWriter().write(objectMapper.writeValueAsString(accessToken));
    }


    /**
     * Decodes the header into a username and password.
     *
     * @throws BadCredentialsException if the Basic header is not present or is not valid
     * Base64
     */
    private String[] extractAndDecodeHeader(String header, HttpServletRequest request)
            throws IOException {

        byte[] base64Token = header.substring(6).getBytes("UTF-8");
        byte[] decoded;
        try {
            decoded = Base64.getDecoder().decode(base64Token);
        }
        catch (IllegalArgumentException e) {
            throw new BadCredentialsException(
                    "Failed to decode basic authentication token");
        }

        String token = new String(decoded, "UTF-8");

        int delim = token.indexOf(":");

        if (delim == -1) {
            throw new BadCredentialsException("Invalid basic authentication token");
        }
        return new String[] { token.substring(0, delim), token.substring(delim + 1) };
    }
}
6. AuthenticationFailureHandler
@Slf4j
@Component
public class MyAuthenticationFailureHandler implements AuthenticationFailureHandler {
    @Override
    public void onAuthenticationFailure(HttpServletRequest request, HttpServletResponse response, AuthenticationException exception) throws IOException, ServletException {
      log.info("认证失败");
      response.setContentType("text/html;charset=utf-8");
      response.getWriter().write(exception.getMessage());
    }
}
7. AuthorizationServerConfiguration
@Configuration
@EnableAuthorizationServer
public class AuthorizationServerConfiguration extends AuthorizationServerConfigurerAdapter {

    @Override
    public void configure(ClientDetailsServiceConfigurer clients) throws Exception {
        clients.inMemory() // 使用in-memory存储
                .withClient("clientId")
                .secret(new BCryptPasswordEncoder().encode("clientSecret"))
                .authorizedGrantTypes("authorization_code")
                .scopes("all")
                .redirectUris("http://www.baidu.com");
    }

    @Override
    public void configure(AuthorizationServerSecurityConfigurer security) throws Exception {
        security
                .tokenKeyAccess("permitAll()")
                .checkTokenAccess("permitAll()")
                .allowFormAuthenticationForClients();
    }
}
8. ResourceServerConfiguration
- 资源服务器@EnableResourceServer用于保护接口,验证token,如果token有效就可以访问api
- 认证服务器@EnableAuthorizationServer用于获取token
- 资源服务器可以单独配置在要保护的项目上,也可以与认证服务器配置在同一个项目中
@Configuration
@EnableResourceServer
public class ResourceServerConfiguration extends ResourceServerConfigurerAdapter {
    @Autowired
    private MyAuthenticationSuccessHandler myAuthenticationSuccessHandler;

    @Autowired
    private MyAuthenticationFailureHandler myAuthenticationFailureHandler;

    @Override
    public void configure(HttpSecurity http) throws Exception {
        http.formLogin()
                .loginPage("/authentication/form")
                .successHandler(myAuthenticationSuccessHandler)
                .failureHandler(myAuthenticationFailureHandler);

        http.authorizeRequests()
                .antMatchers("/login", "/authentication/form").permitAll()
                .anyRequest().authenticated()
                .and().csrf().disable();
    }
}
9. UserController
@RestController
public class UserController {

    @Autowired
    private ObjectMapper objectMapper;

    @GetMapping(value = "/user/me", produces = MediaType.APPLICATION_JSON_UTF8_VALUE)
    public String me() throws JsonProcessingException {
        Authentication auth = SecurityContextHolder.getContext().getAuthentication();
        Object principal = auth.getPrincipal();
        return objectMapper.writeValueAsString(principal);
    }
}
10. 获取token
访问登录地址"authentication/form"获取token, 这里使用Chome插件 rest api客户端来代替登录页面来发送登录请求。
- 登录地址在http.formLogin().loginPage(“authentication/form”)中配置
- username和password要和UserDetailsService中的值保持一致
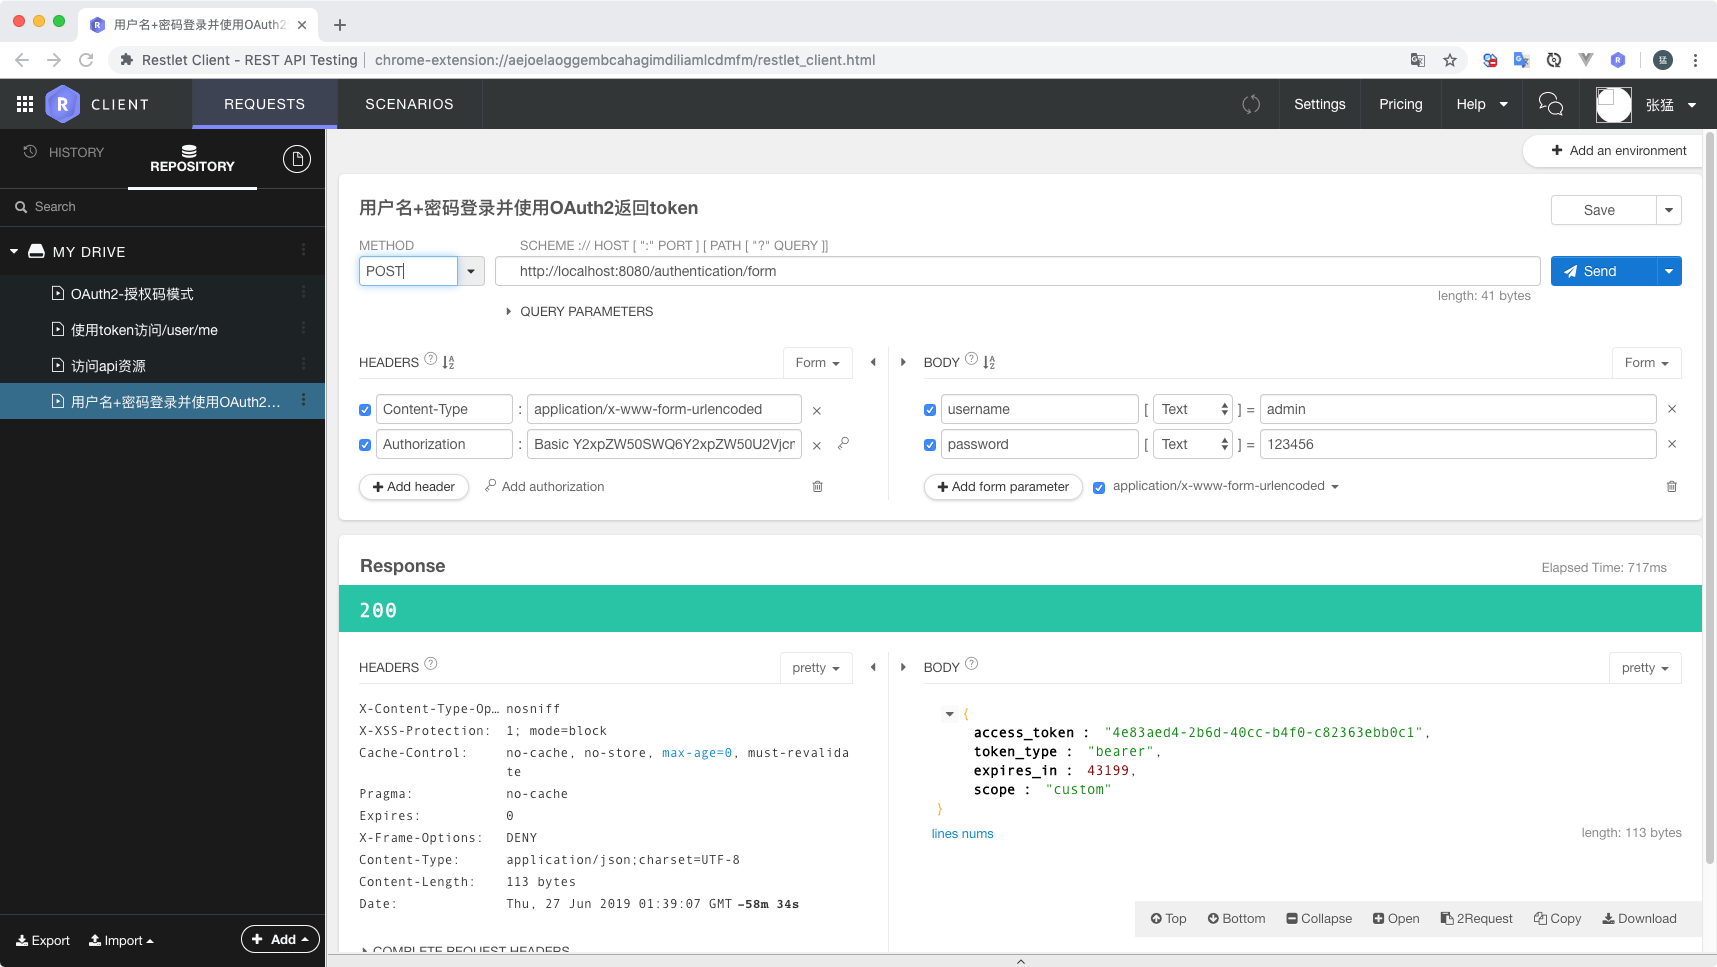
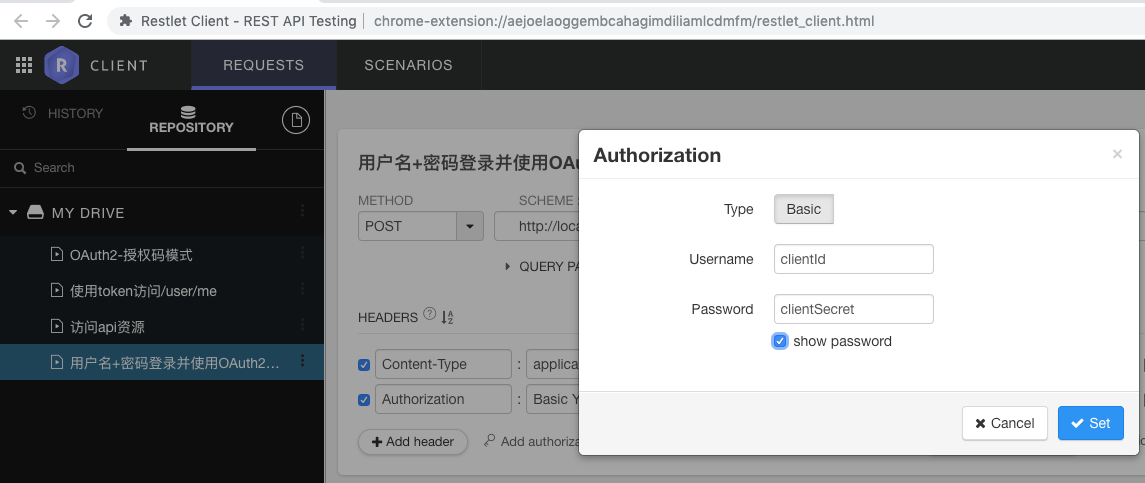
Authorization中的Username和Password为AuthorizationServerConfiguration配置中的client和secret值。clients.inMemory().withClient("clientId").secret(new BCryptPasswordEncoder().encode("clientSecret"))
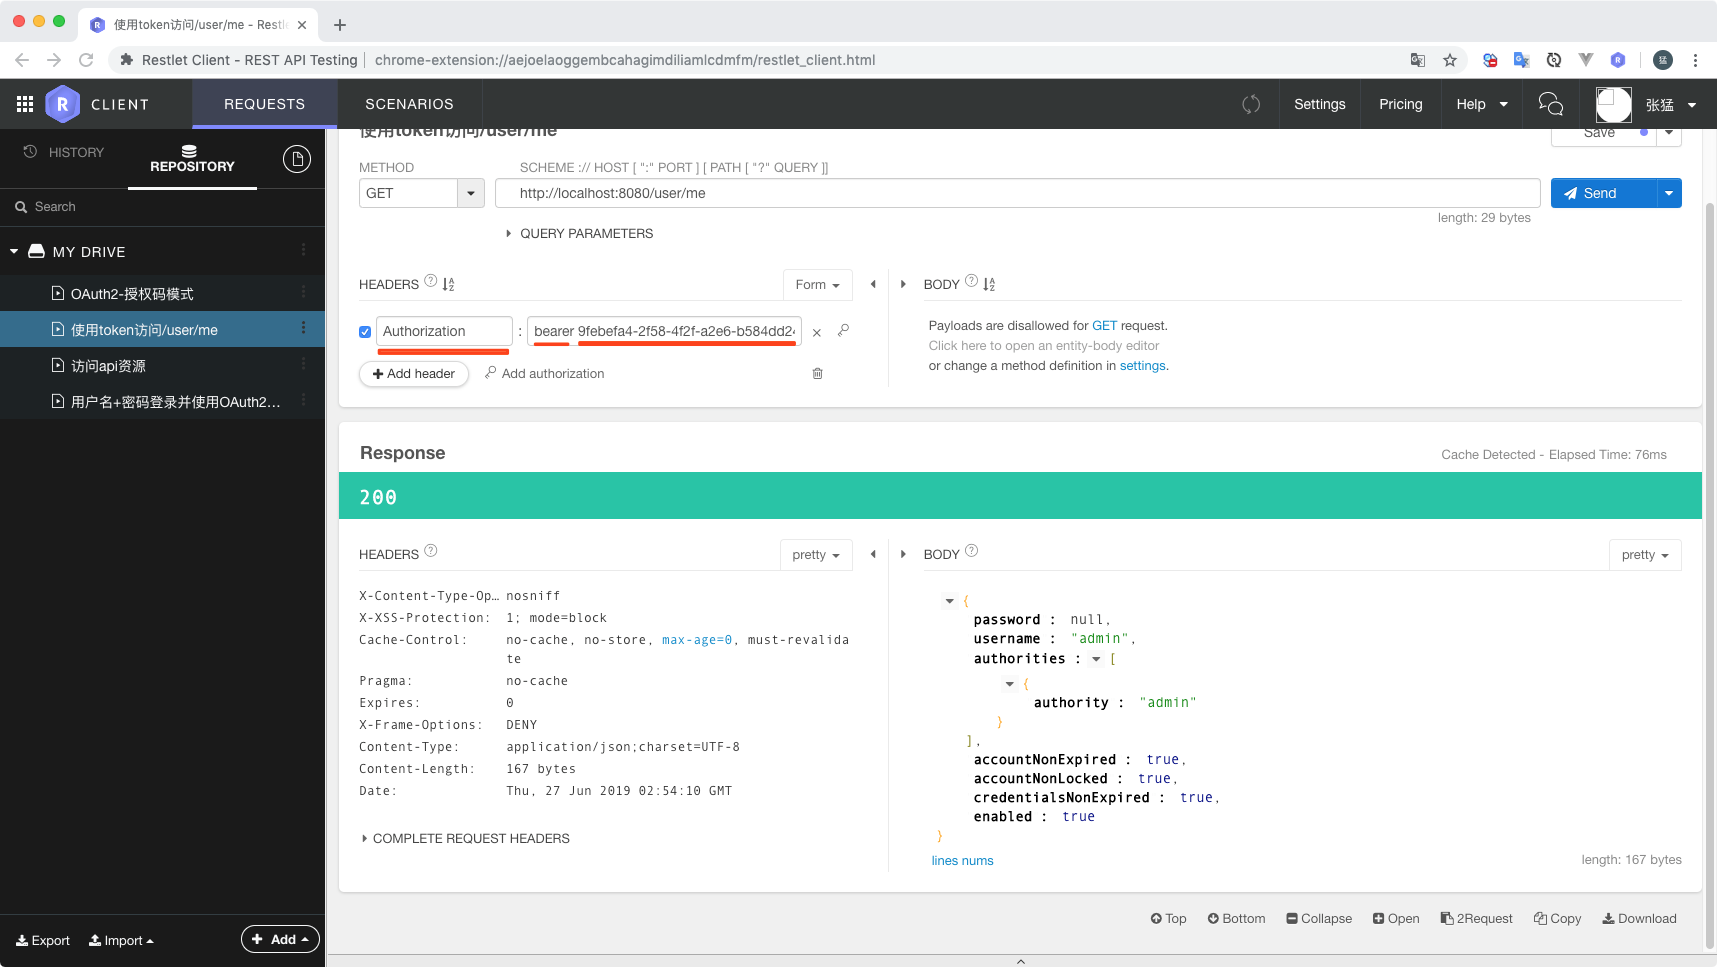
11. 访问资源接口
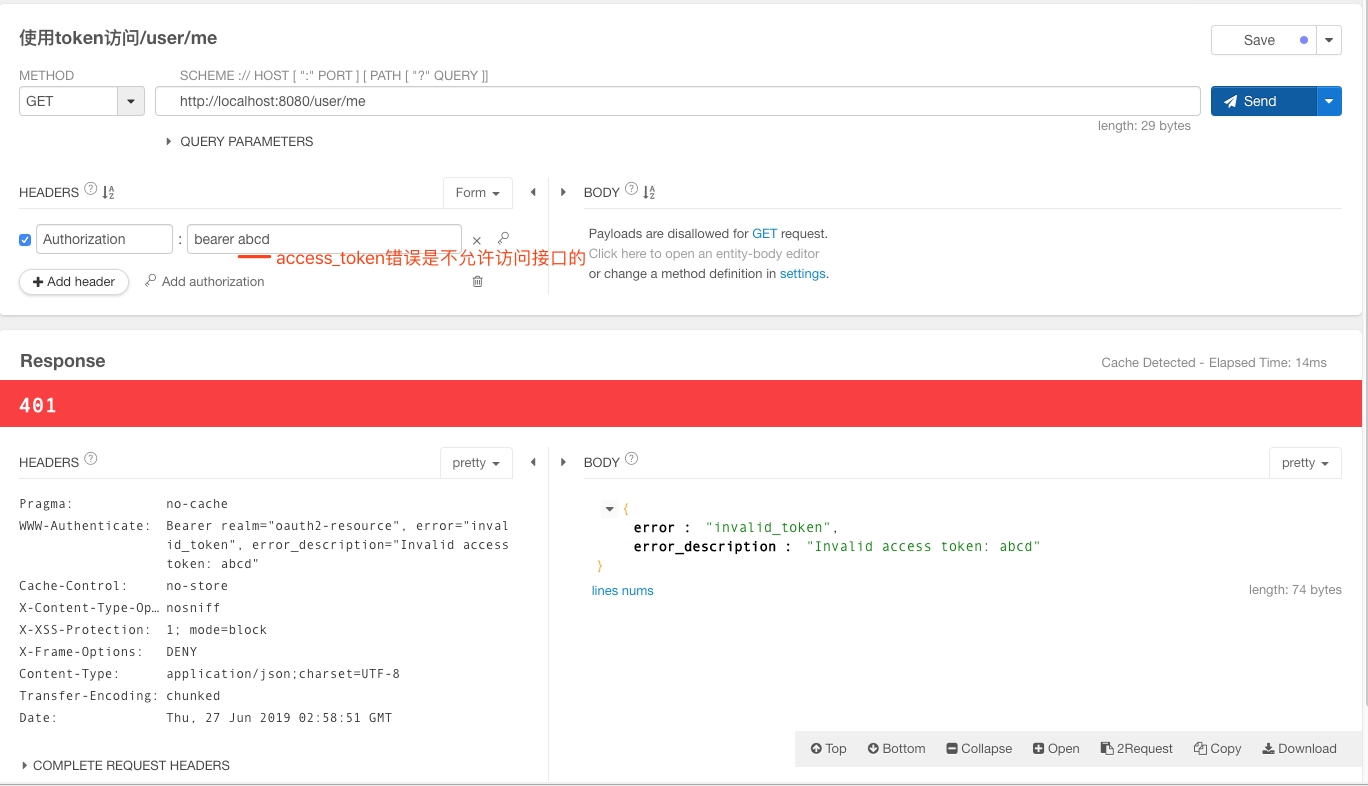
访问UserController中的接口"/user/me", 请求头中需要添加Authorization头,值为 "bearer " + access_token值,注意bearer字符串和access_token中间有个空格,access_token为上面获取token的的“access_token”字段值